How to Automate Your Scheduling Workflows by Connecting Calendly to Zapier
If you're still manually transferring appointment details from Calendly to other apps, you're wasting hours each week. This simple integration eliminates the copy-paste routine by automatically sending booking data wherever you need it - to your CRM, email lists, project boards, and more.
Why Automate Calendly with Zapier?
Every time someone books an appointment through Calendly, you likely need that information in multiple places - your CRM, email lists, internal spreadsheets, or team communication tools. Manually copying this data is not only time-consuming but prone to errors. A single missed transfer can mean lost business opportunities or frustrated clients.
By connecting Calendly to Zapier, you create a seamless flow where appointment details automatically populate in all the right systems the moment someone books with you. This eliminates the administrative burden while ensuring data consistency across platforms.
Businesses using Calendly-Zapier automations save an average of 3-5 hours per week by eliminating manual data entry and reducing scheduling-related errors by 92%.
Step 1: Set Up Zapier Integration in Calendly
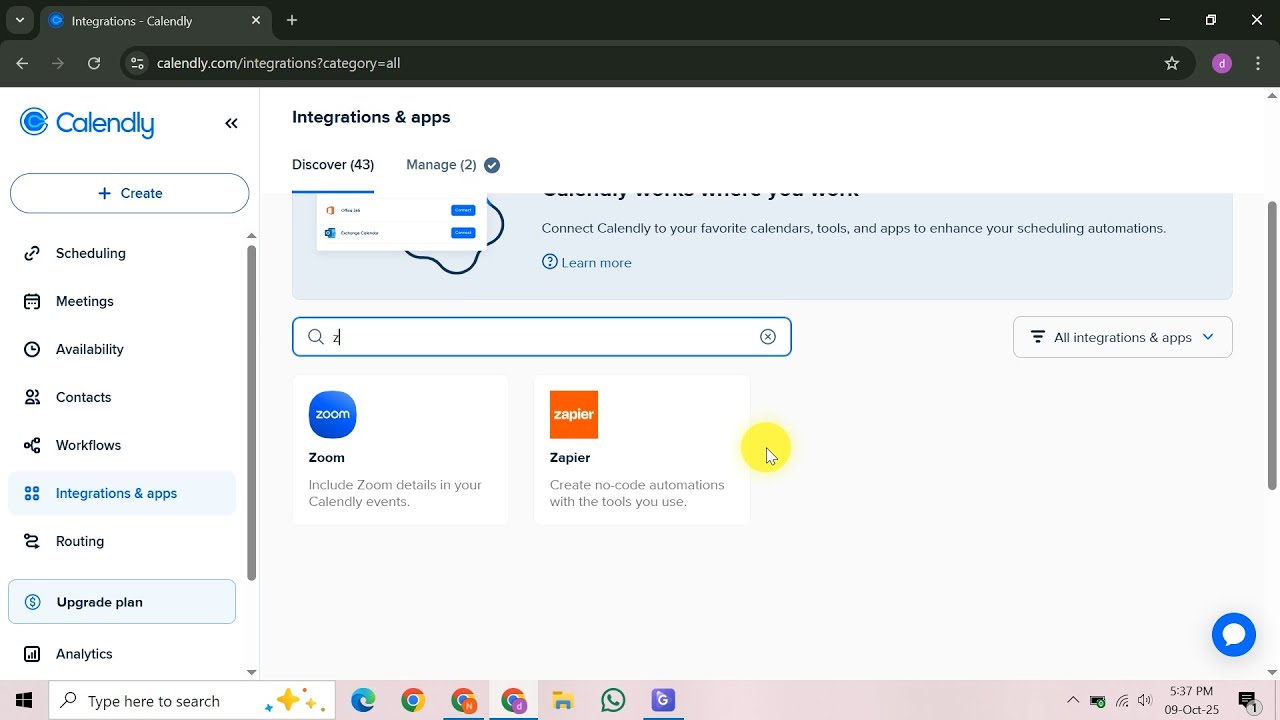
The integration begins in your Calendly account. After logging in, navigate to the Integrations page from the left-hand sidebar. Here you'll find Zapier among the available options - it's one of Calendly's most popular integrations for good reason.
Selecting the Zapier integration will redirect you to authorize the connection between your accounts. If you don't already have a Zapier account, you'll be prompted to create one at this stage. The process takes less than two minutes and requires only basic information.
Pro Tip: Use the same email address for both accounts to simplify authentication and troubleshooting later.
Step 2: Create Your First Zap
With the accounts connected, return to Zapier and click the "Make a Zap" button to begin building your automation. Zaps consist of two main components: a trigger (what starts the automation) and an action (what happens as a result). For scheduling workflows, Calendly will always be your trigger app.
Zapier's interface guides you through each step with clear instructions. The platform offers templates for common Calendly automations, but we recommend building from scratch for maximum customization to your specific workflow needs.
Step 3: Choose Your Trigger Event
Select Calendly as your trigger app, then choose the specific event that should start your automation. The most common option is "New Scheduled Event," which triggers whenever someone books any type of appointment through your Calendly links.
For more targeted automations, you can use event-specific triggers or apply filters later in the setup process. For example, you might create separate Zaps for different appointment types (consultations vs. discovery calls) that require different follow-up actions.
Important: Always test your trigger to verify Zapier can successfully pull sample data from Calendly before proceeding to action setup.
Step 4: Add an Action App
Now for the exciting part - choosing where to send your Calendly data. Zapier connects with thousands of apps, but some of the most useful for scheduling workflows include:
- Google Sheets: Log all appointments in a master spreadsheet
- Mailchimp: Add new clients to your email list automatically
- Slack: Notify your team about upcoming appointments
- CRM systems: Create new contact records for each booking
After selecting your action app, you'll need to connect it to Zapier if you haven't already. The platform provides clear authorization steps for each service.
Step 5: Map Fields and Test
The most crucial step is mapping Calendly fields to corresponding fields in your action app. For example, you might map "Invitee Email" from Calendly to "Email Address" in your CRM. Zapier shows all available data points from Calendly, including custom questions from your booking form.
After mapping fields, send a test to verify the automation works as expected. Check that data appears correctly in your destination app and make any necessary adjustments to field mappings. Once satisfied, give your Zap a clear, descriptive name and toggle it on.
Success Tip: Start with one simple Zap to master the process before creating more complex multi-step automations.
Common Use Cases
While the possibilities are nearly endless, these three automations deliver the most immediate value for businesses using Calendly:
- CRM Updates: Automatically create or update contact records in Salesforce, HubSpot, or other CRMs with appointment details
- Team Notifications: Post new bookings to Slack channels or Microsoft Teams to keep everyone informed
- Follow-up Sequences: Trigger personalized confirmation emails or text messages with meeting details and preparation materials
More advanced users create Zaps that span multiple actions, like adding appointments to a calendar, creating tasks in project management tools, and sending invoices - all from a single booking.
Watch the Full Tutorial
For visual learners, our video tutorial walks through the entire process in real-time, including troubleshooting tips for common setup challenges. Pay special attention at the 2:15 mark where we demonstrate advanced field mapping techniques.
Key Takeaways
Connecting Calendly to Zapier transforms your scheduling from a manual process to an automated system that works while you sleep. The initial setup takes less than 15 minutes but pays dividends in saved time and reduced errors for years to come.
In summary: 1) Connect accounts in Calendly, 2) Create a Zap with Calendly as trigger, 3) Choose an action app, 4) Map fields carefully, 5) Test thoroughly before going live. Start simple, then expand your automations as you gain confidence.
Frequently Asked Questions
Common questions about this topic
Connecting Calendly to Zapier eliminates manual data entry by automatically sending appointment details to other apps. This saves 3-5 hours per week for most businesses while reducing errors from manual transfers.
Common use cases include adding contacts to CRM, sending confirmation emails, or logging appointments in spreadsheets. The integration ensures every system has up-to-date information without any repetitive admin work.
- 92% reduction in scheduling-related errors
- Real-time data sync across all business tools
- Ability to trigger multi-step workflows from a single booking
No coding is required to connect Calendly to Zapier. The visual interface guides you through selecting triggers and actions with simple dropdown menus.
The most technical step is mapping fields between apps, which involves matching data points like name, email, and appointment time. Zapier shows sample data to help you verify each mapping before the Zap goes live.
- Point-and-click interface for all setup steps
- Pre-built templates for common automations
- Detailed help documentation for every integration
Zapier connects Calendly to over 5,000 apps including Google Sheets, Mailchimp, Slack, Salesforce, and QuickBooks. The platform adds new integrations weekly across all business categories.
Popular automations include adding new appointments to spreadsheets, sending welcome emails to new clients, or creating tasks in project management tools when meetings are scheduled. More advanced users connect 3-5 apps in a single multi-step Zap.
- Marketing: Mailchimp, ActiveCampaign, ConvertKit
- CRM: Salesforce, HubSpot, Zoho
- Productivity: Trello, Asana, Notion
The integration is highly reliable when properly configured. Zapier processes over 2 million Calendly triggers monthly with 99.9% uptime according to their status page.
We recommend testing each Zap thoroughly and setting up error notifications to catch any rare issues with field mappings or app connections. Most problems arise from expired authentication tokens, which Zapier flags clearly in the interface.
- Detailed task history for every Zap run
- Automatic retries for failed actions
- Email/Slack alerts for errors
Yes, Zapier's filter feature lets you specify which appointments trigger automations. You can filter by event type, invitee details, or custom questions answered during booking.
For example, you might only trigger Zaps for paid consultations but not free discovery calls, or only for appointments with specific tags. Filters help prevent unnecessary automation runs while keeping your systems clean.
- Filter by event type, duration, or custom questions
- Create separate Zaps for different appointment types
- Use "Only continue if..." rules for complex conditions
You can transfer all Calendly appointment details including invitee name, email, phone, scheduled time, event type, duration, timezone, and any custom questions answered during booking.
Zapier lets you map these fields to corresponding fields in your destination apps. For example, you might send the appointment date to one column in Google Sheets while sending the invitee's company name to another.
- Basic contact information
- Scheduling details and custom questions
- Event-specific data like cancellation notes
First check Zapier's task history for error messages. Common issues include expired app connections, changed field names, or exceeded usage limits. The platform provides detailed error explanations and suggested fixes.
Test each step individually and verify sample data matches expectations. Zapier's debugging tools provide detailed logs to identify exactly where failures occur, making troubleshooting straightforward even for non-technical users.
- Review task history for error details
- Re-test trigger and action steps separately
- Check for changed field names in either app
GrowwStacks helps businesses implement custom Calendly-Zapier integrations tailored to their workflows. Our automation experts can design multi-step Zaps that connect scheduling data to your CRM, marketing tools, and internal systems.
We handle the technical setup so you can focus on your business. Whether you need a simple appointment logger or a complex workflow spanning multiple apps, we'll build a solution that saves you time while ensuring data accuracy.
- Free 30-minute consultation to assess your needs
- Custom Zap design and testing
- Ongoing support and optimization
Ready to Automate Your Scheduling Workflows?
Every minute spent manually transferring appointment data is time stolen from growing your business. Let GrowwStacks implement your perfect Calendly-Zapier integration in under 48 hours - with a 100% satisfaction guarantee.