
Efficient lead routing is crucial for maximizing the productivity of any sales team. However, finding an automated system that perfectly aligns with your business needs can often be a challenge. Many organizations recognize the necessity of streamlining lead distribution but struggle with the implementation details.
The key to selecting the right automated lead routing solution lies in understanding your business's specific requirements and the structure of your sales team. This foundational understanding will enable you to define the precise rules and logic for your automated lead assignment system.
For instance, companies with sales representatives assigned to specific territories or countries often benefit from a system that automatically directs leads to the corresponding regional rep. An incoming lead from a particular state, for example, would be instantly assigned to the sales representative responsible for that area, ensuring localized and timely follow-up.
Conversely, businesses aiming to provide equal opportunities to all sales representatives might prefer a round-robin distribution system. This method ensures that leads are assigned fairly and sequentially, fostering a competitive yet balanced environment while also laying the groundwork for accurate performance measurement across the team.
While various other lead routing methodologies exist, the overarching principle remains consistent: your chosen system must seamlessly integrate with your business objectives, sales team configuration, and operational dynamics. This guide will walk you through building three distinct automated lead routing systems from the ground up, offering practical solutions for diverse business needs.
Let's dive into the specifics of setting up these powerful automations.1. The Automated Round-Robin Lead Routing System
This scenario is particularly useful for sales teams that capture leads through digital forms and manage their customer relationships using HubSpot. The workflow is designed to be straightforward and highly efficient, ensuring no lead is left unassigned.
The process begins by instantly capturing new responses from a Typeform submission. Subsequently, the system randomly assigns the incoming lead to an available sales representative. Crucially, once a representative is assigned a lead, they are temporarily removed from the pool for the next random selection, ensuring an equitable distribution.
Following the assignment, the designated sales representative receives an email notification with the lead's details. Concurrently, the lead is added as a new contact in HubSpot, and the assigned representative is automatically set as the contact owner. Once all sales representatives on the team have received a lead, the system intelligently resets, making all reps available for random assignment once more, thereby maintaining a continuous and fair distribution cycle.

To build this automation, you will need active accounts for Typeform, Airtable, Gmail, HubSpot, and Make.com. Additionally, a pre-configured Airtable base is essential for the scenario to function correctly. We will now proceed with the step-by-step setup.
Step 1: Adding the Typeform App
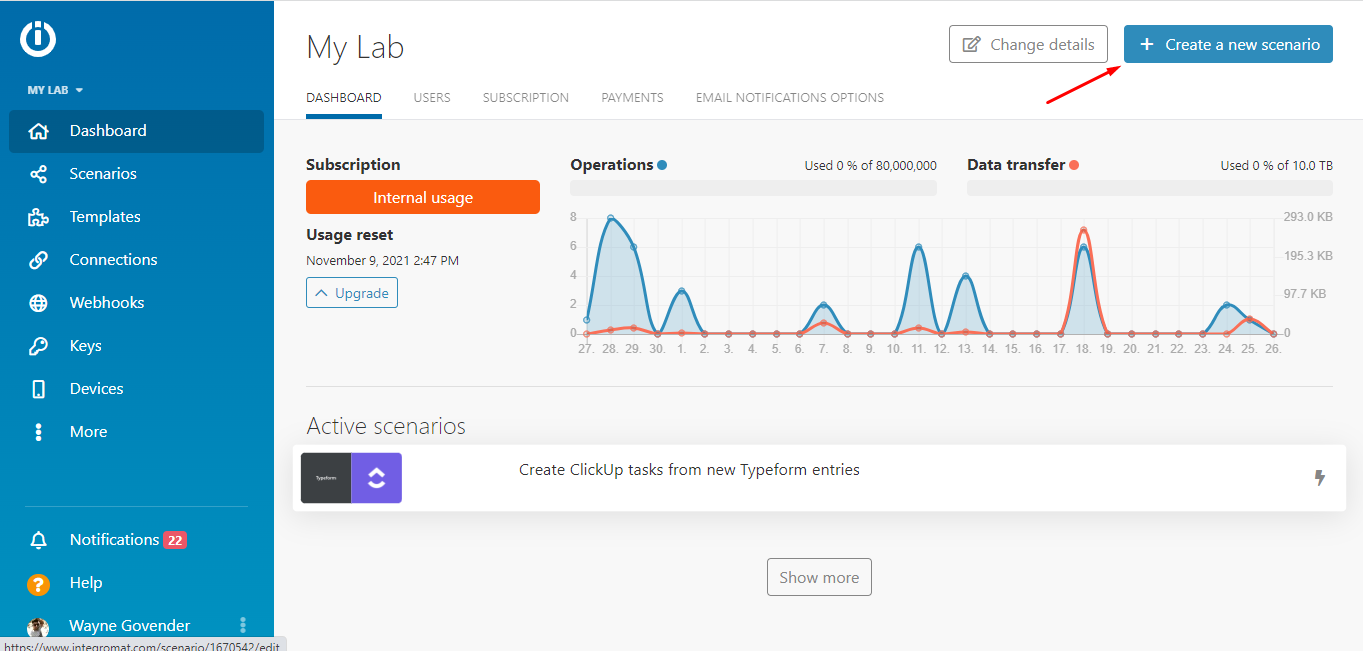
Upon logging into your Make.com account, you will be directed to your dashboard. From there, locate and click the "Create a new scenario" button, typically found in the top right corner of your screen. This action will open the scenario builder interface.
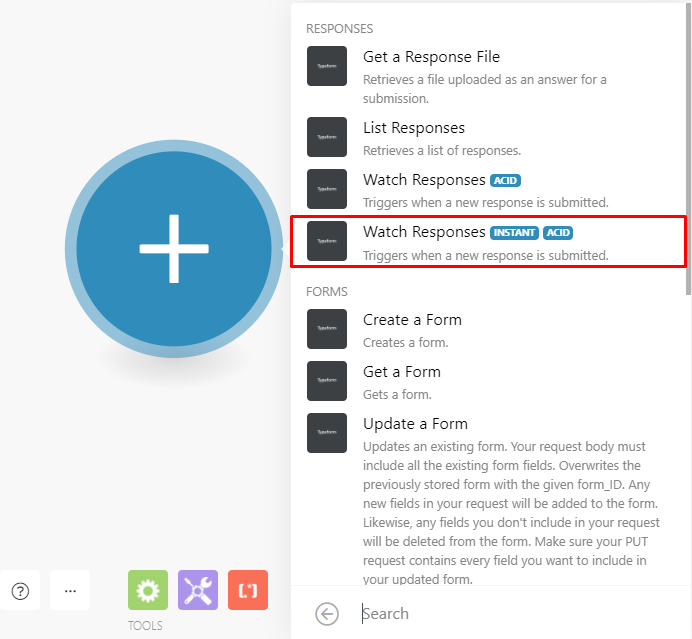
Within the scenario builder, you'll notice a prominent blue circle in the center. Clicking this circle will reveal a comprehensive list of available applications. Search for and select "Typeform" from this list. A subsequent display will present all available modules for Typeform, including triggers, actions, and searches.
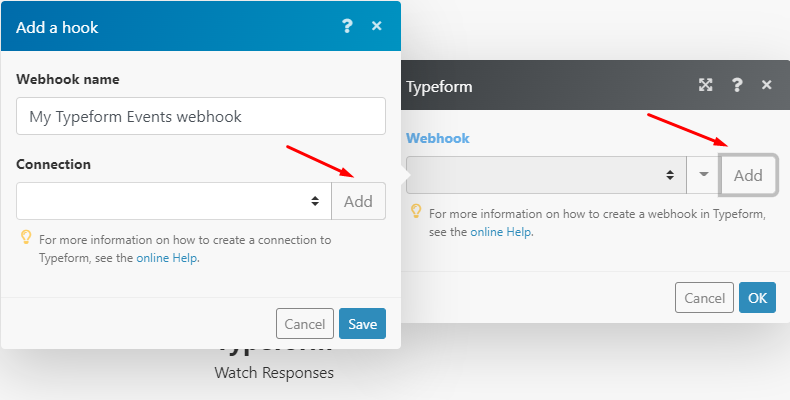
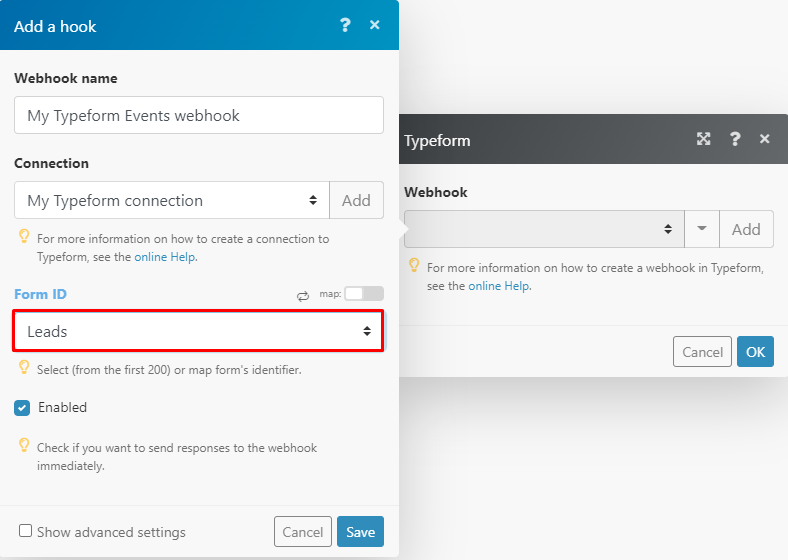
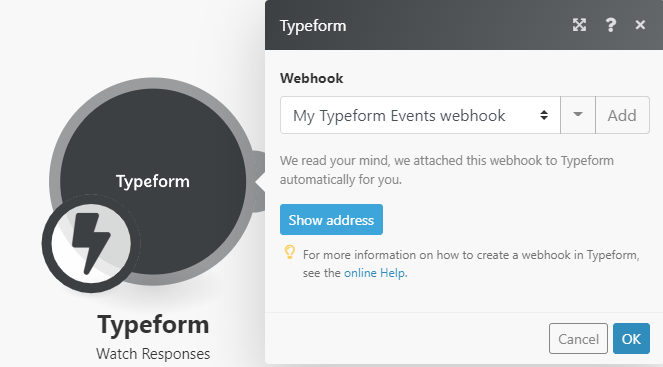
For this automation, we will utilize Typeform's instant module, which leverages webhooks to receive form responses in real-time. Select the "Watch responses" module to begin configuring the webhook. In the module's configuration panel, click the "Add" button and provide a descriptive name for your new webhook. Proceed by clicking "Add" again within the webhook configuration to establish a connection between your Typeform account and Make.com. After clicking "Connect" and "Accept" in the pop-up authorization screen, select the specific Typeform you wish to monitor for responses and click "Save." The webhook will then be automatically configured and linked to your chosen Typeform, requiring no further action on your part. Confirm by clicking "OK."

Step 2: Adding the Airtable App
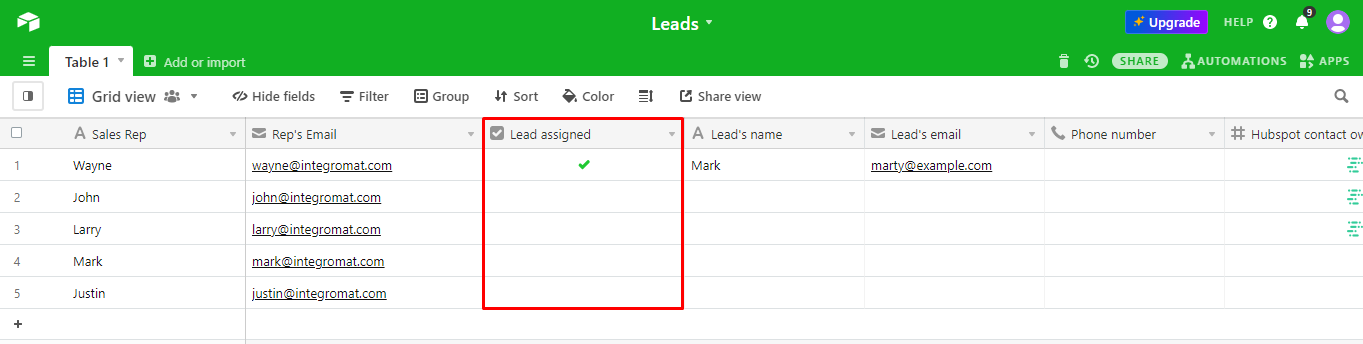
Before proceeding with the scenario configuration, let's briefly review the Airtable base. You'll observe two critical columns: "Sales reps" and "Lead assigned." These columns are fundamental to the round-robin logic.
When a sales representative is assigned a lead, the "Lead assigned" column for that rep is automatically marked as "ticked." This action temporarily removes them from the pool of available reps for the next random selection, ensuring that all representatives receive an equitable share of leads over time. Once every rep on the team has been assigned a lead (meaning all "Lead assigned" fields are ticked), this column automatically resets, clearing all ticks and making all reps available for random assignment once more. This mechanism ensures a continuous and fair distribution cycle.
Additionally, the Airtable base includes a field for the "HubSpot contact owner ID" for each rep. This ID is crucial for automatically assigning the correct sales representative as the contact owner in HubSpot once a new lead is created. We will demonstrate how to retrieve and utilize this ID later in the guide.
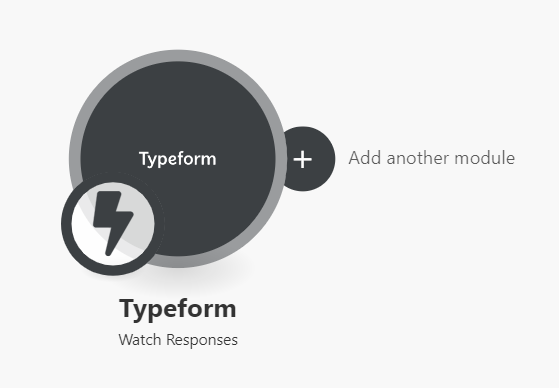
The next step involves integrating Airtable with your Typeform module within the Make.com scenario. To do this, hover your cursor over the Typeform module in the scenario builder. A small circle will appear on its right side. Click this circle to add the next application, which will be Airtable.
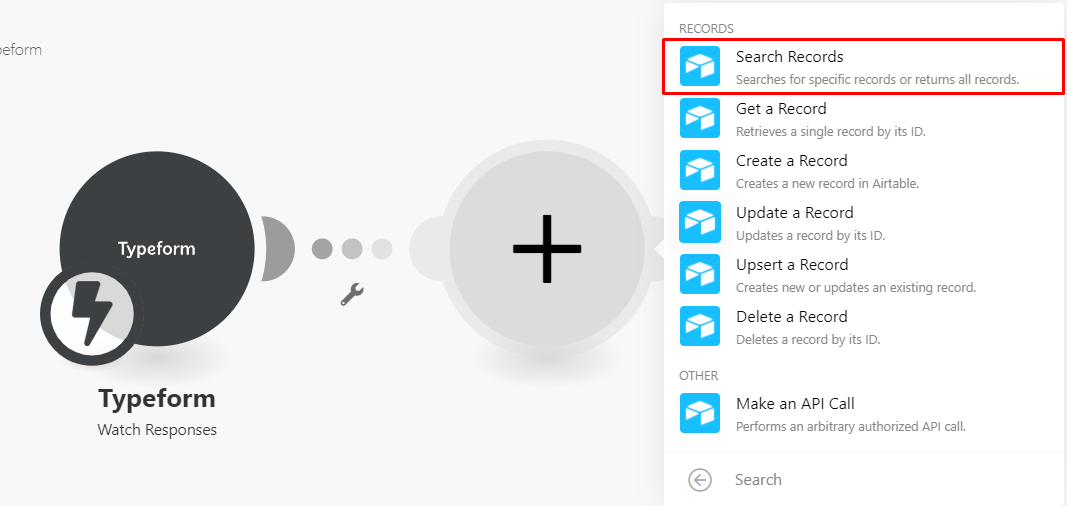
A list of options will pop up. Search for the "Airtable" app and select the "Search records" module. In the configuration box for this module, connect your Airtable account to Make.com, similar to how you connected Typeform. Once the connection is established, select the provided Airtable base and the relevant table.
Airtable allows for precise record searching using formulas. In this case, we need to find sales representatives who have not yet been assigned a lead (i.e., their "Lead assigned" field is not ticked). Copy the following formula and paste it into the "Formula" field: {Lead assigned} = ' '. This formula will return only the records of available sales reps.
Below the "Formula" field, you'll find the "Limit" field. This setting determines the maximum number of records Make.com will retrieve during a single execution of the scenario. It's advisable to set this to a sufficiently high number to ensure that no available records are missed. While this module effectively retrieves available sales reps, it does so in a top-to-bottom order, not randomly. To achieve random assignment, further steps are required.
Pro tip: Always set your "Limit" field in search modules to a number higher than your expected maximum results. This prevents data truncation and ensures all relevant records are processed in your automation.
To randomly select a sales representative from the retrieved records, you need to perform two key actions:
- First, consolidate all the individual Airtable records returned by the search into a single data bundle. This process is known as data aggregation.
- Next, shuffle this aggregated data and automatically select the first record. This effectively randomizes the selection of the sales representative.
Let's proceed to configure these steps in your Make.com scenario.
Step 3: Adding the Array Aggregator and Variable Modules
At the bottom of the scenario builder, locate the "Tools" menu. Click on it, then select the "Flow Control" option. From the options presented, choose "Array Aggregator" and drag it onto your scenario, positioning it after the Airtable module you just configured.
In the Array Aggregator's configuration box, the first field you'll encounter is "Source." Since your goal is to aggregate the Airtable records, select the Airtable module as the Source. The "Target structure type" will typically be automatically selected. Your primary task here is to tick the "ID" field under "Airtable > Search records" within the "Aggregated fields" box. This ensures that the unique IDs of the available sales reps are collected into an array.
With the record IDs now aggregated, the next step is to introduce randomness into the selection process. This requires creating a variable. Make.com provides a dedicated module for this purpose. Return to the "Tools" menu at the bottom of the scenario builder, select the "Set variable" module, and attach it directly after the Array Aggregator.
In the configuration panel for the "Set variable" module, begin by assigning a clear and descriptive name to your variable. Next, within the "Variable value" field, you will need to select the "Shuffle" function. This function can be found under the "Functions for working with arrays" tab. Once selected, map the "Array" element (which contains the aggregated Airtable record IDs) within the parentheses of the Shuffle function, as illustrated in the example provided in the platform's interface.
For this module to correctly output the shuffled data required by subsequent modules in your scenario, it's essential to run it independently first. To do this, right-click on the "Set variable" module and select the "Run this module only" option. A prompt will appear; click "Add item," enter any value (this is just for testing the module's output), then click "Add" and finally "OK." This temporary run will help ensure the variable is correctly configured before proceeding.
Step 4: Updating Airtable Records
To continue building the scenario, add another "Airtable > Update a record" module. As before, select the same Airtable base and table that you've been using throughout this process. This module will be responsible for marking the assigned sales representative as unavailable for the next round of lead distribution.
In the "Record ID" field of this new module, map the "ID" element that was outputted by the "Set variable" module in the previous step. This ensures that the correct sales rep's record is targeted for an update. Scroll down the configuration options until you locate the "Lead assigned" field and select "Yes." This action will automatically tick the corresponding field in your Airtable base, indicating that the representative has been assigned a lead and should be temporarily excluded from subsequent random selections.
Once you have configured these settings, click "OK" to save the module's configuration and proceed to the next stage of your automated lead routing system.
Step 5: Adding the Gmail and HubSpot Modules
With the sales representative now assigned to the lead, the next crucial steps involve notifying the rep and integrating the lead into your HubSpot CRM. This ensures both immediate action and proper record-keeping. Start by adding the Gmail app to your scenario and selecting the "Send an email" module. Please note that this module typically functions with business Gmail accounts; if you are using a personal account, you may need to follow additional authentication steps as prompted by the module.
The email addresses of your sales representatives are already stored in your Airtable table, making it easy to map them within the Gmail module. Click "Add a recipient" and then map the "Rep’s Email" element from your Airtable module to the "Email address" field. You can then customize the email's subject line and body content, dynamically inserting lead details by mapping elements from the "Airtable > Update a record" module, as shown in the platform's examples. Once your email content is finalized, click "OK" to save the Gmail module configuration.
Next, to add the lead as a contact in HubSpot CRM and assign the sales rep, add the "HubSpot CRM" app to your scenario and select the "Create/Update a contact" module. After connecting your HubSpot account to Make.com, tick the "Contact information" option within the "Property group" box. Scroll down until you find the "Contact owner" field.
Recall that in an earlier step, we mentioned the "HubSpot contact owner ID" field in your Airtable base. This ID is vital for automatically assigning the correct sales representative as the contact owner when the lead is created in HubSpot. To retrieve these IDs, in the "Contact owner ID" field of the HubSpot module, select a representative and toggle the map switch to "on." This action will display their unique ID. Repeat this process for all your representatives and populate their respective IDs in your Airtable table. Once all IDs are in Airtable, map the "HubSpot contact owner ID" element from the "Airtable > Update a record" module to the "Contact owner" field in HubSpot to ensure dynamic assignment. Finally, map the "Lead’s email" and "Lead’s name" elements from the Airtable module to their corresponding fields in the HubSpot module, and select the appropriate options as indicated in the platform's visual guides.
Step 6: Adding the Airtable Modules that Reset the “Leads Assigned” Field
A critical component of a continuous round-robin system is the ability to reset the "Leads assigned" field in Airtable once all sales representatives have received a lead. This ensures that the cycle can begin anew, and all reps become eligible for new assignments. To achieve this, the system must constantly check if the last available rep has just been assigned a lead.
We will re-use the "Search records" Airtable module for this purpose. For efficiency, you can right-click on the existing "Search records" module in your scenario, clone it, and then attach the cloned module to the HubSpot module. Verify that this newly added Airtable module is configured correctly. As the formula suggests, this module will search for any empty or unticked records in the "Leads assigned" column. If all fields are ticked, indicating that every rep has received a lead, this module will output zero bundles of data. This "zero bundles" output is crucial for triggering the reset mechanism.
Next, add another "Search records" Airtable module to the scenario. Before configuring this new module, click on the link connecting it to the previous module to open the filter menu. This filter is designed to allow data to pass only when the previous module outputs zero bundles, signifying that all reps have been assigned. In the filter configuration box, give it a descriptive name. Map the "Total number of bundles" element from the preceding "Search records" module to the top field. Select the "Equal to" operator (ensuring it's the numeric option) and enter "0" in the bottom field. This completes the filter setup; click "OK."
Now, open the third "Search records" Airtable module in your scenario. If the data bundles successfully pass the filter, it means the "Leads assigned" field for all records must be cleared to restart the assignment process. Use the following formula to retrieve all records on the table: NOT({Lead assigned} = ''). Remember to also increase the number in the "Limit" field to a high value to ensure all records are captured. Finally, add an "Airtable > Update a record" module. In its configuration, map the "ID" element from the previous "Search records" module and select "No" under "Lead assigned." This will effectively clear the column, preparing it for the next round of lead assignments.
Step 7: Testing the Scenario
Congratulations, you've reached the final and most exciting stage: testing your automated lead routing scenario! To initiate a test run, direct your attention to the bottom left of the scenario builder and click the blue "Run once" button. Immediately after, navigate to your Typeform and submit a test entry. This will trigger the scenario's execution.
Observe the execution flow within Make.com. Initially, since you've submitted only one form, only one sales representative will be assigned a lead in your Airtable table and HubSpot CRM. Consequently, the final three modules in your scenario, which are responsible for resetting the "Leads assigned" field, will not execute at this point. This is expected behavior, as the reset only occurs when all reps have received a lead.
To witness the complete scenario execution, including the reset mechanism, you can manually adjust your Airtable base. Tick all the "Lead assigned" fields for your sales representatives, leaving just one field unticked. Then, click "Run once" again and submit another test form. This time, you should observe the full scenario, including the reset of all "Lead assigned" fields once the last available rep receives the lead. Once you've verified that the scenario functions as intended, activate it by toggling the switch at the bottom of the builder. Your automated round-robin lead routing system is now fully operational!
Pro tip: When testing complex scenarios, always start with a single test case to verify initial steps. Then, simulate edge cases, like all reps being assigned, to ensure the full logic, including resets or alternative paths, functions correctly.
2. Routing Leads to Different Sales Teams
It is a common practice for companies to organize their sales efforts by assigning different teams to handle distinct types of leads. This specialization allows for more targeted and effective sales strategies. Leads can be segmented based on various criteria, ensuring they are directed to the team best equipped to manage them.
Typical categorization methods include:
- By company type: Small, Medium, Enterprise
- By geographical location like countries or continents
- By lead score
For example, if your organization has dedicated sales teams for small businesses, medium-sized companies, and large enterprises, you would want leads to be automatically and accurately assigned to the appropriate team. This ensures that leads receive the most relevant attention from specialists.
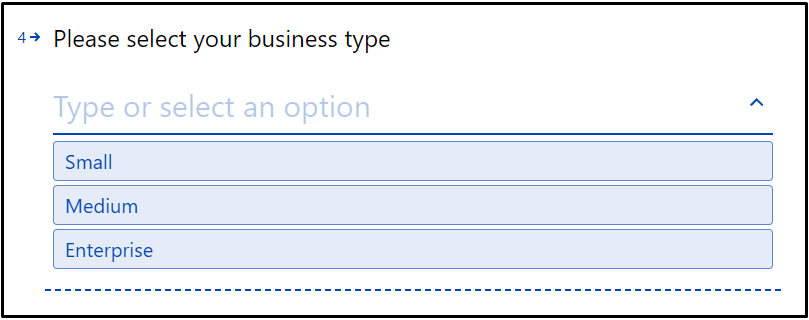
Implementing such a system is straightforward and can be achieved by making minor modifications to the previous scenario. Let's use the company type example to illustrate the necessary adjustments. First, your lead capture form (e.g., Typeform) should include a multiple-choice question such as "Please select your business type," allowing leads to self-identify their company size.
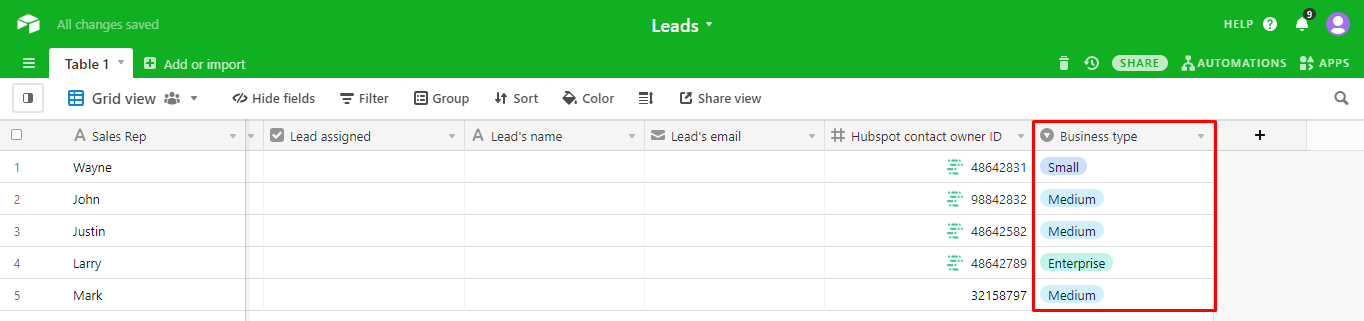
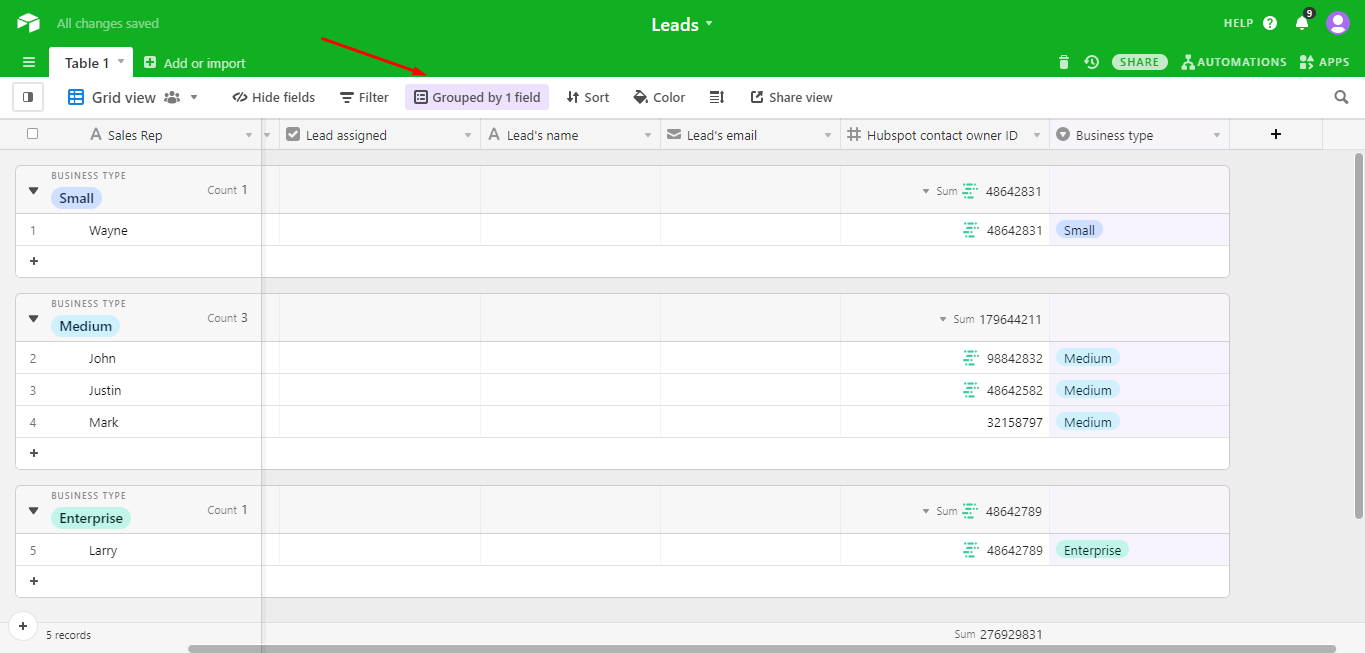
Next, you'll need to make a few adjustments within your Airtable base. Add a new "single select" column, naming it "Business type." Populate this column with the various business type options (e.g., Small, Medium, Enterprise). It is crucial that these options precisely match the answers provided in your Typeform to ensure seamless data flow and accurate routing. Once this column is set up, assign each sales representative to the specific business types they handle. Finally, utilize Airtable's "Group by" option and select the "Business type" column to organize your records effectively. This setup provides a clear overview of which reps handle which lead types.
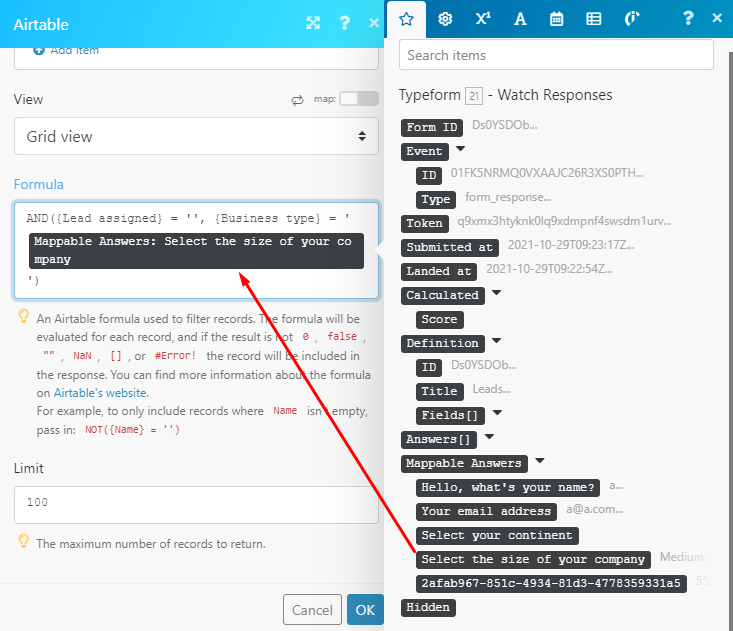
With the Airtable adjustments complete, return to your Make.com scenario. The primary change required is updating the formulas within the three "Search records" Airtable modules. For the first two "Search records" modules, use the following formula, replacing "Typeform answer" with the actual answer element from your Typeform: AND({Lead assigned} = '', {Business type} = 'Typeform answer'). This ensures that only available reps assigned to the specific business type are considered.
For the third "Search records" module, use this formula: AND(NOT({Lead assigned}) = '', {Business type} = 'Typeform answer'). This formula checks if all reps for a specific business type have been assigned a lead, triggering the reset for that particular team. The visual representation within Make.com will clearly show how these formulas are integrated into the modules. Once these changes are applied, your scenario will effectively route leads to different sales teams based on the specified business type, optimizing your sales workflow.
You're likely eager to see this enhanced scenario in action. After implementing these formula changes, run a test by submitting a Typeform entry with a specified business type. Observe how the lead is routed to the correct team's representative, demonstrating the effectiveness of your team-based lead distribution system.
3. Bonus Scenarios: Automated Lead Routing by Source
At Make.com, the goal is to simplify automation setup, making it accessible and efficient for all users. Beyond the round-robin and team-based routing, there are numerous ways to automate lead distribution, particularly by lead source. This section introduces several ready-to-use templates that streamline lead collection from popular advertising platforms like LinkedIn and Facebook, integrating them directly into your sales workflows.
The first template is designed for businesses utilizing LinkedIn Lead Generation Ads. It allows you to automatically capture submissions from these ads and add them as new rows to a Google Sheets spreadsheet. This immediate transfer of data ensures that your sales team has instant access to fresh leads, enabling rapid follow-up and improving response times significantly.
For those who prefer real-time notifications, another template integrates LinkedIn Lead Generation Ads with Slack. This automation sends an instant message to a designated person or team on Slack every time a new lead form is submitted on LinkedIn. Such immediate alerts are invaluable for sales teams that need to act quickly on new opportunities, ensuring no lead goes unnoticed.
Similarly, if your lead generation efforts focus on Facebook Lead Ads, there's a template to send Slack notifications for new submissions. This drastically cuts down the response time, allowing your team to engage with potential customers while their interest is highest. Prompt engagement can be a significant differentiator in competitive markets.
Finally, a powerful template for Facebook Lead Ads integrates directly with Pipedrive. This automation takes new Facebook leads and instantly creates deals within your Pipedrive CRM. This not only saves your sales team valuable administrative time but also helps them move leads through the sales pipeline more efficiently, ultimately assisting in closing deals faster by providing a structured and automated follow-up process.
The Takeaway
Implementing an automated lead routing system, while initially requiring some setup, offers substantial long-term benefits by operating seamlessly in the background and consistently saving valuable time. These Make.com-powered solutions are not only efficient but also cost-effective, eliminating the complexities often associated with app onboarding, the need for expensive consultants, and restrictive contracts.
The ultimate objective of these automated lead assignment systems is to significantly enhance the efficiency of your sales teams. By ensuring leads are distributed promptly and intelligently, these automations set every member of your team up for success from the moment the system goes live, fostering a more productive and responsive sales environment.
Happy automating!