Dropshipping through Shopify has become increasingly popular, attracting many entrepreneurs to the e-commerce sector. The appeal of this business model is clear, offering several compelling advantages for those looking to establish an online presence.
Key reasons for its popularity include the availability of efficient fulfillment services, the widespread adoption of online shopping habits, and the ease with which digital storefronts can be created. In essence, the market is highly receptive to sellers who can excel in two critical areas: sourcing quality products at competitive prices and managing their operational processes more effectively than competitors.
Automation plays a crucial role in achieving operational excellence. By automating various tasks across operations, marketing, and sales, dropshippers can build a foundation for more efficient workflows and improved profit margins. However, with numerous automation possibilities available, it can be challenging to know where to start.
This guide aims to simplify that by focusing on one of the most time-consuming aspects of Shopify dropshipping: automatically sending order details to manufacturers for fulfillment. This process, traditionally a manual and repetitive task, can significantly impact a dropshipper's earnings when automated, freeing up valuable time and resources.
We will walk you through setting up an automated order flow from the initial purchase on Shopify to its fulfillment by the supplier. Before diving into the technical steps, let’s consider some fundamental aspects of the dropshipping business model.
Shopify Sellers and Suppliers: A Special Relationship
The success of a dropshipping business heavily relies on the quality and reliability of its suppliers. After the often meticulous process of selecting the right partners, a seamless collaboration between the seller and the supplier becomes paramount. Many Shopify store owners encounter the challenge of manually forwarding order information to their suppliers, typically through email or other direct communication methods.
This manual approach is not only inefficient but can also become a bottleneck as order volumes increase. The more sales a store generates, the more time and effort are consumed in simply relaying order details to manufacturers, hindering scalability. Recognizing this common pain point, and the fact that Shopify does not offer a built-in solution for this specific automation, we present a powerful workaround using Make.com.
Our solution will demonstrate how to leverage Make.com to streamline your dropshipping operations. Specifically, we will cover how to:
- Automatically store new Shopify orders in a structured database.
- Enable your suppliers to easily access and fulfill new orders from this database.
- Send automated confirmation emails to customers once their orders have been fulfilled.
To achieve this end-to-end automation, we will integrate three core tools: Airtable for database management, Make.com as the automation platform, and a standard email service for notifications. Please note that you will need an active Make.com account to implement this integration. If you don't have one, you can register for free. Also, throughout this tutorial, the term "scenario" refers to an automated workflow within Make.com, and our setup will involve two distinct scenarios.
Shopify Order to Manufacturer, Automated: A Step-by-Step Guide
As previously mentioned, Airtable will serve as our central database for managing orders. This is where all new Shopify orders will be recorded, allowing suppliers to track and fulfill them efficiently. Upon fulfillment, an automated notification will be dispatched to the customer, ensuring a smooth and transparent process.
To achieve this comprehensive automation, we will construct two distinct scenarios within Make.com:
- Scenario 1: This workflow will instantly capture new orders from Shopify and automatically create a corresponding record in your designated Airtable base. It utilizes two key Make.com modules: "Shopify > New Event (instant)" and "Airtable > Create a record."
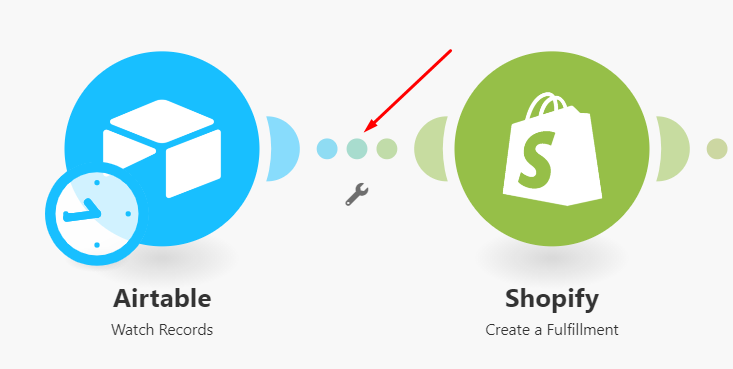
- Scenario 2: This scenario monitors the Airtable base for changes in order status, specifically looking for orders marked as 'Shipped'. Once detected, it automatically updates the order status in Shopify and sends a shipping confirmation email to the customer. This scenario will employ the following Make.com modules: "Airtable > Watch records," "Shopify > Create a fulfillment," and "Email > Send an email."
Let's begin by setting up the first Make.com scenario to connect Shopify and Airtable.
Scenario 1: Connecting Shopify to Airtable
To initiate the first automation, navigate to your Make.com dashboard and click the "Create a new scenario" button located in the top right corner. This action will open the scenario builder, where you will configure the integration.
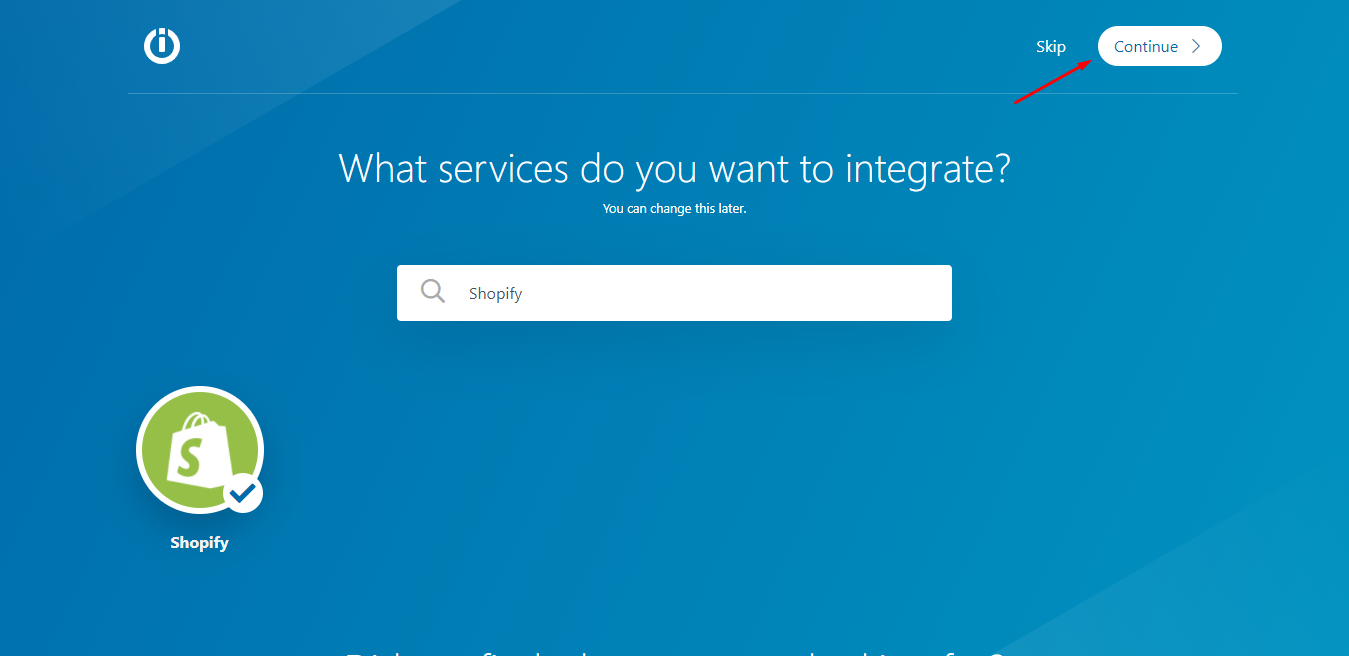
On the subsequent screen, use the search bar to find "Shopify," select the application from the results, and then click "Continue" in the top right corner. This will bring you into the visual builder interface, ready to construct your Shopify-Airtable connection.

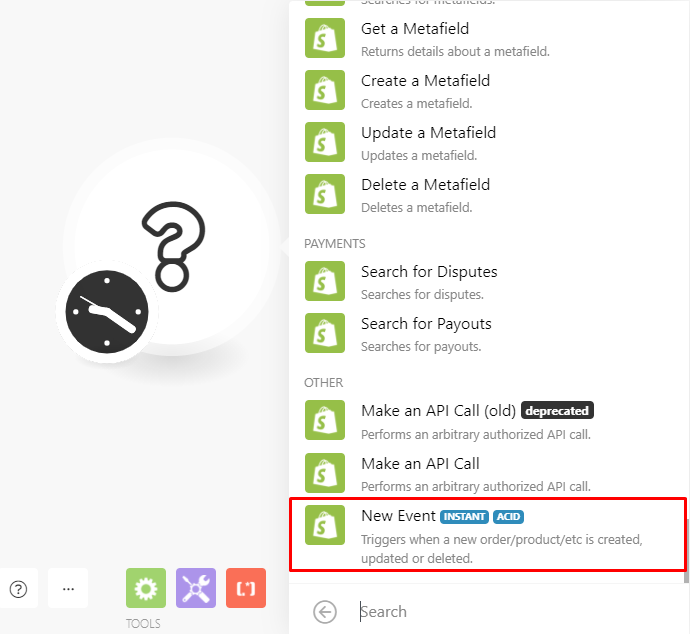
Within the scenario builder, you'll see a blank module. Click on it and select the pre-loaded Shopify app, then choose the "New events" module. This specific module is designed to instantly capture new orders as they are created and marked as paid within your Shopify store, acting as the trigger for your automation.
1. Configuring the “New Event” Shopify module
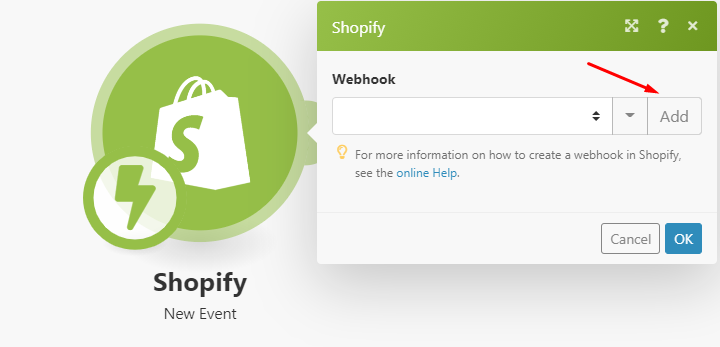
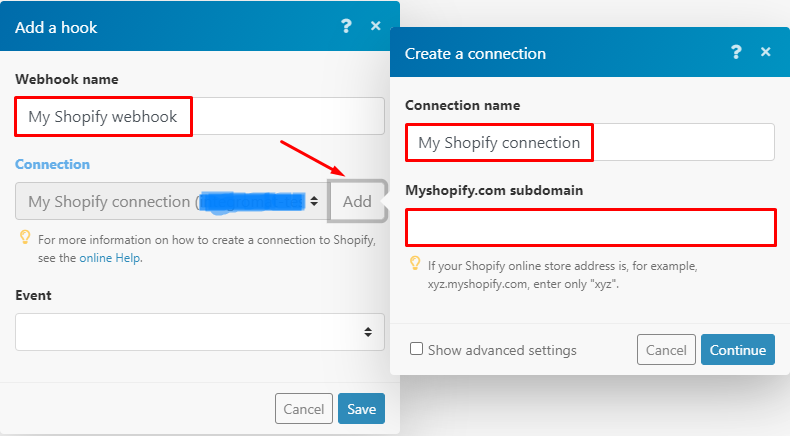
For Make.com to receive real-time order data from Shopify, you first need to set up a webhook. To do this, click the "Add" button within the "New events" module. A dialogue box titled "Add a hook" will appear, prompting you to name your webhook (optional) before clicking "Add" again.
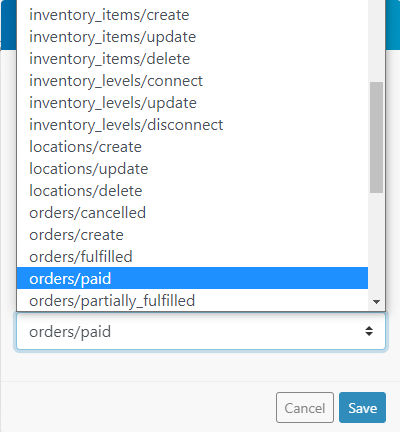
Following this, a "Create a connection" box will emerge. Here, you'll assign a name to your connection, input your Shopify subdomain, and then click "Continue." This establishes the link between Make.com and your Shopify store. Next, from the "Event" dropdown menu, select "orders/paid" to ensure the automation triggers specifically when an order is paid. Confirm your selection by clicking "Save."
Once these steps are completed, Make.com will automatically configure and attach the webhook to your Shopify store. To finalize the module's setup and ensure it's functioning correctly, you must test the webhook. Webhooks require Make.com to understand their data structure before integrating other applications into the scenario. Follow these steps to perform the test:
- Click the "Run once" button located at the bottom left of your scenario.
- Navigate to your Shopify store, create a new order, and mark it as paid.
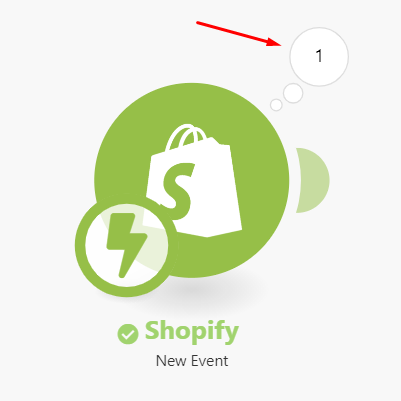
- Return to your Make.com scenario. If you see the number '1' displayed above the Shopify module, it indicates that the webhook is successfully receiving data.
2. Configuring the “Create a record” Airtable module
With the Shopify module now fully configured and tested, the next step is to integrate Airtable into the scenario. This will allow new Shopify orders to be automatically added to your Airtable base. To do this, locate the plus sign on the left side of the Shopify module in your Make.com scenario builder. Click it to open the search box, then type "Airtable," and select the Airtable app.
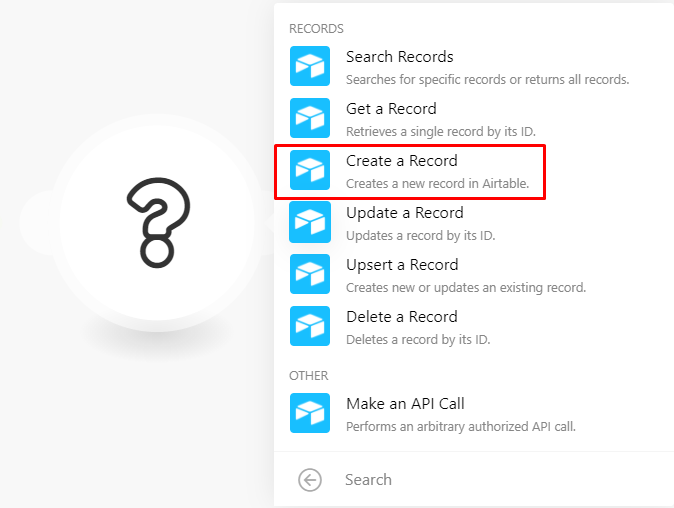
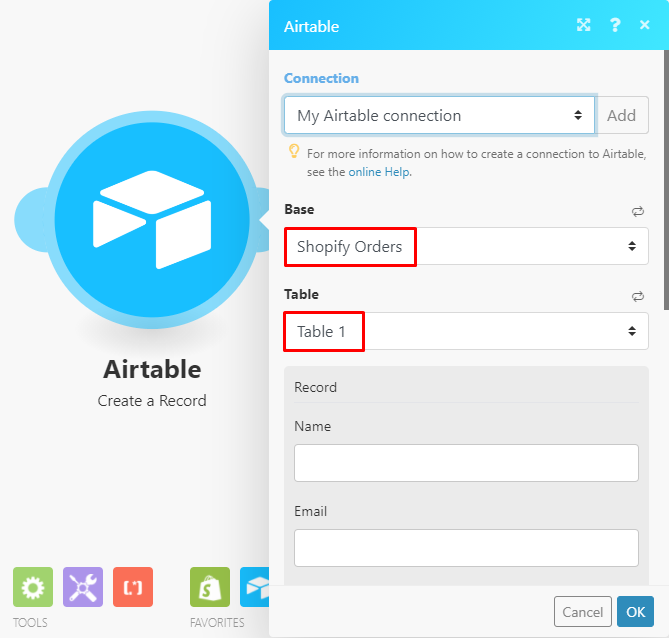
From the list of available Airtable modules, choose "Create a record." This module is specifically designed to add new entries to your Airtable database. In the module's configuration box, click the "Add" button to connect your Airtable account to Make.com. You will need to provide your Airtable API token during this process; detailed instructions on how to obtain it are available in the Make.com documentation.
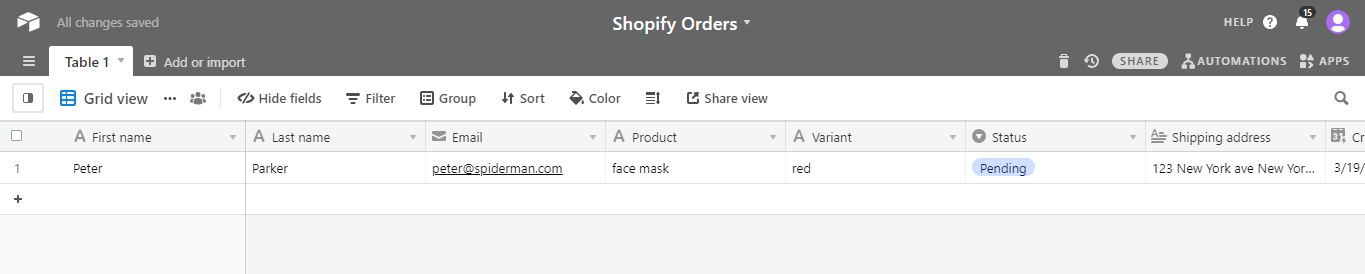
Assuming you have already set up an Airtable base for your orders, you'll then select the specific base and table where you want the Shopify order data to be stored. The crucial next step involves mapping the data elements from the Shopify module to the corresponding fields in your Airtable module. Before proceeding with the mapping, it's beneficial to understand the expected field layout in your Airtable table. While your table might have custom fields, ensure the following standard fields are included for this process:
- First name
- Last name
- Product
- Variant
- Status (configured as a Single Select field with 'Pending' and 'Shipped' options)
- Shipping address
- Created time
- Last modified time
- Order ID
- Order number
If you wish to use the exact Airtable base demonstrated in this tutorial, a copy is available via the provided link. Back in the Airtable module, you will see your Airtable columns presented as fields. Here, you will drag and drop the relevant data elements from the Shopify module (e.g., "Data customer: first_name" to the "First name" field, "Data customer: last_name" to the "Last name" field) into their respective Airtable fields. When you reach the "Status" field, set its initial value to "Pending," as this reflects the status of newly placed orders awaiting shipment. Finally, populate the "Shipping address" box with the appropriate data element from Shopify. After completing all mappings, click "Ok" at the bottom of the module, and then click the "Save" button at the bottom of the scenario to preserve your changes.
3. Testing the scenario
Once the scenario has been fully configured, it is crucial to test it thoroughly to ensure it operates precisely as intended. Similar to the webhook test, click the "Run once" button in your Make.com scenario and then proceed to create a new order in your Shopify store, ensuring it is marked as paid. This action will trigger the scenario.
Upon successful execution, you should observe the data flowing from Shopify into your Airtable base, with a new record created containing all the mapped order details. To activate this scenario for continuous operation, simply toggle the switch located below the "Run once" button to the "on" position.
Pro tip: Always perform a test run after configuring each module or adding a new step to your scenario. This helps identify and troubleshoot any issues early, preventing potential data discrepancies or workflow failures down the line.
Scenario 2: Updating Order Status on Shopify, Sending Email Notifications
With the first scenario actively running, new Shopify orders are now automatically populating your Airtable base. Once you grant your supplier access to this base, they can view incoming orders and initiate the fulfillment process. The second Make.com scenario completes the automation loop by handling post-fulfillment actions.
This scenario is designed to perform two critical tasks: automatically updating the order status in Shopify to "Fulfilled" once your supplier marks it as "Shipped" in Airtable, and sending a personalized shipping confirmation email to the customer. Here’s a detailed breakdown of how to set this up.
1. Creating a new scenario
Begin by creating a new scenario directly from the Make.com scenario builder, similar to how you started the first one. While the first scenario monitored Shopify for new orders, this second scenario will focus on monitoring Airtable for changes in order status. After creating the new scenario, select the Airtable app in the scenario builder and search for the "Watch records" module.
Since your Airtable connection was already established in the previous scenario, it should be pre-selected within this module. Proceed to select the specific Airtable base and table that contains your order information. In the "Trigger" field, choose the "last modified time" option. This setting ensures that Make.com is alerted and triggers the automation whenever any change, including a status update, occurs in a record within your selected Airtable table.
Next, you will need to choose a field that will serve as a unique label for each record, aiding in identification. In the "Limit" field, specify the maximum number of records you want Make.com to retrieve during a single run of this scenario. This helps manage the processing load and ensures efficient operation.
Pro tip: When setting the "Limit" for watching records, consider your typical order volume and how frequently your suppliers update statuses. A lower limit with more frequent runs can provide near real-time updates, while a higher limit with less frequent runs might be suitable for businesses with fewer daily updates.
2. Connecting the Shopify app
This module is responsible for automatically updating the order status in Shopify to "Fulfilled," eliminating the need for manual intervention. In the scenario builder, add a new module, select the Shopify app, and then choose the "Create a fulfillment" module. Your previously established Shopify account should already be available for selection within this module.
Within the module's configuration, simply map the "Order ID" data element from the Airtable module to the corresponding "Order ID" field in the Shopify module. Additionally, select the appropriate fulfillment location. Scroll down to the "Shipment status" field and select the "confirmed" option. Once these settings are applied, click "OK" to save the module configuration.
3. Configuring the filter: A simple way to manipulate data on Make
Consider a scenario where a supplier accidentally changes an order's status to "shipped" and then reverts it to "pending." Without proper safeguards, the "last modified time" field in Airtable would still update, potentially causing the order status in Shopify to be incorrectly marked as "Fulfilled" when the scenario runs. To prevent such inaccuracies, you can implement a filter.
Make.com's filters are powerful tools that allow only data meeting specific criteria to pass through a workflow. In this case, the filter's criterion will be that the "Status" of a record must be exactly "Shipped." This ensures that only genuinely shipped orders trigger the subsequent actions in Shopify. To set up this filter, click on the connection line between the Airtable "Watch records" module and the Shopify "Create a fulfillment" module.
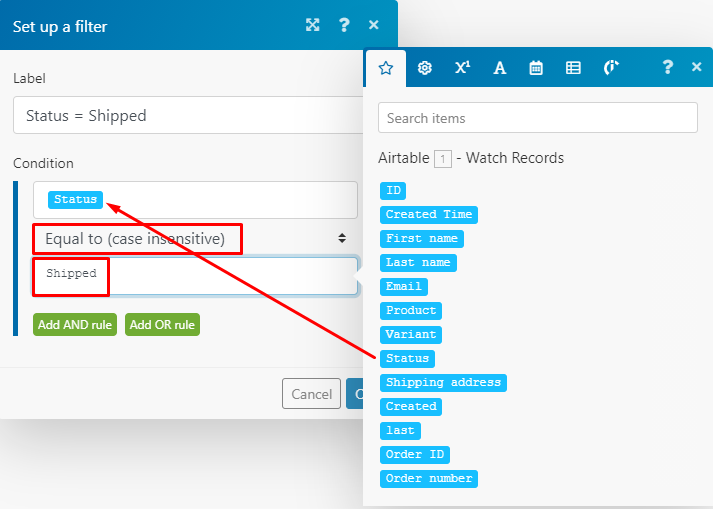
Configure the filter with the following settings:
- Give the filter a descriptive name.
- Map the "Status" element from Airtable to the top field under "Condition."
- Select the "Equals to (case insensitive)" text operator.
- In the bottom field, type the word "Shipped" exactly as it appears in your Airtable status options, including capitalization.
With the filter now in place, only records with a "Shipped" status will proceed, ensuring accurate updates in Shopify. Let's move on to configuring the final part of this scenario.
4. Configuring the Email app
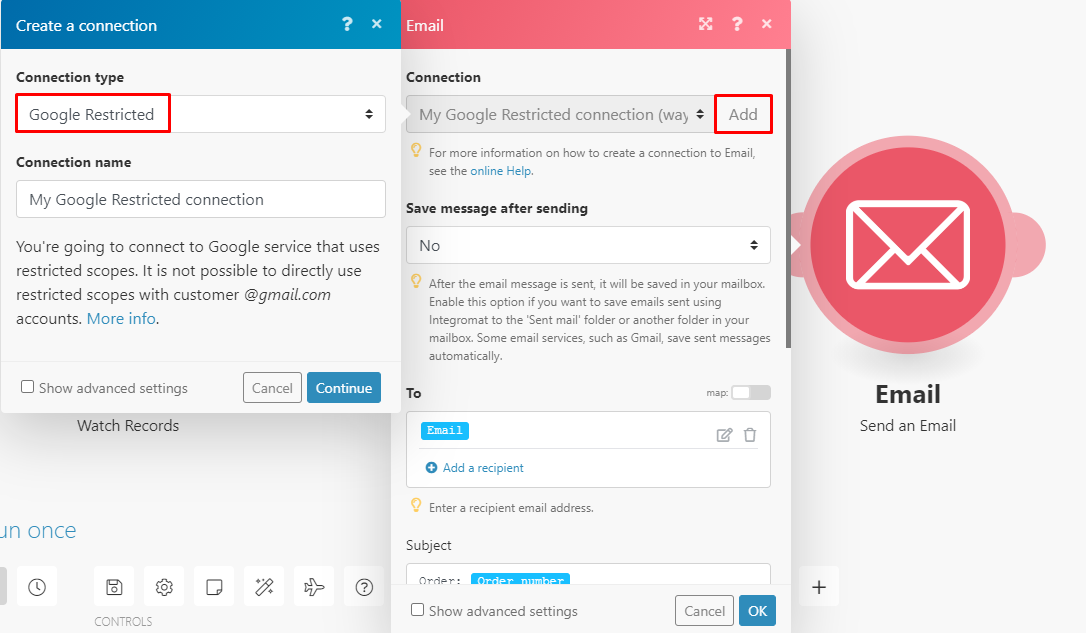
The final component of this scenario involves sending shipping notifications to your customers via email. To set this up, add a new module to your scenario, search for the "Email" app, and select the "Send an email" module. When connecting your email account, you'll typically have two connection type options:
- Google restricted (for Gmail accounts, often requiring specific app passwords or permissions)
- Others (SMTP) (for most other email providers, requiring SMTP server details)
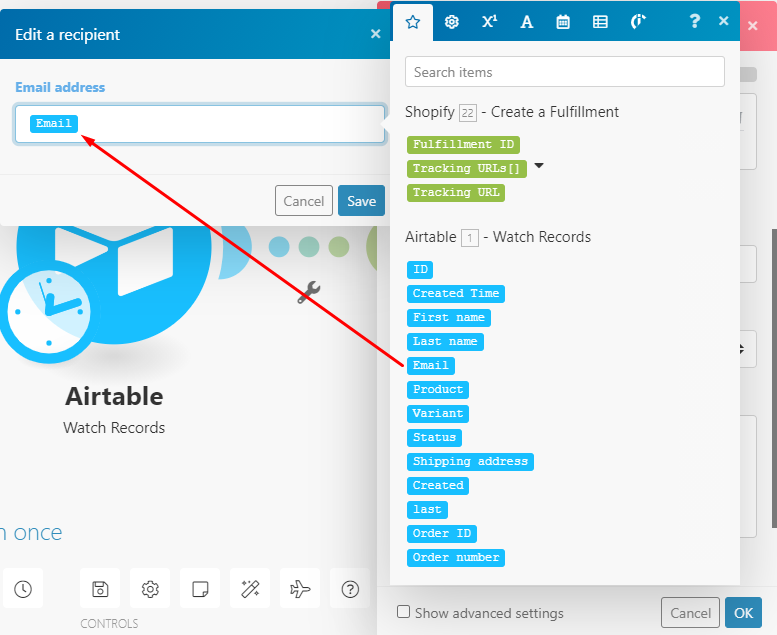
If you are using Gmail, be sure to review any additional information or requirements under the "Connection name" section to ensure a successful connection. The customer's email address is stored in the "Email" field within your Airtable table. In the "To" field of the email module, click the pencil icon and map the "Email" data element from the Airtable module. This ensures the notification is sent to the correct recipient.
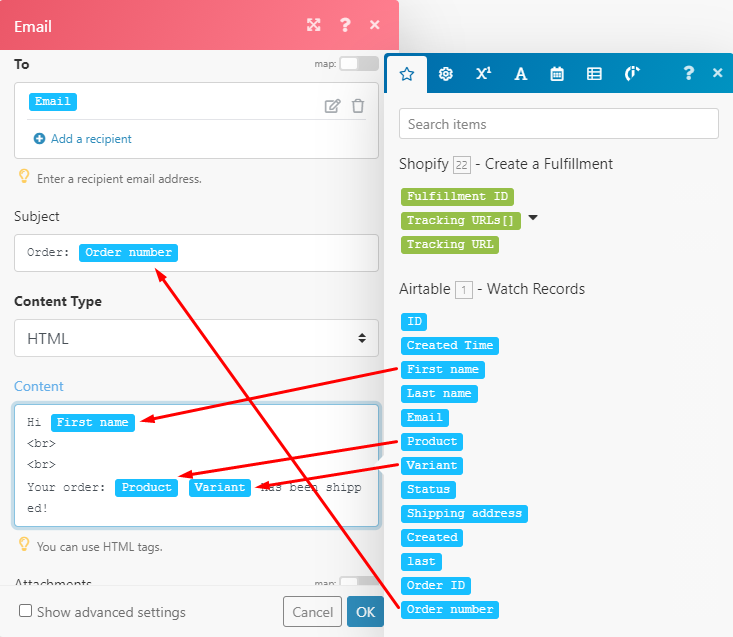
You have full flexibility to customize the subject line and content of the shipping confirmation email. A well-crafted email can significantly enhance the customer experience. Below is an example of a basic layout, highlighting important elements you might want to map into the subject and body of your email, such as the customer's name, order number, and a tracking link if available.
5. Testing the scenario
Testing this second scenario differs slightly from the first, as it doesn't rely on a webhook trigger. To test its functionality, you will need to manually change the status of an order in your Airtable base to "Shipped." After making this change, click the "Run once" button in your Make.com scenario.
If the scenario is configured correctly, you should observe the workflow executing, updating the corresponding order in Shopify to "Fulfilled," and sending the confirmation email to the customer. This visual confirmation ensures that all steps are working as expected.
6. Scheduling the scenario
To ensure this scenario runs automatically and consistently, you need to set up its scheduling. After activating the scenario by switching it "on," the schedule box will automatically appear. Alternatively, you can always access this menu by clicking the clock icon on the trigger module (the Airtable "Watch records" module).
In the "Run scenario" field, select the interval that best aligns with your business needs. For instance, you might choose to run it every 15 minutes to provide timely updates. Once you've selected your desired interval, click "Ok" to save the schedule. This scheduling determines how frequently the scenario will check for updated order statuses in Airtable, subsequently updating Shopify and sending email notifications to your customers.
Pro tip: When setting the schedule, consider the typical turnaround time for your suppliers to update order statuses. If they update frequently, a shorter interval (e.g., every 5-15 minutes) is ideal. If updates are less frequent, a longer interval (e.g., hourly) might suffice, balancing real-time updates with operational costs.
And with that, your automated Shopify dropshipping fulfillment workflow is complete!