
In the first part of our procurement automation series, we outlined the essential requirements for such systems and introduced the initial Make.com scenario. That scenario focused on monitoring Shopify inventory levels through Airtable, specifically tracking when product stock reached predefined thresholds.
This second installment builds upon that foundation. We will now demonstrate how to seamlessly integrate Airtable and QuickBooks, enabling the automatic addition of products and suppliers from Airtable directly into your QuickBooks account. This crucial step aligns your inventory data with your financial records, paving the way for fully automated purchase order generation.
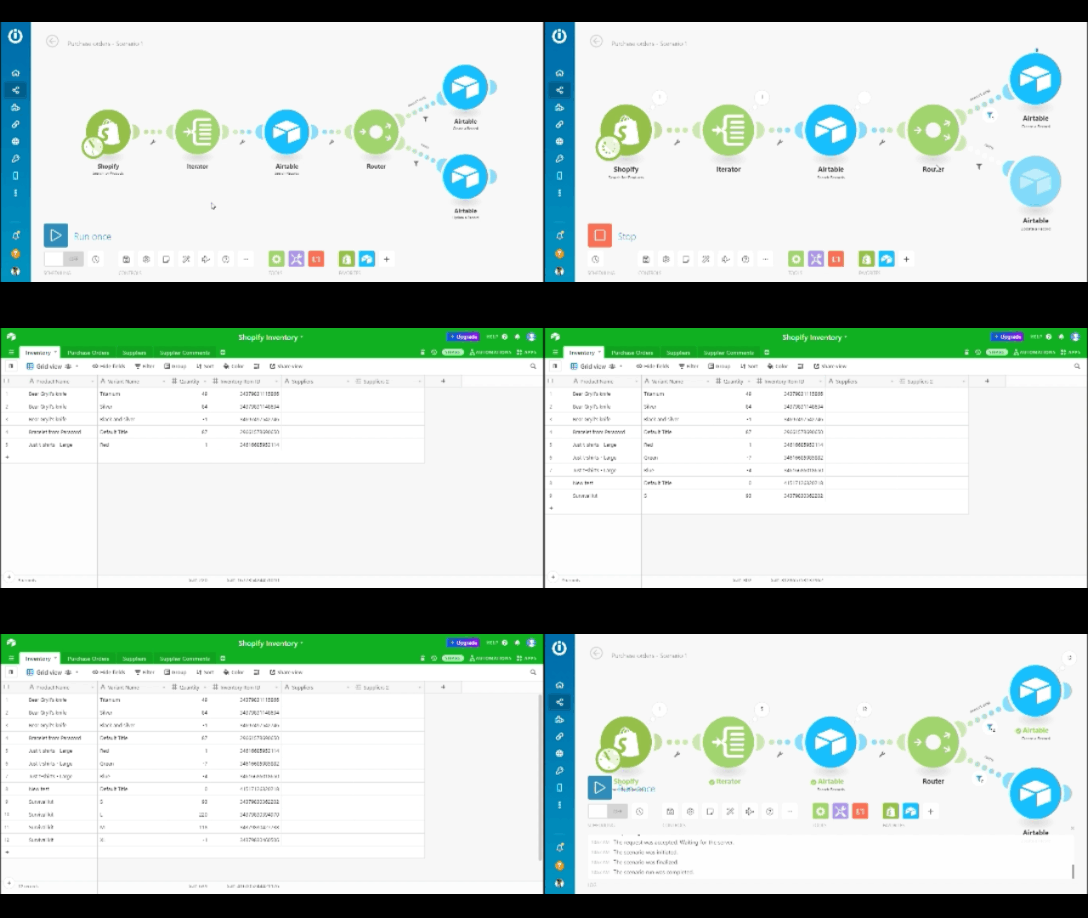
By synchronizing Airtable and QuickBooks, you achieve a unified view of your inventory and financial data. This integration is a prerequisite for automating purchase orders and, by extension, optimizing your entire procurement process. Before diving into the technical setup, let's briefly review the overall solution architecture.
Syncing QuickBooks and Airtable to Keep Track of Inventory
Having established how to transfer Shopify inventory data into Airtable, the next logical step is to integrate this data with QuickBooks. This ensures that your financial records accurately reflect your current stock and supplier information.
To achieve this critical synchronization, we will construct two distinct, yet complementary, scenarios within Make.com. These scenarios are designed to automate the flow of product and supplier data between Airtable and QuickBooks, minimizing manual data entry and reducing the potential for errors.
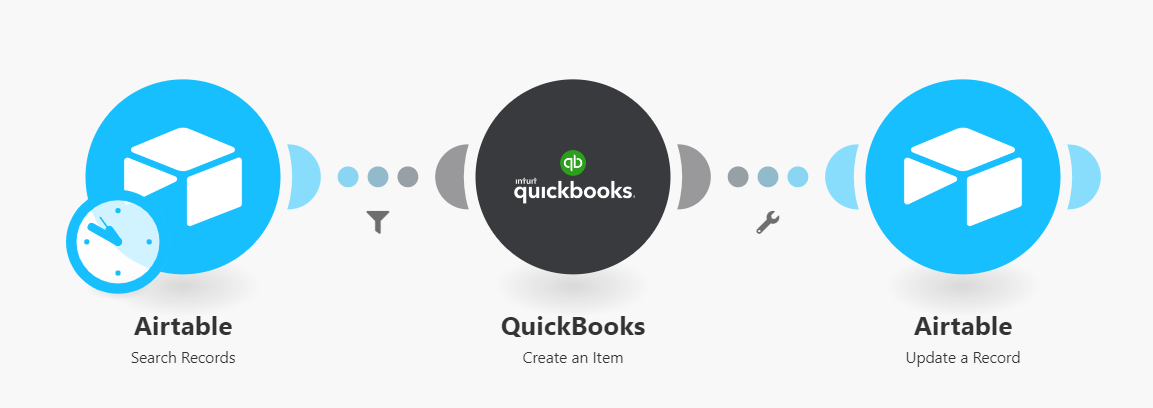
The first scenario focuses on products: it will automatically add new items from Airtable to QuickBooks. Crucially, it also retrieves the unique Item IDs generated by QuickBooks and writes them back into the corresponding Airtable records. This two-way sync is vital for preventing duplicate entries in QuickBooks and maintaining a consistent product catalog across both platforms.
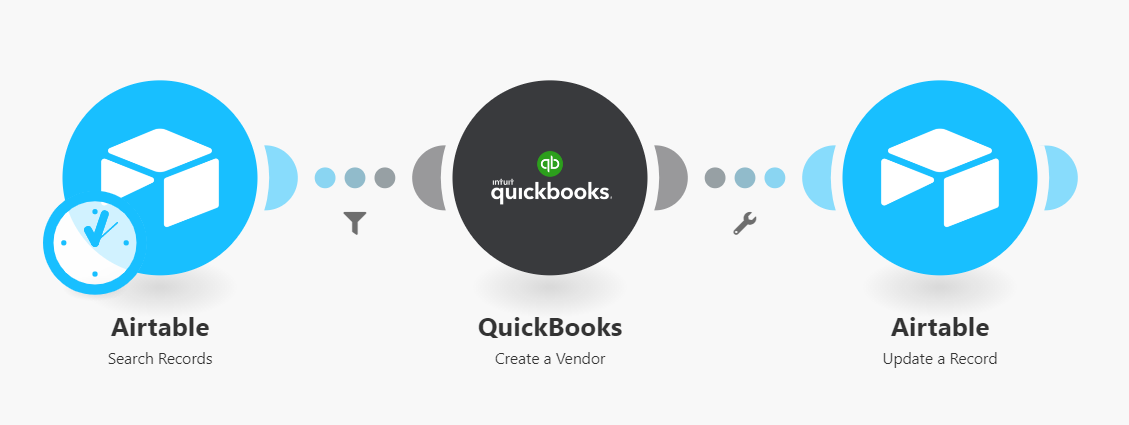
The second scenario addresses suppliers. It will automatically transfer supplier details from your dedicated "Supplier" table in Airtable to QuickBooks, creating new vendor records as needed. Similar to the product scenario, it will also capture the Vendor IDs from QuickBooks and update the Airtable records, ensuring no supplier is duplicated.
It's important to note that while the system automates the creation of products and suppliers, the task of linking a specific supplier to a particular product in your Airtable inventory base remains a manual step. This is because the decision of which vendor supplies which product is a business-specific choice that the automation cannot infer. This manual input ensures accuracy in your procurement process.
For this entire series, we will continue to use the same Airtable base established in Part 1. If you haven't already, we highly recommend reviewing Part 1 to familiarize yourself with the initial setup, including navigating the Make.com scenario builder, connecting applications, and configuring modules. This foundational knowledge will be invaluable as we proceed with the more advanced automation steps outlined in this guide.

Now, let's dive straight into building these powerful automation scenarios.
Scenario A: Automatically Create Products/Items in QuickBooks from Items on Airtable
This first scenario is designed to automate the creation of new product items in QuickBooks based on your Airtable inventory data. It ensures that any new products added to your Airtable base are reflected in your accounting software without manual intervention.
To build this scenario, you will utilize three core Make.com modules:
- Airtable > Search Records
- QuickBooks > Create an Item
- Airtable > Update a Record
Begin by logging into your Make.com dashboard and creating a new scenario. This will be the canvas for our product synchronization workflow.
Step 1: Adding the Airtable Module
Once you're in the scenario builder, the first module to add is "Airtable > Search Records." This module will act as the trigger and data retriever for our automation.
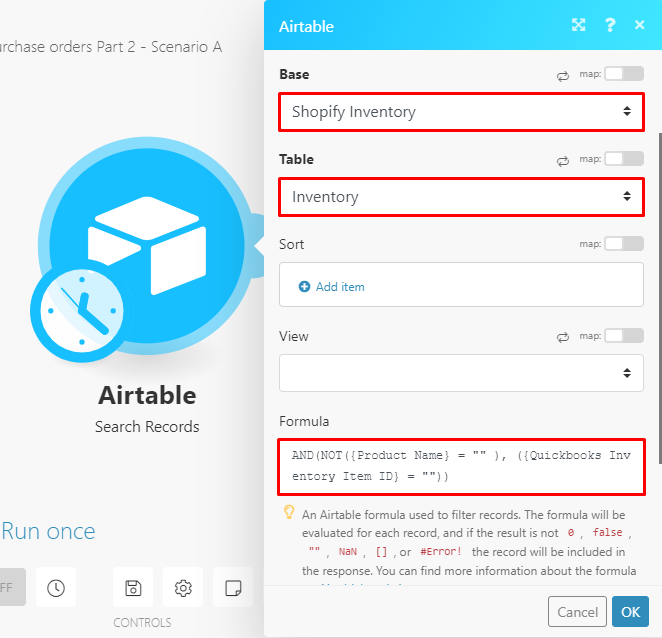
In the configuration panel for this module, you'll need to specify your Airtable base and table. Select your "Shopify Inventory" base and then choose the "Inventory" table. This tells Make.com where to look for your product data.
A crucial aspect of this automation is preventing duplicate product entries in QuickBooks. When an item is successfully added to QuickBooks, we will store its unique "Item ID" back in the corresponding Airtable record. This "Item ID" field in Airtable will serve as an indicator of whether a product has already been synced.

To ensure we only process new items, we'll use a formula within the Airtable module to search for records that currently lack a "QuickBooks Inventory Item ID." This effectively filters out products that have already been synced.
Copy and paste the following formula into the appropriate field in your Airtable "Search Records" module: AND(NOT({Product Name} = "" ), ({Quickbooks Inventory Item ID} = "")). This formula identifies records where the product name is not empty and the QuickBooks Inventory Item ID is also empty.
Additionally, set the "Limit" field count to "100" to process a reasonable batch of records per execution. Once these configurations are complete, click "OK" to save the module settings and proceed to the next step.
Step 2: Adding the QuickBooks Module
Following the Airtable module, add the "QuickBooks > Create an Item" module to your scenario. This module will be responsible for pushing the new product data into your QuickBooks account.
If you haven't already, you'll need to connect your QuickBooks account to Make.com by clicking the "Add" button within the module's configuration box and following the authentication prompts.
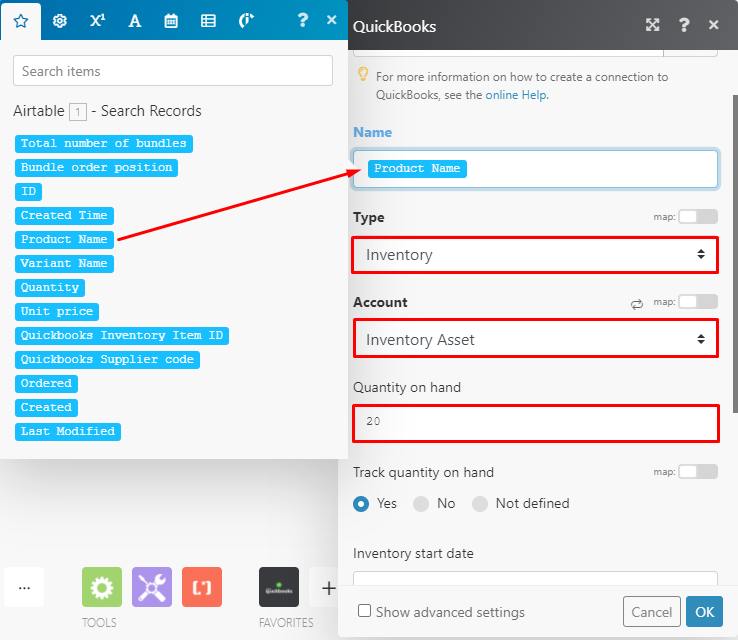
Now, map the relevant fields from your Airtable module to the corresponding fields in QuickBooks. Specifically, map the "Product Name" element from Airtable to the "Name" field in QuickBooks. Select "Inventory" as the "Type" of item and choose the appropriate "Inventory Asset" account from your QuickBooks chart of accounts.
Next, you'll need to set the "Quantity on hand" for these new products. While this tutorial uses a default quantity of "20" for demonstration, you should input a value that makes sense for your initial stock. Remember, the actual dynamic stock levels will be pulled from Airtable, not directly from this initial QuickBooks entry. Ensure that the "Track quantity on hand" option is also selected in QuickBooks.
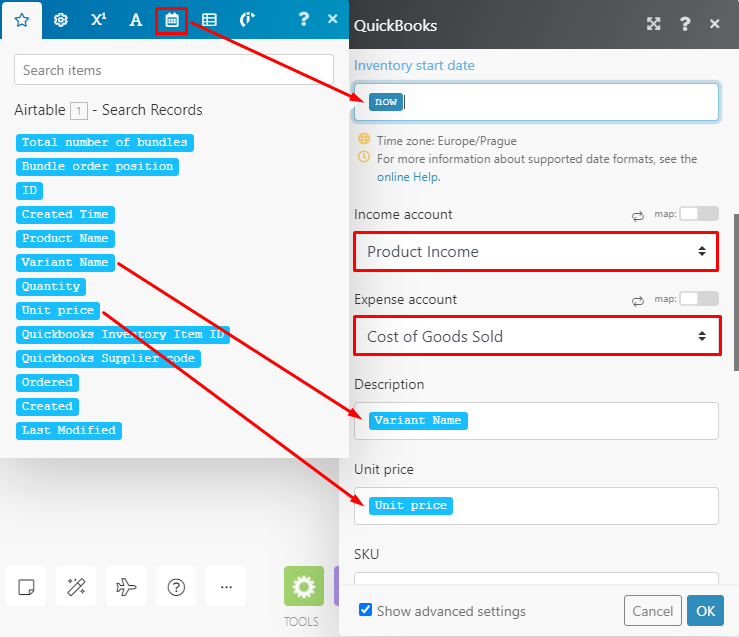
Scroll down within the QuickBooks module configuration to the "Inventory start date" field. Here, map the "Now" variable, which can be found under the "Date and Time" functions in Make.com. This will set the inventory start date to the current time when the item is created.
Further configure the module by mapping the following fields:
- Select your Income account (this must be an 'Income' account with 'Sales of Product Income' as the Detail Type in QuickBooks).
- Select your Expense account (this should be a 'Cost of Sales' account with 'Suppliers & Materials - COGS' as the Detail Type in QuickBooks).
- Map the Variant Name element from Airtable to the Description field in QuickBooks.
- Map the Unit price element from Airtable to the Unit price field in QuickBooks.
While the QuickBooks module offers additional configuration options, these are not strictly necessary for the scope of this tutorial. Feel free to explore them if your specific business needs require more detailed setup.
Once all the required fields are mapped and configured, click "OK." This QuickBooks module is now prepared to receive data from the preceding Airtable module and create new items in your accounting system.
The next step is to ensure that the unique Item IDs generated by QuickBooks are automatically recorded back into your Airtable base, completing the synchronization loop.
Step 3: Updating Airtable Records
To complete the data synchronization, you need to update your Airtable records with the QuickBooks Item IDs. Add an "Airtable > Update a Record" module to your scenario.
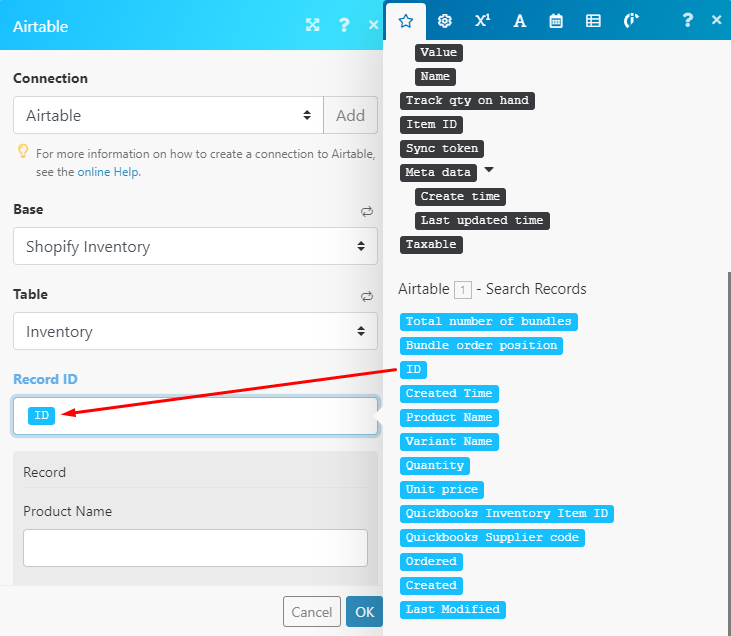
In the configuration box for this module, select the same "Shopify Inventory" base and "Inventory" table that you used in the initial Airtable module. This ensures you're updating the correct records.
The update module needs to know which specific record to modify. To achieve this, map the "ID" element from the first "Airtable > Search Records" module to the "Record ID" field in this "Update a Record" module. This links the newly created QuickBooks item back to its original Airtable entry.
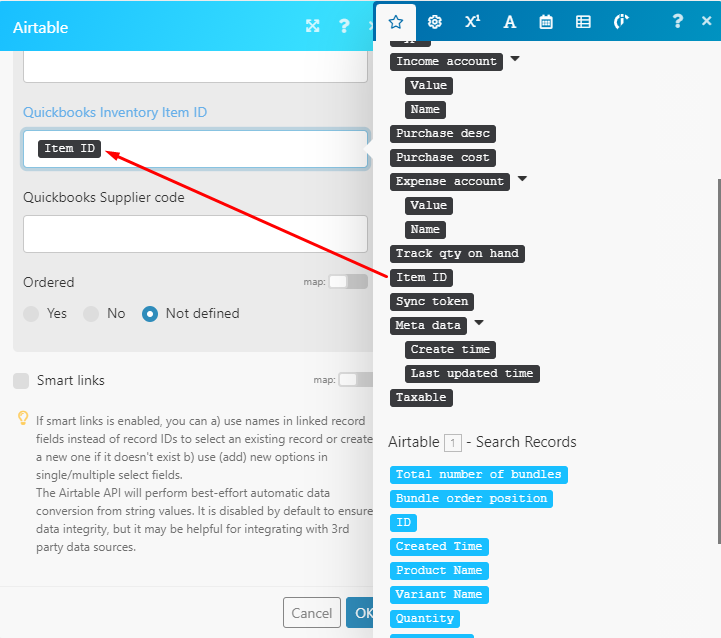
Finally, map the "Item ID" element from the "QuickBooks > Create an Item" module to the "QuickBooks Inventory Item ID" field in your Airtable "Update a Record" module. This action populates your Airtable with the unique identifier from QuickBooks.
Click "OK" to finalize the configuration of this module. This step is crucial for maintaining data consistency and preventing future duplicate entries.
Before concluding this scenario, it's essential to introduce a filter between the initial Airtable module and the QuickBooks module. This filter acts as a safeguard, preventing unnecessary executions and potential errors.
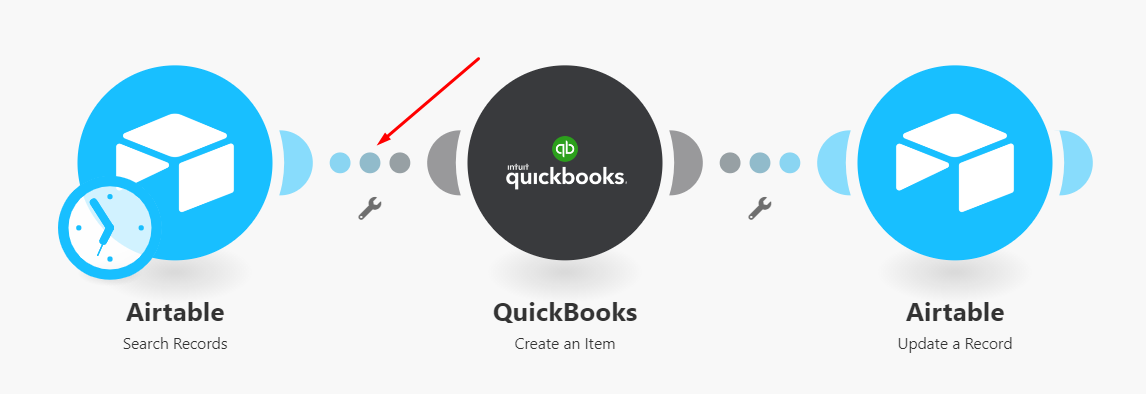
The primary reason for implementing this filter is error prevention. If the "Airtable > Search Records" module, when executed, does not find any records that match our specified formula (i.e., no new products without a QuickBooks Item ID), the filter will prevent the scenario from proceeding to the QuickBooks module. This avoids an attempt to create an item with no data, which would otherwise trigger an error.
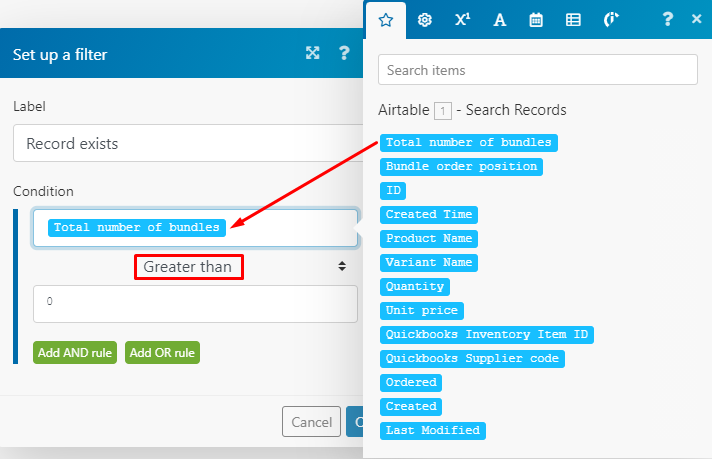
Once you add the filter, a configuration box will appear. Give your filter a descriptive name. Then, map the "Total number of bundles" element from the preceding Airtable module. Select the "Greater than" numeric operator and enter "0" in the lower field. This configuration ensures that the scenario only continues if at least one record (bundle) was found by the Airtable search module.
If the "Total number of bundles" is 0, it signifies that no new records were found that require processing, and the scenario will gracefully stop at this filter, preventing any unnecessary actions or errors downstream.
Step 4: Testing the Scenario
With all modules configured and the filter in place, it's time to test your scenario. Assuming your Airtable table is already populated with data from the initial scenario in this series, you can now verify if this new automation successfully adds products to QuickBooks.
Click the "Run once" button in your Make.com scenario builder. Observe the flow of data and ensure that new products from Airtable are created in QuickBooks and that their respective Item IDs are updated back in Airtable. The scenario should execute smoothly, as demonstrated in the visual below.
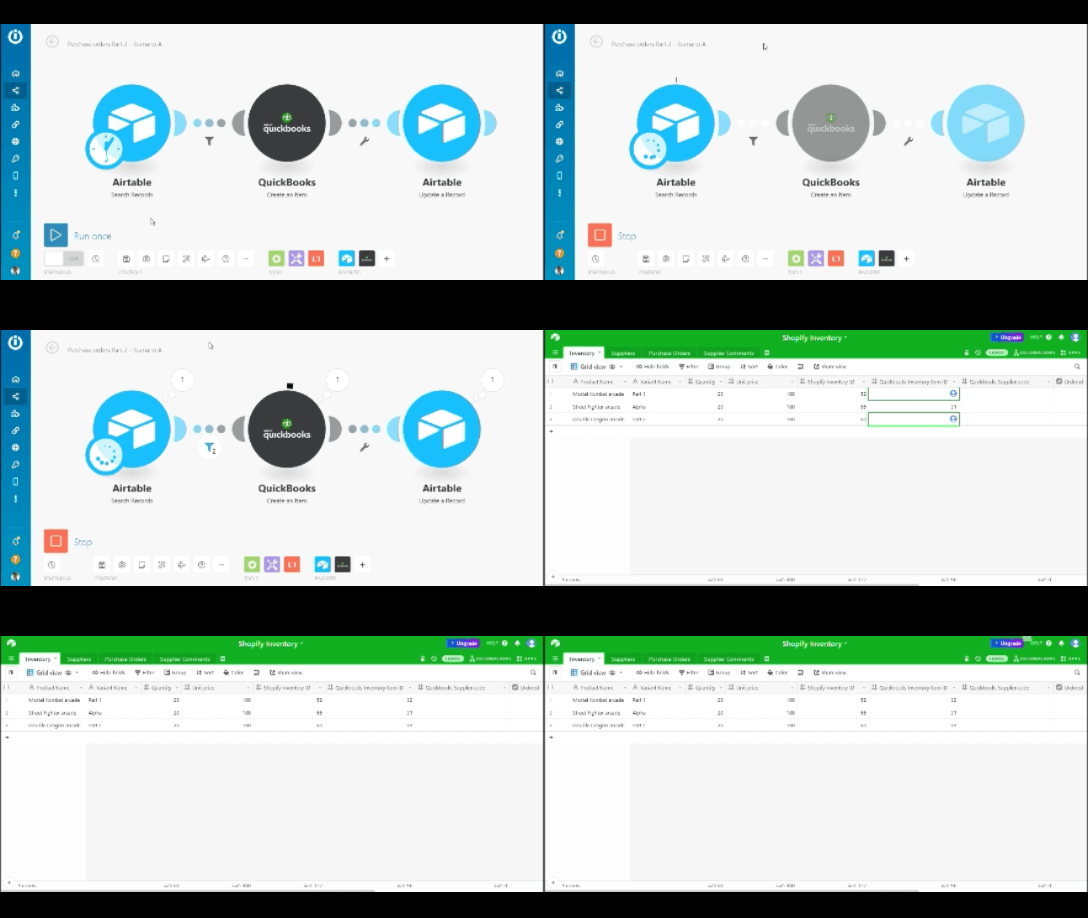
If the scenario functions as expected, your final step is to save it and then schedule its execution. It's crucial to schedule this scenario to run immediately after the initial Shopify-to-Airtable inventory sync scenario. This sequence ensures that any new products added to Shopify are first captured in Airtable, and then subsequently created in QuickBooks, maintaining a continuous and accurate data flow.
Step 5: Assigning a Rotation Frequency to the Items
In any e-commerce store, the optimal reorder point for products can vary significantly. Some items might sell quickly and require frequent replenishment, while others move slowly. Our system is designed to accommodate these variations, allowing you to define specific reorder triggers for each product.
Your store likely carries hundreds of different items, each with its own sales velocity and lead time. Consequently, the minimum stock levels that should trigger a purchase order will not be uniform. For instance, you might want to reorder Product A when its stock drops to 10 units, but Product B when it reaches 25 units.
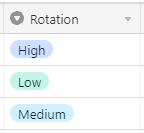
Our flexible system empowers you to manage these distinct reorder thresholds. We've established three general categories of "rotation frequencies" that you can assign to your inventory items. These categories serve as a framework for determining when a purchase order should be initiated.
The defined rotation frequencies are:
- High: These items should be reordered when their quantity drops below 50% of the maximum stock level. This percentage is fully adjustable to suit your specific needs.
- Medium: For these items, a reorder is triggered when the quantity falls below 20% of the maximum stock level. Like the "High" category, this percentage can be customized.
- Low: This category is for items you either don't plan to reorder automatically or prefer to manage manually.
You have the flexibility to create additional categories beyond these three, or modify the existing percentages, to perfectly align with your inventory management strategy. The rotation level of any item can be adjusted at any time to reflect changes in demand or supply chain dynamics.
With the product synchronization complete and rotation frequencies defined, we now move on to the second scenario of this guide, which is the third in our overall series.
Scenario B: Automatically Create Suppliers/Vendors in QuickBooks from Suppliers Details on Airtable
This scenario mirrors the product creation workflow but focuses on synchronizing your supplier data. It ensures that all your vendors, as recorded in Airtable, are accurately reflected in QuickBooks, preventing duplicate entries and maintaining a consistent supplier database.
The core logic remains similar to Scenario A, but the data being transferred pertains specifically to suppliers. This automation is crucial for streamlining your accounts payable and purchase order processes.
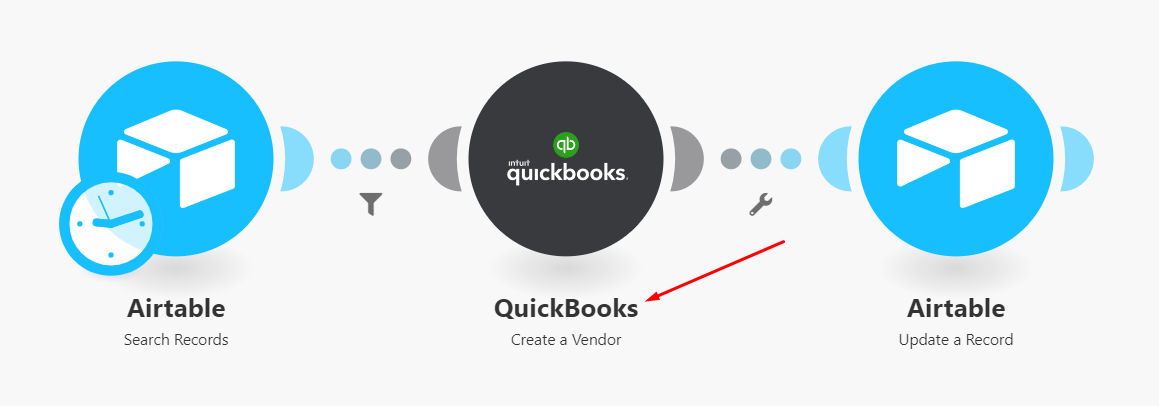
To accomplish this, the scenario will utilize the following Make.com modules:
- Airtable > Search Records
- QuickBooks > Create a Vendor
- Airtable > Update a Record
Let's begin setting up this second scenario.
Step 1: Adding the Airtable Module
As with the previous scenario, start by creating a new scenario from your Make.com dashboard. The first module you'll add is "Airtable > Search Records."
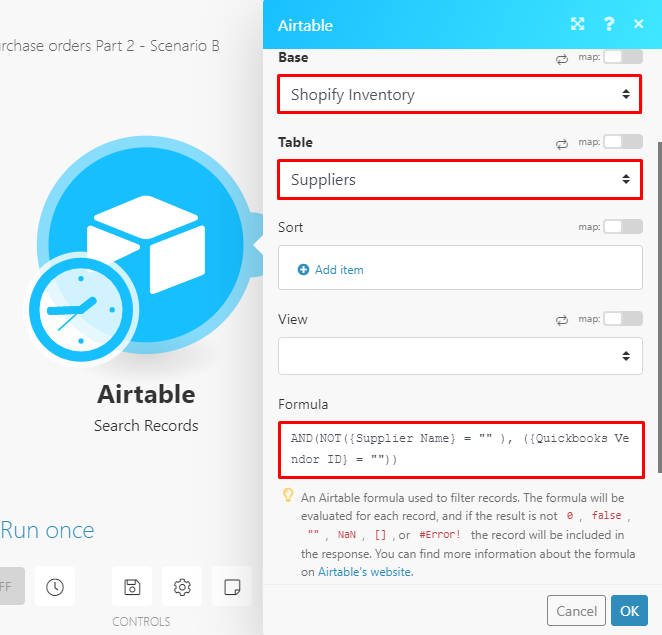
In the configuration box for this Airtable module, select your "Shopify Inventory" base. However, this time, instead of the "Inventory" table, choose the "Suppliers" table. This directs the module to retrieve your supplier data.
To prevent the creation of duplicate vendor records in QuickBooks, we'll use a formula similar to the one in Scenario A. This formula will search for supplier records in Airtable that do not yet have a "QuickBooks Vendor ID."
Copy and paste the following formula into the "Formula" field of your Airtable module: AND(NOT({Supplier Name} = "" ), ({Quickbooks Vendor ID} = "")). This ensures that only new suppliers, or those not yet synced with QuickBooks, are processed.
Once you've entered the formula and confirmed the settings, click "OK." This module is now ready to identify suppliers that need to be added to QuickBooks.
Step 2: Adding the QuickBooks Module
The next step is to add the "QuickBooks > Create a Vendor" module to your scenario. This module will take the supplier data from Airtable and create corresponding vendor records in QuickBooks.
Within the configuration box for this module, you will map the relevant supplier details from your Airtable module to the appropriate fields in QuickBooks. Specifically, map the "Supplier Name," "Email," "Phone number," and "Billing Address" elements from Airtable to their respective fields in the QuickBooks "Create a Vendor" module. This ensures that all essential contact and billing information for your suppliers is accurately transferred.
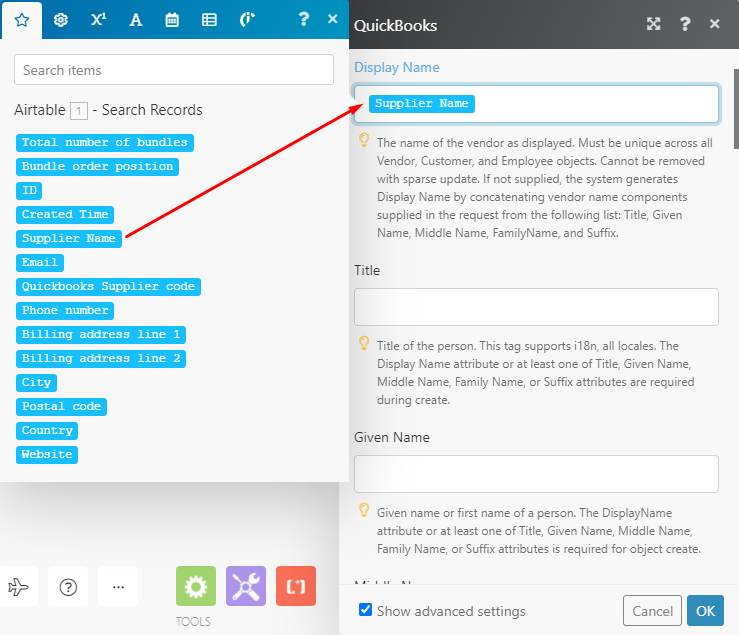
Ensure that all necessary fields are correctly mapped to maintain data integrity. This step is crucial for accurate financial tracking and communication with your vendors.
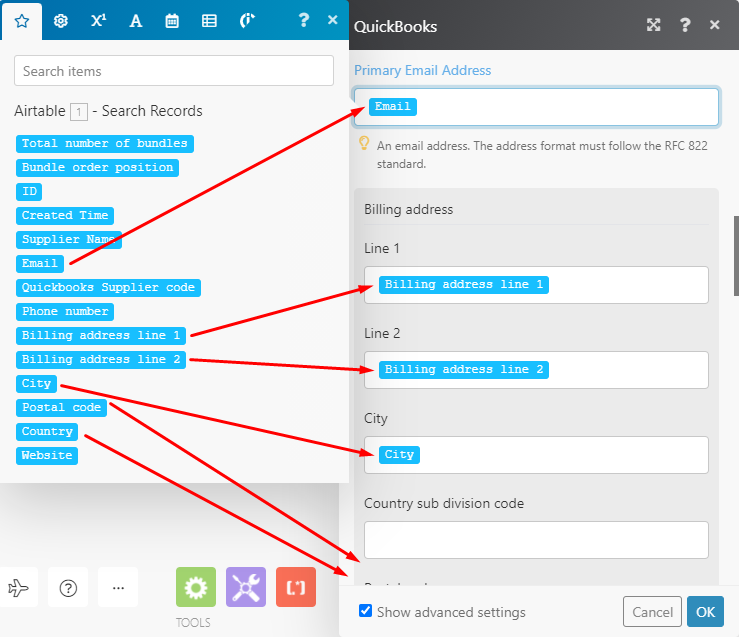
Once you have mapped all the required fields, click the "OK" button to save the module's configuration. This prepares the module to create new vendor records in QuickBooks. The final step for this scenario will be to update Airtable with the newly generated QuickBooks Vendor IDs.
Step 3: Adding the Airtable Module
To finalize this scenario, you'll add an "Airtable > Update a Record" module. This module will ensure that the unique Vendor IDs generated by QuickBooks are written back to your Airtable "Suppliers" table, completing the two-way synchronization.
In the configuration box, you'll need to specify the Airtable base and table. Select the "Shopify Inventory" base and the "Suppliers" table. This ensures you are updating the correct records.
To identify which specific record to update, map the "ID" element from the initial "Airtable > Search Records" module (for suppliers) to the "Record ID" field in this "Update a Record" module. This links the QuickBooks Vendor ID to the correct supplier entry in Airtable.
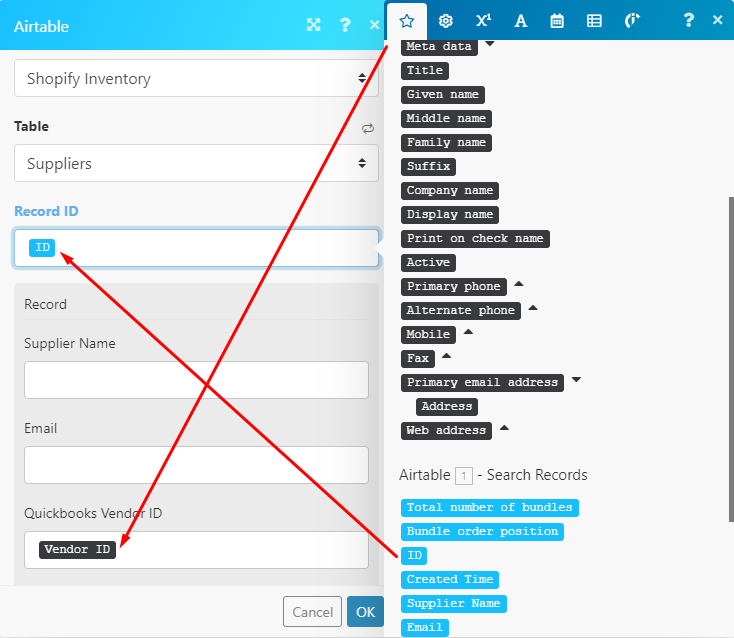
Map the "Vendor ID" element from the "QuickBooks > Create a Vendor" module to the "QuickBooks Vendor ID" field in your Airtable "Update a Record" module. This action populates your Airtable with the unique identifier from QuickBooks.
As with the previous scenario, remember to add a filter between the first Airtable module and the QuickBooks module. Configure this filter in the exact same way you did for Scenario A, ensuring it only proceeds if records are found, thereby preventing errors.
Step 4: Testing the Scenario
Once you have completed the configuration of all modules and added the necessary filter, it's time to test the supplier synchronization scenario. Click the "Run once" button in Make.com to observe its execution.
For the scenario to work correctly, your "Suppliers" table in Airtable should contain some records. If it's empty, no vendors will be created in QuickBooks. The visual below illustrates a successful execution, where suppliers are created as vendors in QuickBooks, and their respective "Vendor IDs" are updated back in Airtable.
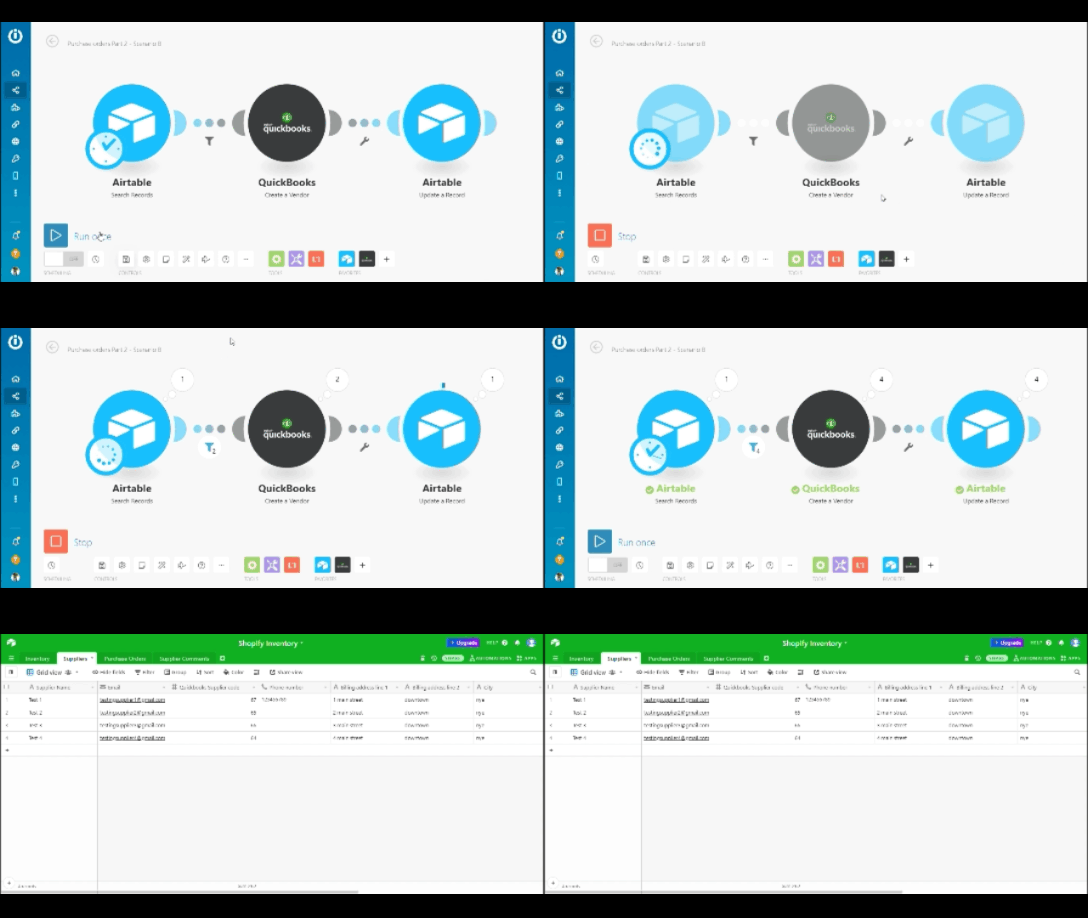
You can schedule this scenario to execute concurrently with Scenario A, or immediately after it, depending on your preference. This ensures that both your product and supplier data are consistently synchronized between Airtable and QuickBooks.
Before we conclude this part of the series, there's one crucial manual step that underpins the effectiveness of the entire procurement automation system.
Step 5: Adding the Supplier/Vendor to an Item on the Table
Now that you have successfully synchronized both your product items (with their QuickBooks Item IDs) and your suppliers (with their QuickBooks Vendor IDs) across Airtable and QuickBooks, there's a final, essential manual step to complete. This step involves linking specific products to their respective suppliers within your Airtable base.
Navigate to your Airtable Base and open the "Inventory" table. Here, you will manually associate each product record with its corresponding supplier. This is done by entering the "Vendor ID" from the "Suppliers" table into the "QuickBooks Vendor ID" column of the relevant product record in the "Inventory" table.
This data linkage is critically important for the next phase of our automation series (Part 3), where we will focus on automatically creating purchase orders. Without this manual connection, the system wouldn't know which supplier to send a purchase order to for a given product.

While this step requires manual input, it provides the necessary intelligence for the automated purchase order system. If you prefer to create purchase orders manually, you could input vendor names instead of Vendor IDs, but using the IDs is essential for full automation.