
Notion's recent button feature allows for powerful automation of tasks directly within your Notion workspace. These native buttons are excellent for streamlining internal Notion database actions, such as adding new items to a to-do list, navigating between pages, or assigning tasks to team members.
However, the true potential of Notion buttons can be unlocked when they are integrated with external applications. If your goal is to have a Notion button trigger actions outside of Notion, you'll need to connect it to an automation platform like Make (formerly Integromat). This guide will walk you through the process of creating Notion buttons that can interact with other apps, making your Notion workspace an even more central hub for your workflows.
The setup process for a Make-powered Notion button is straightforward and highly effective. By following the steps outlined below, you'll be able to execute actions in various external applications with a simple click from your Notion page. This significantly expands the utility of Notion buttons beyond their default capabilities.
Step 1: Create your Notion button
Instead of using Notion's built-in /button command, which is limited to internal Notion actions, we will begin by creating a callout block. This callout block will then be formatted and customized to visually resemble a button, providing the desired aesthetic while allowing for external integration.
To initiate this, locate the desired position for your button on your Notion page and click the + icon. From the menu that appears, select "Callout." This will insert a callout block into your page, which will serve as the foundation for your custom button.
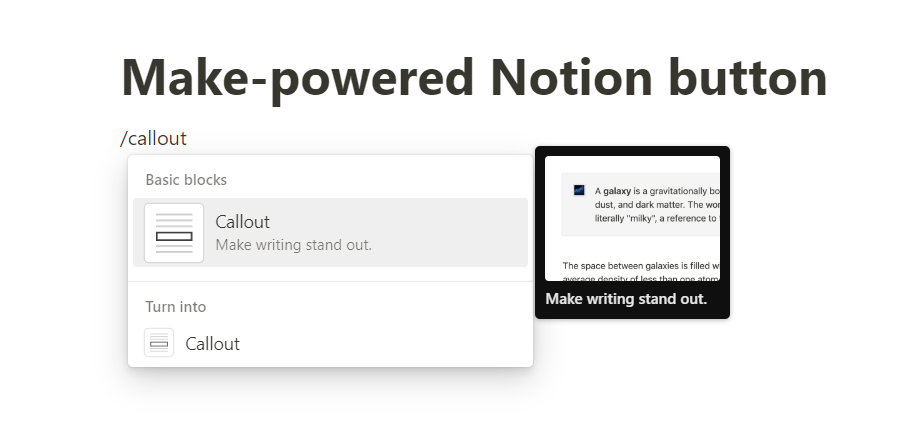
By default, a callout block spans the entire width of the editable area in Notion. If you prefer a more compact button, you can insert columns into your Notion page before adding the callout block. A three-column layout is often recommended for an optimal button width, but you can adjust this based on your specific design preferences.
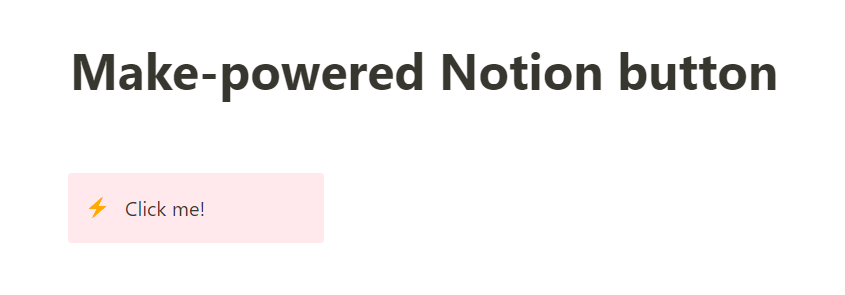
Once the callout block is in place, you can customize its appearance. Type the desired button text directly into the callout. Notion also allows you to change the callout's background color and select an icon, further enhancing its resemblance to a functional button. At this stage, the button is purely visual and does not yet trigger any actions.
The visual customization is crucial for making the callout block intuitive and user-friendly. Choose a color scheme and icon that clearly communicate the button's purpose. While the button is not yet functional, these aesthetic choices lay the groundwork for a seamless user experience once the automation is configured.
Step 2: Set up a webhook in Make and link it to your Notion button
To enable your Notion button to trigger actions in other applications, you'll need to connect it to a custom webhook in Make. A webhook acts as a unique URL that, when accessed, instantly sends data to another application. In this context, clicking your Notion button will essentially "call" this webhook, initiating a predefined automation scenario within Make.
This setup allows Make to act as an intermediary, receiving the signal from your Notion button and then executing a series of actions in various integrated apps. The ultimate outcome is that your Notion button becomes a powerful trigger for cross-application workflows.
To begin, log into your Make account and create a new scenario. Within this new scenario, select the "Custom webhook" trigger module. This module is specifically designed to listen for incoming data from external sources like your Notion button.
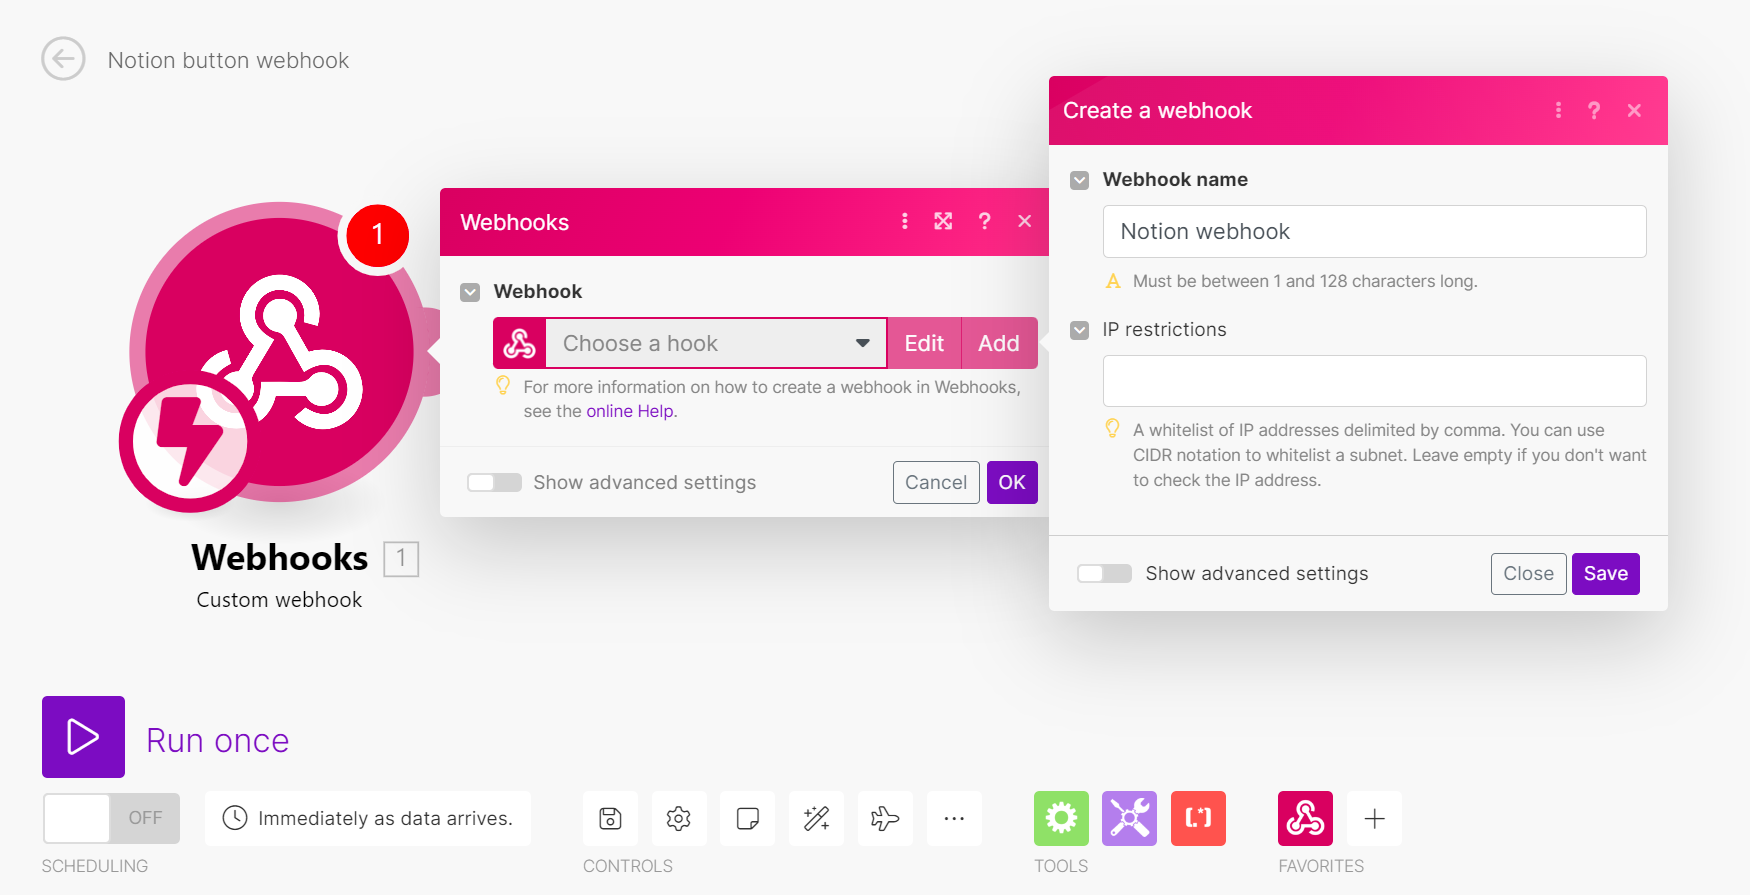
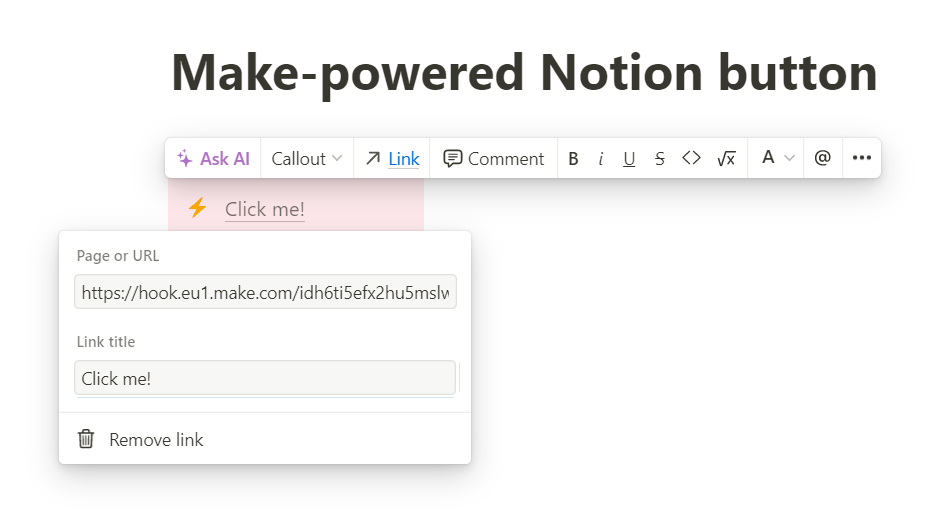
Once the custom webhook module is added, click the "Add" button next to the Webhook field to generate a new, unique webhook URL. Make will then display this URL. It is crucial to copy this URL accurately, as it will be the link that connects your Notion button to your Make automation.
Finally, return to your Notion page and link the text within your custom callout button to this copied webhook URL. This establishes the connection: whenever someone clicks the text within your Notion button, it will activate the Make webhook, thereby triggering your automation scenario.
Step 3: Set up your Make scenario’s actions
With your Notion button now linked to a Make webhook, the next step is to define what actions Make should perform when the button is clicked. This involves adding various action modules to your Make scenario, each corresponding to a specific task in an external application. The possibilities for these actions are extensive, allowing for highly customized and powerful automations.
To illustrate the versatility of this setup, we will explore three practical examples: automatically duplicating a Google Doc template, updating your Slack status, and scheduling a Google Calendar event. These examples demonstrate how a single Notion button can streamline diverse aspects of your daily work.
Consider the potential for efficiency gains. Instead of manually performing these repetitive tasks, your Notion button can execute them instantly, freeing up your time for more strategic work. Let's delve into building these specific automations.
1. A Notion button that creates a copy of your Google Doc template
If you frequently use a specific Google Doc as a template for new documents, you can automate the duplication process with a Notion button. This means that with a single click, a fresh copy of your template will be created, ready for you to start writing, without the need to navigate through Google Drive.
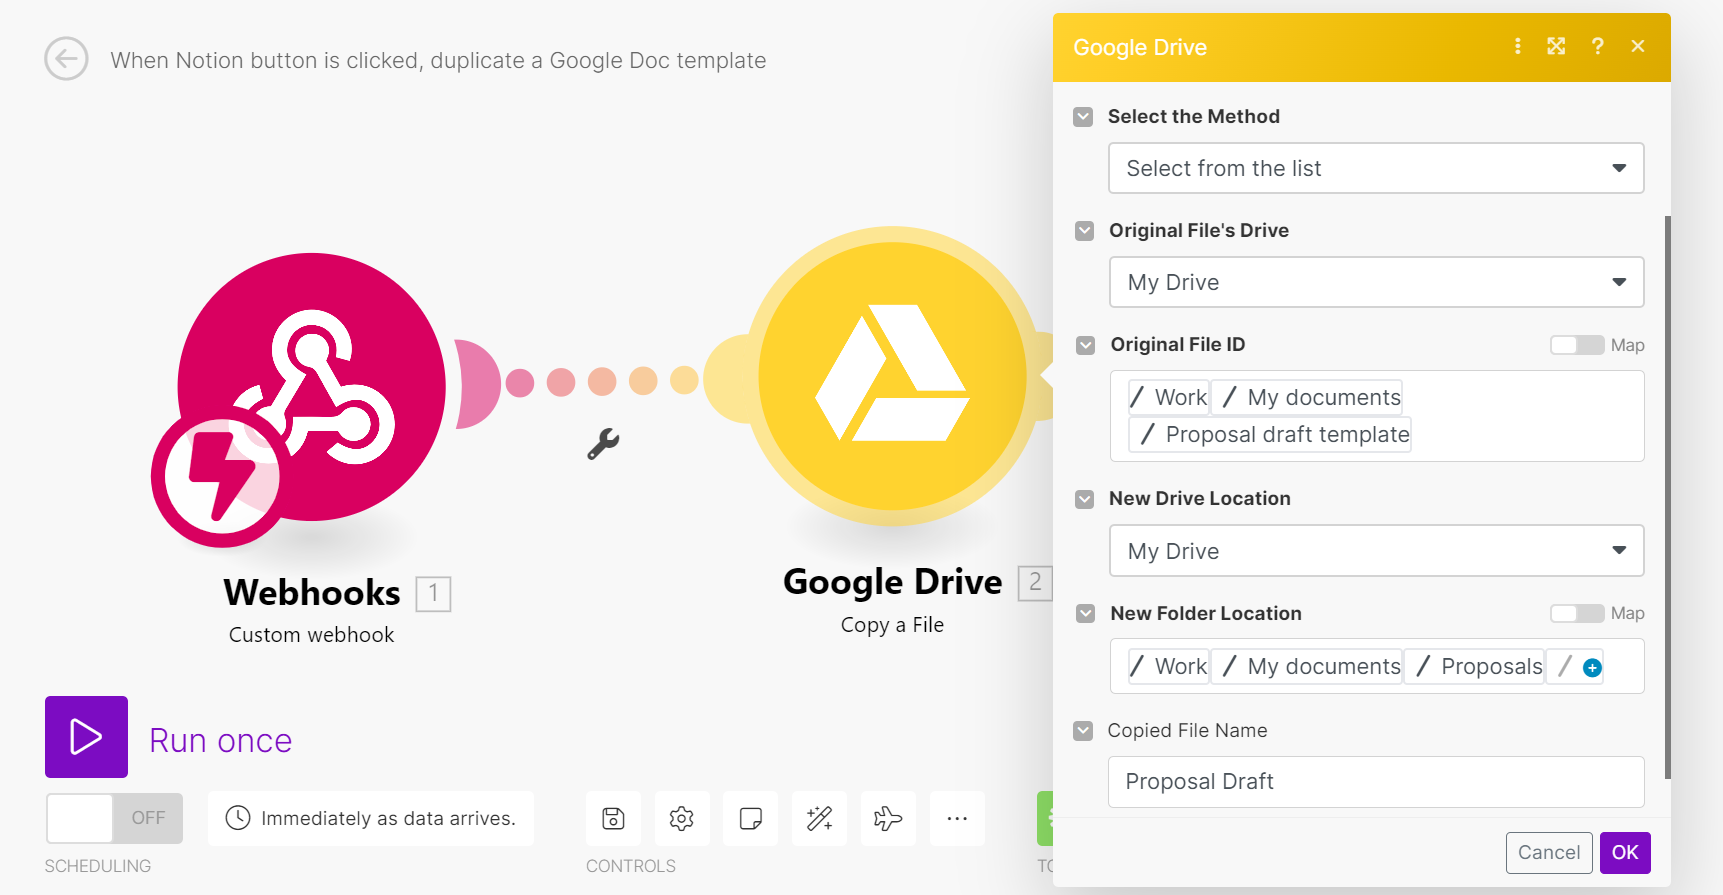
To set this up, add the "Google Drive > Copy a File" module to your Make scenario, connecting it to your custom webhook trigger. Within this module, configure the settings to specify the source and destination of the file. You'll need to select the Google Drive where your template is stored (e.g., "My Drive" or "Shared With Me") and then choose your specific Google Doc template from the "Original File ID" dropdown list.
Further configuration involves selecting the target Google Drive and the specific folder within it where you want the duplicated document to be saved. Finally, you'll provide a name for the new, duplicated Google Doc. This ensures that each new document is organized and easily identifiable.
Once the setup is complete, it's essential to test your automation. In Make, click "Run once" for your scenario, then go to Notion and click your custom button. Check your Google Drive to confirm that a copy of your template has been created in the designated folder. Your Notion button should also open a new web page displaying "Accepted," indicating a successful webhook trigger. After confirming functionality, save and activate your Make scenario.
2. A Notion button that updates your Slack status to “Out for lunch” for one hour
For organizations using Slack, a Notion button can provide a quick way to manage your availability. Imagine a button that instantly updates your Slack status to "Out for Lunch" for a set period, automatically clearing it afterward. This eliminates manual updates and ensures your team is always aware of your status.
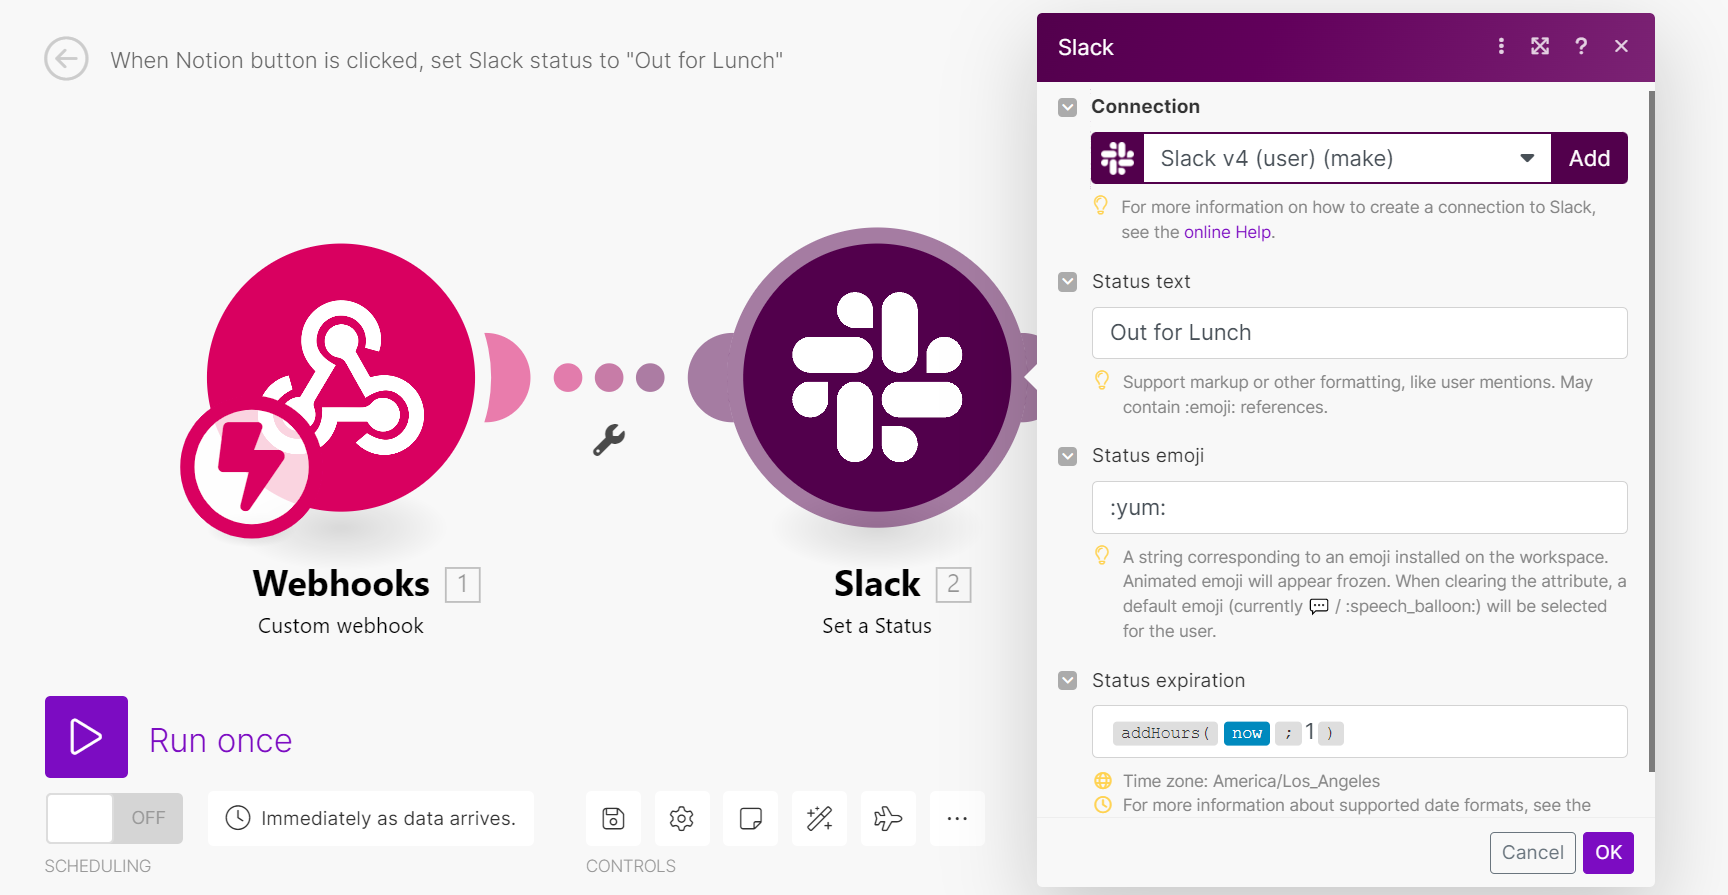
To implement this, add the "Slack > Set a Status" module to your Make scenario, following your custom webhook trigger. In the module's configuration, set the "Status text" field to "Out for Lunch." You can also include a relevant emoji and, importantly, define an expiry date for the status.
A useful formula for setting a temporary status is {{addHours(now; 1)}}. This expression will automatically clear your Slack status one hour after you click the Notion button, ensuring you don't forget to change it back. Remember, if you need different buttons for various statuses, each will require its own webhook and Make scenario.
Test the scenario by running it in Make and clicking your Notion button. Verify that your Slack status updates correctly. If it does, clear your status manually (to avoid confusion) and then save and activate your Make scenario. This automation provides a convenient way to manage your availability with minimal effort.
3. A Notion button that adds a Google Calendar event to block out your Friday afternoon for a meeting
Manually creating calendar events can be time-consuming, especially for recurring or common meetings. A Notion button can automate this, allowing you to block out time in your Google Calendar with a single click. This is particularly useful for scheduling regular team meetings or dedicated focus time.
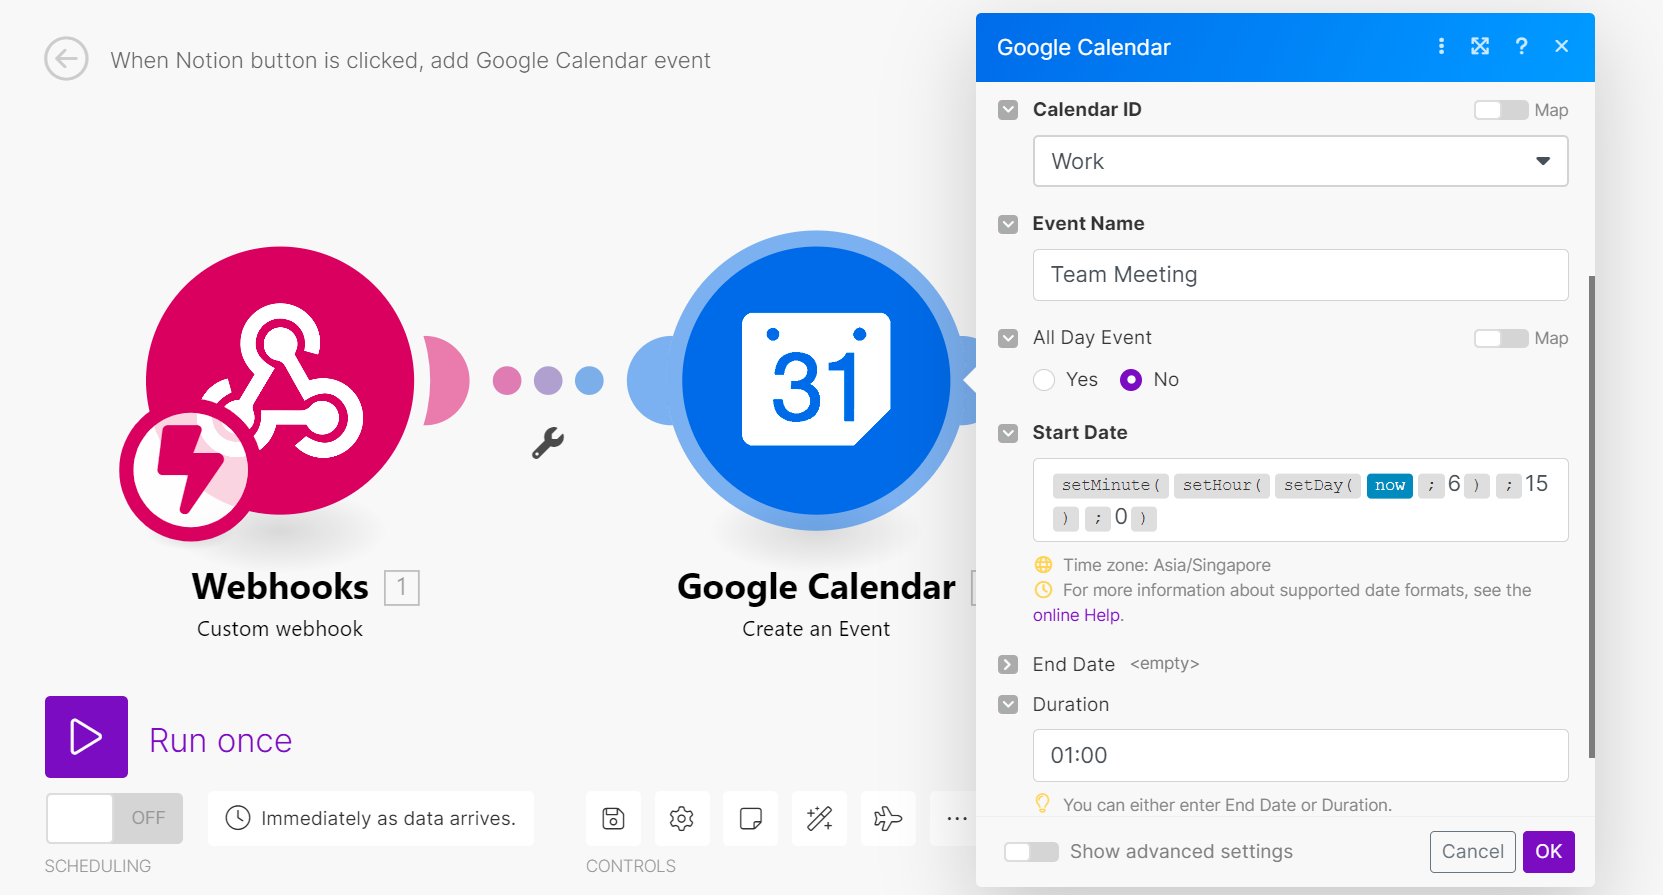
To set this up, create a new Make scenario with a custom webhook trigger, similar to the previous examples. Then, add the "Google Calendar > Create an Event" module. Begin by configuring the module with your Calendar ID and a descriptive "Event Name," such as "Team Meeting."
Next, you'll use Make's date and time functions to specify the event's start date and time. For instance, to schedule an event for the upcoming Friday at 3 PM, you would use the formula {{setMinute(setHour(setDay(now; 6); 15); 0)}} in the "Start Date" field. This formula dynamically calculates the date and time, ensuring the event is always scheduled for the next Friday at 3 PM.
Pro tip: Make's date and time functions are incredibly powerful. Explore the documentation for setDay(), setHour(), and setMinute() to create dynamic event scheduling based on current date, day of the week, and time, making your calendar automations highly flexible.
Finally, you can specify either the event's end date or its duration. You can use similar date and time functions for the end date or simply provide a duration in HH:mm format. This completes the event creation setup.
Test the Make scenario by running it and clicking your Notion button. Verify that a new event titled "Team Meeting" appears in your Google Calendar for the upcoming Friday. If successful, save and activate your scenario. This automation is a significant time-saver for anyone who regularly schedules meetings or blocks out specific times in their calendar.
Notion's databases are excellent for centralizing information and processes within the platform. However, their native buttons have limitations when it comes to interacting with external applications. This is where Make steps in, seamlessly bridging this gap and extending the functionality of your Notion workspace.
By leveraging Make's custom webhooks, you can transform simple Notion callout blocks into powerful buttons that trigger complex automations across thousands of applications. This integration allows you to move beyond basic internal Notion actions and create dynamic workflows that connect your Notion data with your entire tech stack.
The process is straightforward: sign up for a Make account, generate your custom webhooks, and configure your scenarios. With this setup, you can create Notion buttons that not only enhance your productivity but also make your databases more interactive and useful than ever before, truly unlocking the full potential of your Notion workspace.