Connecting different Airtable bases is a common requirement for businesses that manage and share data across various processes. This functionality is crucial for maintaining organized workflows and ensuring data consistency.
Project managers, sales directors, and many other professionals frequently encounter scenarios where they need to transfer information between bases. The ability to link bases effectively can significantly enhance operational efficiency and data management.
Linking Bases in Airtable: Two Sequences of Events
When considering how to link Airtable bases, it's helpful to understand the two primary types of data transfer sequences. Each sequence addresses a different need and complexity level in data management. This guide will focus on the simpler, more common scenario of copying records.
The first and most straightforward sequence involves copying records from one base to another. This process is initiated when new records are created or added to a primary base (Base A), and based on specific conditions, selected records are automatically duplicated in a secondary base (Base B). This method is ideal for distributing tasks or information without altering the original data.
The conditions for copying records are entirely customizable and depend on your specific workflow requirements. For instance, if you manage a project with various tasks in Base A, you might want to automatically send design-related tasks to a designer's base (Base B). This prevents team members from needing access to the main project base while still receiving their assigned work.
These conditions can be based on various data points within your Airtable records. You could trigger a copy based on specific text or keywords in a field, the selection of certain single-select items, the status of a checkbox, or even the assignment of a collaborator or an email address. The flexibility of these conditions allows for highly tailored automation.
The second, more advanced sequence involves not only copying records but also updating the original records in Base A when changes are made in Base B. This requires a two-way synchronization, making the setup more complex. While powerful, this advanced scenario will be covered in a separate guide due to its intricate nature.
For this article, we will concentrate on the first sequence: automatically copying records from one Airtable base to another using Make.com. This approach is the most accessible way to begin linking your Airtable bases and immediately see the benefits of automation. To follow along, you will need a Make.com account. If you don't have one, you can register for free.
Using a Real-Life Example to Link Bases in Airtable
To illustrate the process of linking Airtable bases, we will use a practical, real-world example involving two distinct bases. This scenario is common in many organizations and highlights the utility of automated data transfer.
Our example will feature a "Social Media Content Calendar" (Base 1) and a "Designer's Base" (Base 2). Social media content calendars are frequently used by companies to plan and manage their content efforts, often requiring input from multiple team members such as managers, writers, and designers. Managing all these contributions within a single base can quickly become chaotic.
To mitigate this, a more efficient solution involves using multiple Airtable bases. The primary base, managed by a team lead, can be used to create and oversee all tasks. Then, secondary bases can be created for each team member, such as a writer's base or a designer's base, to receive only the tasks relevant to them.
In this setup, the team lead maintains control over the main content calendar, where all tasks are initially created. The crucial part is linking this main base to a secondary one, like the Designer's Base. This allows for the automatic copying of specific records or tasks assigned to a designer into their dedicated base.
For instance, if a new social media post requiring a graphic is added to the Social Media Content Calendar, that specific task will be automatically duplicated in the Designer's Base. This ensures designers receive their assignments promptly and without manual intervention, improving workflow efficiency. While our example uses two bases for simplicity, this method can be scaled to connect any number of secondary bases to your main one.
Step 1: Airtable Bases
The first step in linking your Airtable bases is to set them up correctly. For our example, we'll establish two bases: the "Social Media Content Calendar" (Base 1) and the "Designer's Base" (Base 2).
Base 1, the Social Media Content Calendar, serves as the central hub for the team lead to create tasks and monitor content creation progress. This base typically includes columns for publication date, target platforms (e.g., Facebook, Twitter, Instagram), content type (e.g., text, text + image, link + image), post title, copy, final copy version, status, creation timestamp, last modification timestamp, and attachment/image fields.
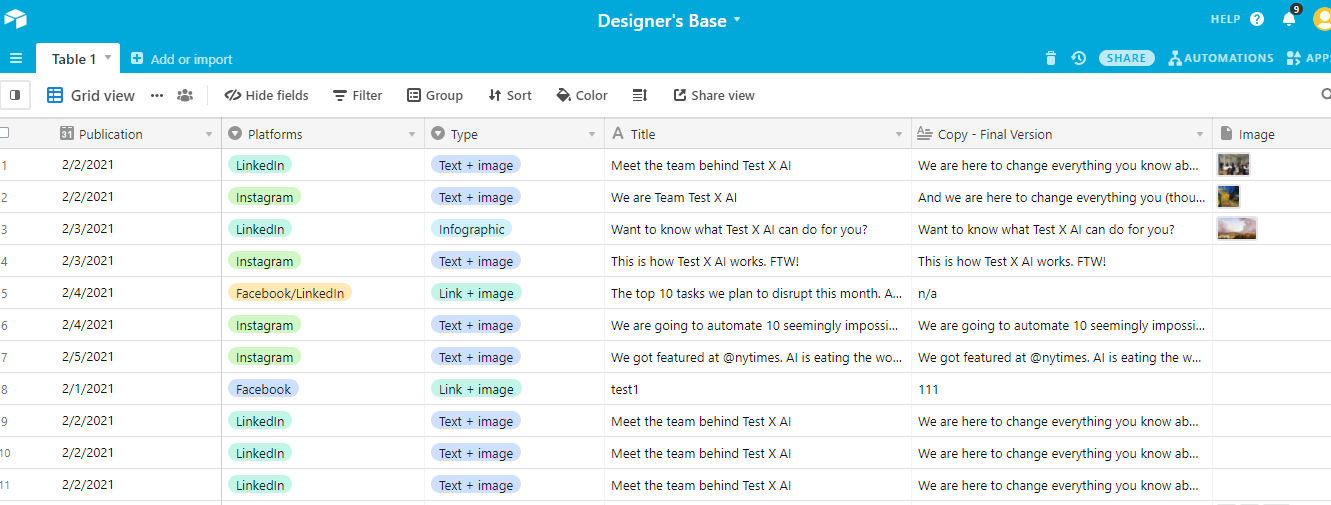
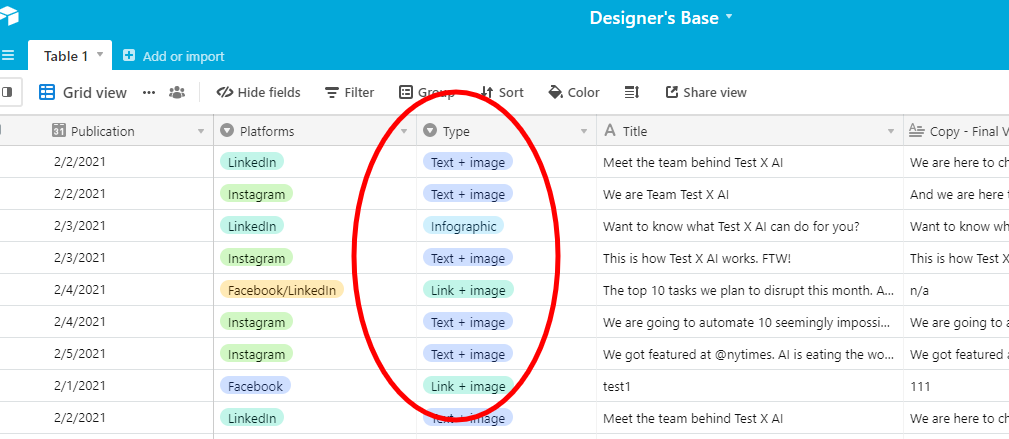
Base 2, the Designer's Base, is a streamlined version of Base 1, containing only the information essential for the designer to complete their tasks. This typically includes columns such as publication date, platform (as design specifications can vary by platform), type of post, title of post, final copy version, attachments/image, and last modified time. This focused approach ensures designers only see relevant information, reducing clutter and improving clarity.
Once both bases are structured with the necessary columns, you can proceed to set up the Make.com scenario that will automate the linking process. This foundational step is crucial for ensuring that the data transfer is accurate and efficient.
Step 2: Creating the Make Scenario
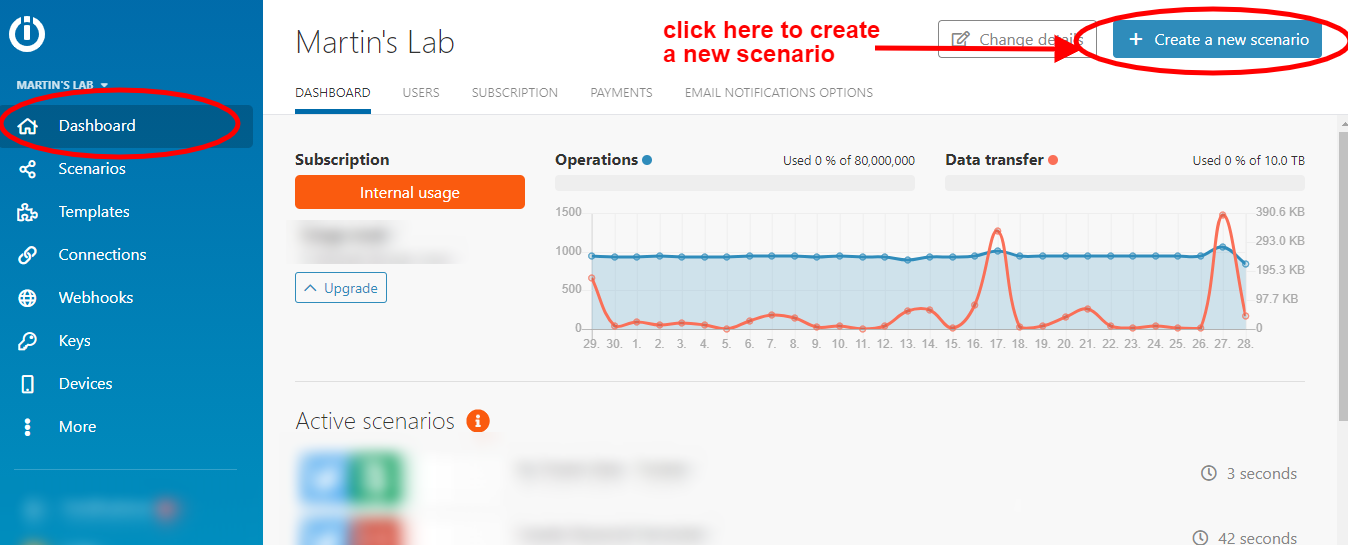
With your Airtable bases prepared, the next step is to configure the automation in Make.com. Begin by logging into your Make.com account. From your dashboard, you'll initiate the creation of a new scenario, which is the core of your automation workflow.
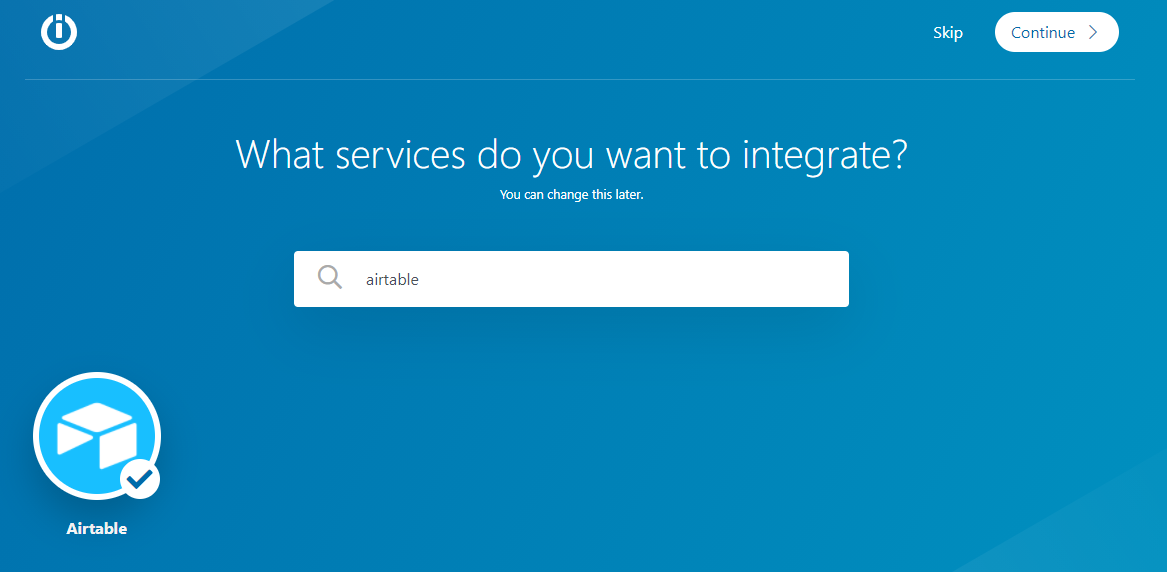
After selecting to create a new scenario, you will be prompted to choose the application module that will act as the trigger. In this case, you will select the Airtable app. Once selected, click the "Continue" button located in the upper right corner of the screen to proceed to the scenario builder.
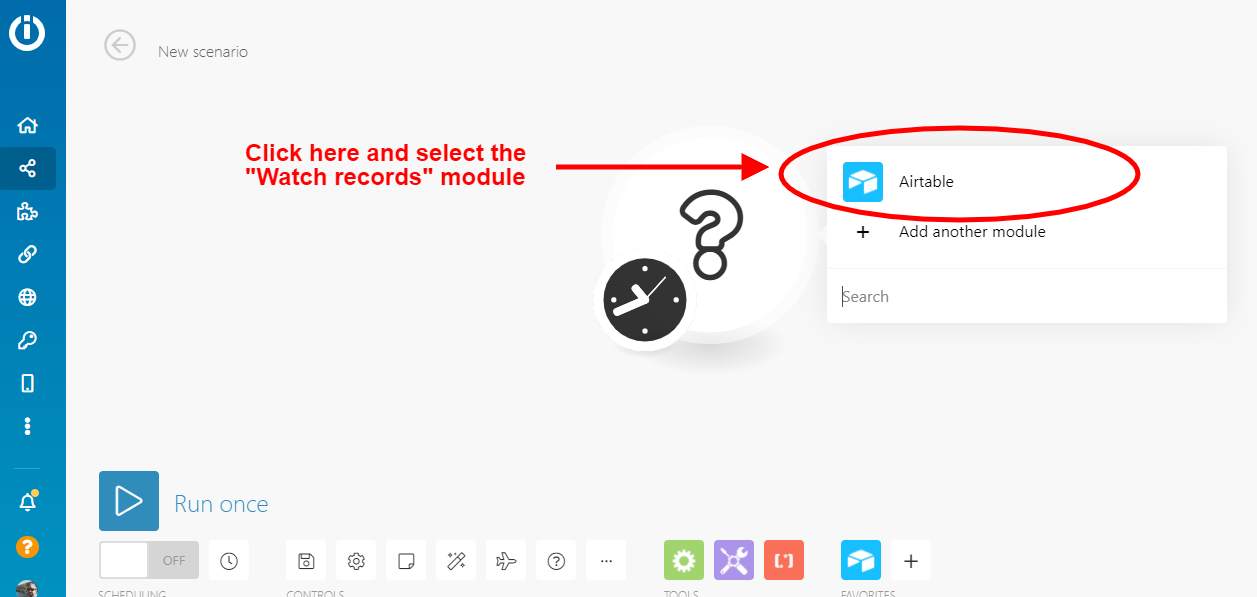
The scenario builder, also known as the visual canvas, is where you will visually construct your automation. The Airtable app will already be pre-loaded as your initial module. Click on this Airtable module, and from the available options, select the "Watch records" module. This module is designed to monitor your specified Airtable base for new or updated records, serving as the starting point for your automation.
After selecting "Watch records," you will then proceed to configure this first Make module. This configuration will define which Airtable base and table the scenario will monitor, and under what conditions it will trigger the automation.
Step 3: Configuring the "Watch Records" Airtable Module
This module is crucial as it instructs Make.com to continuously monitor your primary Airtable base (Base 1, the Social Media Content Calendar) for new records. The configuration process involves several key steps to ensure accurate data capture.
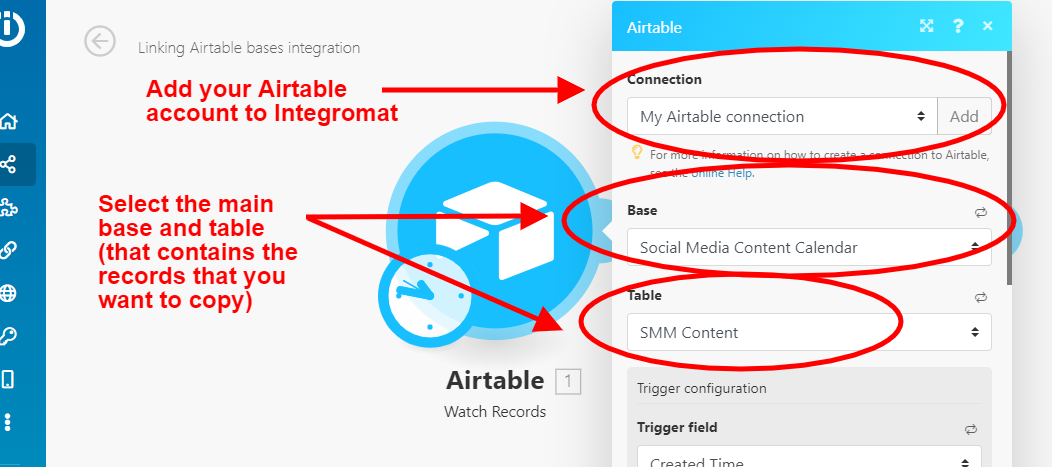
First, you need to establish a connection between your Airtable account and Make.com. Click on the "Add" button within the module settings to link your accounts. Once connected, you will then select "Social Media Content Calendar" as your main base and "SMM Content" as the specific table within that base that Make.com should watch.
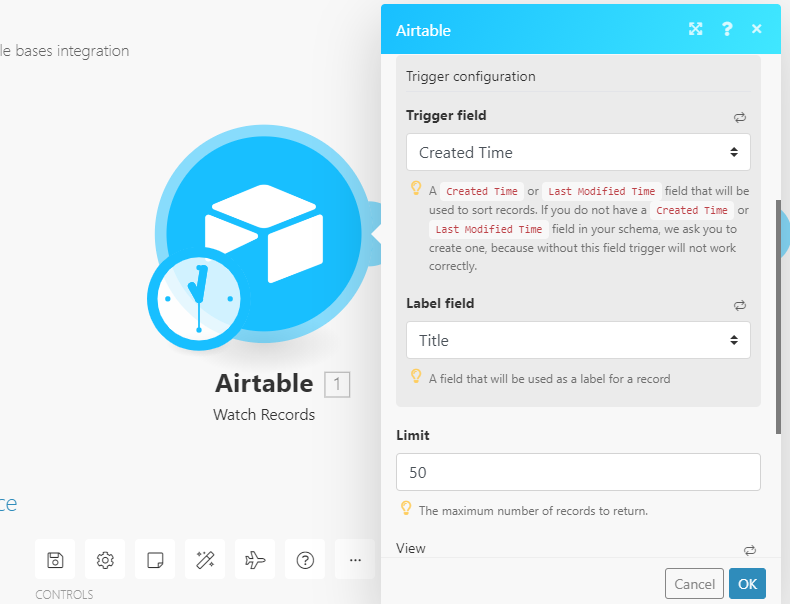
Next, you must configure the trigger field. To ensure Make.com watches every new record, regardless of its content, select "Created time" as the trigger. This means the scenario will activate whenever a new record is added to the table. It's highly recommended that your Airtable bases include "Created time" and "Last modified time" columns, as they simplify the creation of such integrations.
Additionally, set "Title" as the label field and specify a limit for the number of records to watch per cycle, for example, 50. This limit can be adjusted based on your daily record creation volume; if you typically add 200 records a day, setting the limit to 220 or 250 ensures all new entries are captured. The "View" and "Formula" fields can be left blank as they are not relevant for this specific setup. Once these settings are applied, click "OK" to save the module configuration.
Pro tip: Always include "Created time" and "Last modified time" fields in your Airtable bases. These fields are invaluable for setting up robust automation triggers and ensuring your scenarios capture all relevant changes and new entries efficiently.
Step 4: Scheduling Your Scenario
After successfully configuring the "Watch records" module, the next critical step is to define how frequently your Make.com scenario will execute. This is managed through the scheduling feature, which dictates the interval at which Make.com checks for new records in your Airtable base.
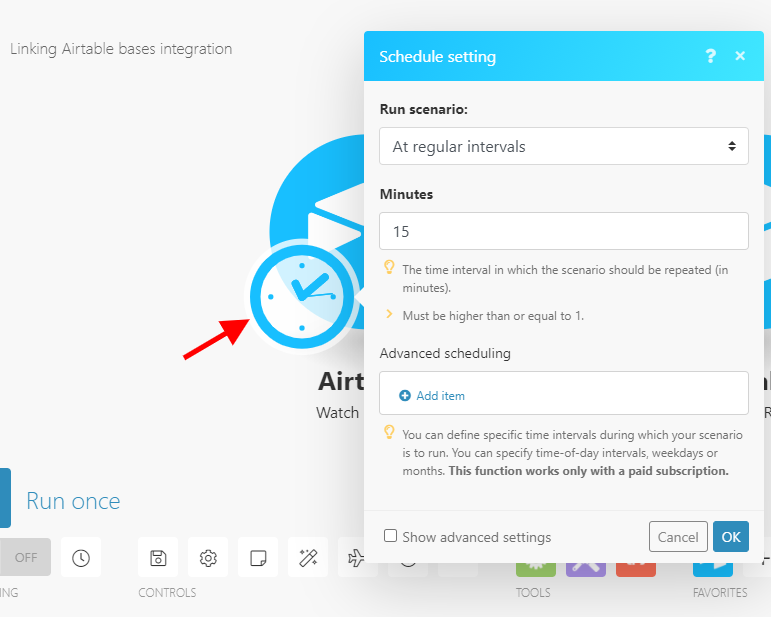
The scheduling module should appear automatically after you click "OK" on the previous step. If it doesn't, simply click on the small clock icon attached to your first Airtable module on the visual canvas. This will open the scheduling options.
For this example, we will set the scenario to run every 15 minutes, meaning Make.com will check for new records in your Social Media Content Calendar base every quarter of an hour. You can adjust this frequency to better suit your operational needs; for instance, if new tasks are added less frequently, you might choose a longer interval, or a shorter one for high-volume environments.
Make.com also offers advanced scheduling options, including the ability to process records retroactively. If you need to capture records created before the scenario was activated, you can select "Show advanced settings" and specify a past date from which Make.com should start watching records. Once your desired schedule is set, confirm the changes.
Step 5: Configuring the Second Airtable Module
With the first module set up to watch for new records, the next step is to define what happens to those records. This involves adding and configuring the second Airtable module, which will be responsible for creating new records in your secondary base.
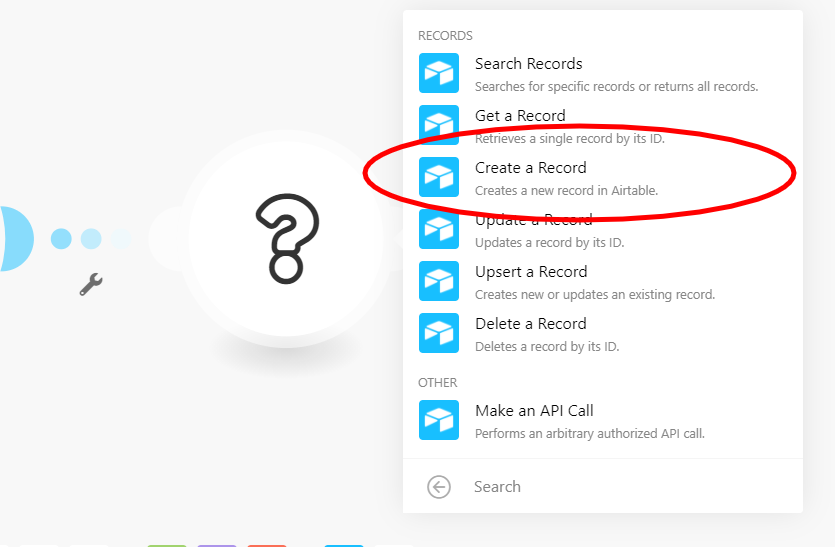
On the Make.com visual canvas, click the "plus" sign located next to your first Airtable module. This action will prompt you to select another app. Choose Airtable again, and then from the list of available modules, select "Create a record." This module will take the data from the records identified by the first module and use it to generate new entries in your designer's base.
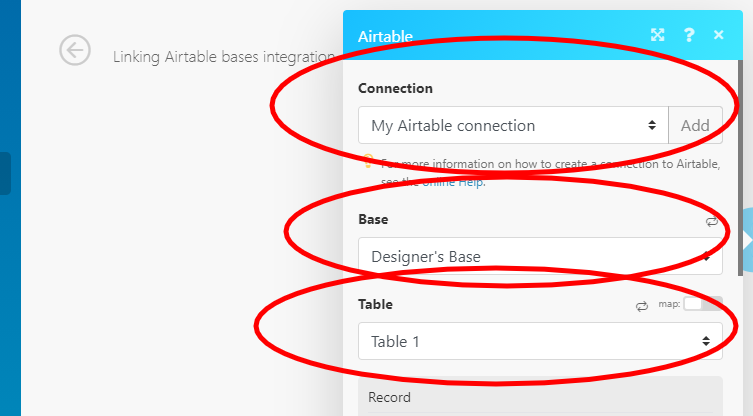
Similar to the first module, you'll need to configure this one by selecting your existing Airtable connection. Then, specify "Designer's base" as the secondary base and "Table 1" (or whatever you've named it) as the table where the new records will be created. This ensures the data is directed to the correct destination.
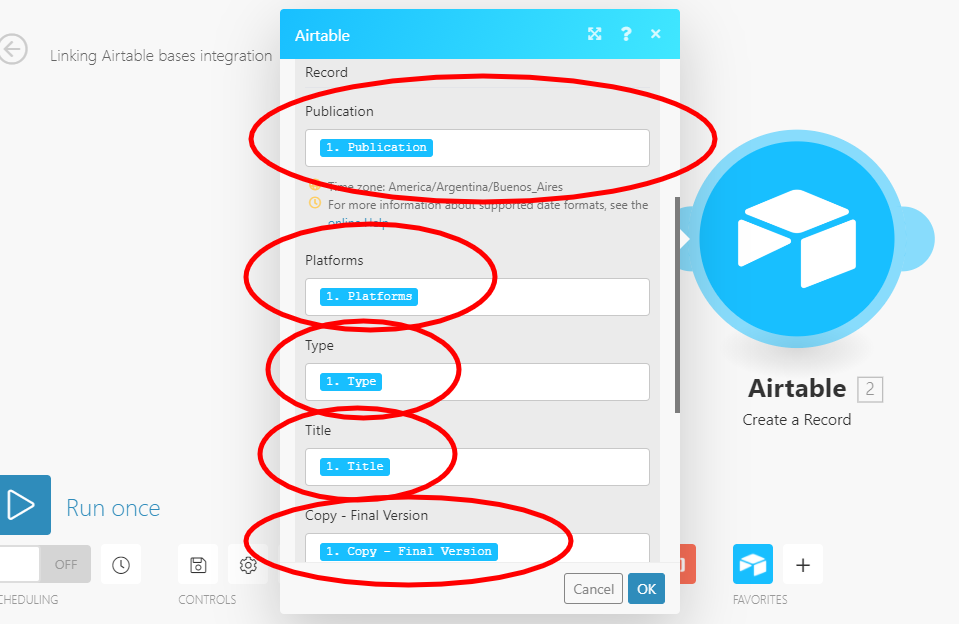
The final part of this module's setup involves mapping the data fields from Base 1 to Base 2. Since this scenario is designed to assign tasks to a designer, you will select relevant fields such as Publication date, Platforms, Type of task (e.g., Link + image, Text + image), Title, and Final copy version. Click on each field in the "Create a record" module and choose the corresponding data from the list provided by the first module. This mapping ensures that the correct information is transferred for each new record.
Now, the crucial question arises: how does the scenario determine which records are specifically meant for the designer's base? This is where a filter comes into play, ensuring that only relevant tasks are copied, preventing unnecessary data duplication.
Step 6: Configuring the Filter
The filter is an essential component of this scenario, as it prevents all records from Base 1 from being indiscriminately copied to Base 2. Its purpose is to establish specific conditions that a record must meet before it is transferred, ensuring that only relevant data reaches the secondary base.
To set up the filter, locate the small wrench icon positioned between your first ("Watch records") and second ("Create a record") Airtable modules on the Make.com visual canvas. Click this icon and select the "Set up a new filter" option. This action will open a configuration window where you can define your filtering criteria.
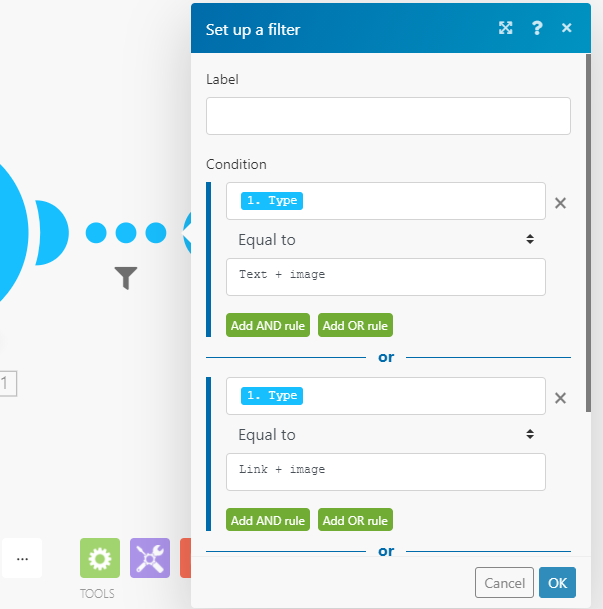
Within the filter setup, you will define the conditions that a record must satisfy to be copied. For our example, since we want to send only design-related tasks to the designer's base, we will configure the filter to look for specific values in the "Type" column of Base 1. These values include "Text + image," "Link + image," and "Infographic."
By implementing this filter, the scenario will only process and copy records where the "Type" column contains any of these specified text strings. This ensures that the designer's base remains focused solely on tasks requiring their creative input. It's crucial to ensure that the text you enter into the "Equal to" field precisely matches the options in your Airtable's "Type" column, including any spaces or capitalization, to avoid errors in condition recognition.

Pro tip: When setting up text-based filters, always double-check for exact matches, including spaces and capitalization. Even a minor discrepancy can prevent your automation from triggering correctly.
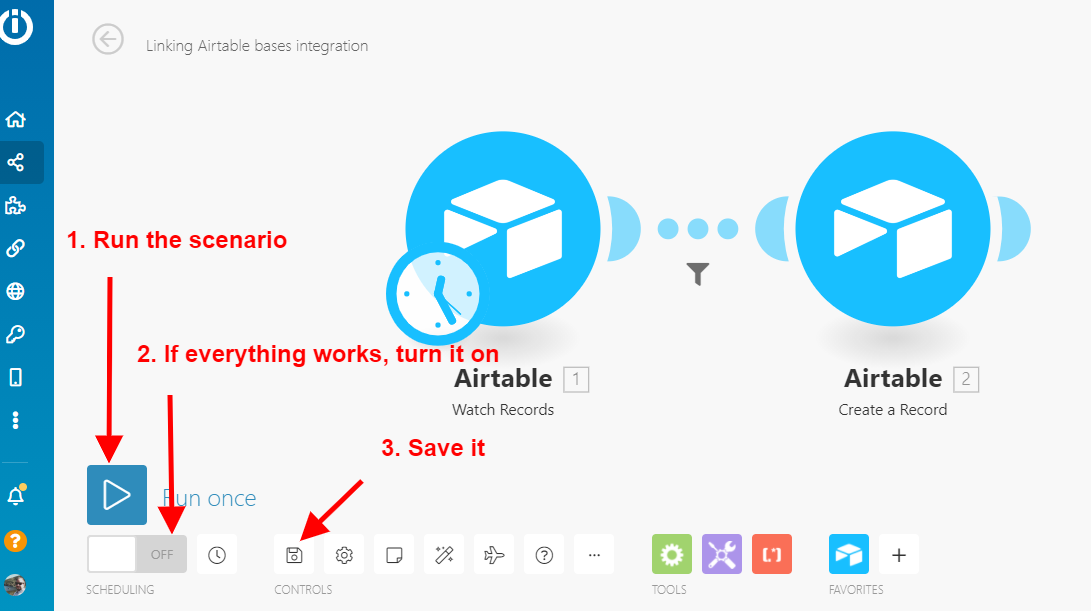
Step 7: Run the Scenario
Once you have completed the filter configuration, the final step is to test and activate your Make.com scenario. This ensures that all components are working together as intended and that records are being copied correctly between your Airtable bases.
To do this, first, initiate a test run of your scenario. This will allow you to observe the flow of data and verify that records meeting your filter criteria are indeed being transferred to the Designer's Base. If the test run is successful and everything functions as expected, you can then proceed to activate the scenario.
After confirming its functionality, save your scenario. With the scenario turned on, Make.com will now continuously monitor Base 1, filter records based on your defined conditions, and automatically send the relevant tasks to Base 2. This automation ensures that your designer receives their assignments without any manual effort, significantly streamlining your workflow and improving overall efficiency.
This automated process effectively organizes tasks and workflows involving multiple teams, eliminates the need for manual data entry, enhances data visibility by providing tailored views, and helps categorize and decentralize large databases. By connecting your Airtable bases in this manner, you unlock greater efficiency and order within your organization.