
Sending Xero invoices to multiple email addresses can often be a challenge using Xero's standard features. While Xero offers a built-in email function, it comes with several limitations that can hinder efficient and professional communication. For instance, all saved email addresses for a contact typically appear in the "From" field, preventing the discreet use of CC or BCC. This can be problematic when you need to keep certain recipients private or include internal stakeholders without them being visible to the primary client.
Furthermore, Xero's default email templates may not always align with your brand's voice or specific communication needs. Constantly editing these templates for each invoice is a time-consuming and repetitive task. Another drawback is that recipients can see the email originates from Xero's postmaster address, which might reduce the perceived professionalism compared to an email sent directly from your own email client. These limitations can make managing invoice distribution cumbersome, especially for businesses that frequently send invoices to multiple parties.
Some businesses might consider integrating Xero with an email marketing tool like Mailchimp. However, this approach is often overkill if your primary goal is simply to send invoices rather than elaborate newsletters. Moreover, accessing Xero's native integrations with such tools often requires a premium Xero account, adding unnecessary costs. Fortunately, there's a more flexible and cost-effective solution: leveraging an automation platform like Make.com.
This tutorial will guide you through building a simple yet powerful automation using Make.com. The core idea is straightforward: when an invoice is approved in Xero, Make.com will use a regular email client, such as Gmail, to send that invoice to the main recipient. Crucially, it will also allow you to BCC or CC other relevant email addresses, such as those for internal management or finance departments, ensuring all necessary parties are informed without compromising privacy. This solution requires only a Make.com account and a few minutes of your time to set up. Let's dive in and streamline your Xero invoice distribution process.
Step 1: Save your contacts’ email addresses in Xero
Before you can automate the sending of Xero invoices to multiple recipients, the first crucial step is to ensure that all relevant email addresses are correctly stored within Xero. Xero's contact management system allows you to associate multiple email addresses with a single organizational contact. This feature is fundamental to our automation, as it provides the source data that Make.com will later retrieve.
To begin, you'll need to create a new contact in Xero or edit an existing one. Within the contact's details, locate the sections for "Primary person" and "Additional people." The email address for the main recipient of the invoice should be entered in the "Primary person" section. Subsequently, any other individuals who need to receive a copy of the invoice (e.g., accounts payable, project managers, or internal finance teams) should have their email addresses added to the "Additional people" section. This structured approach ensures that all necessary email addresses are linked to the correct client record.
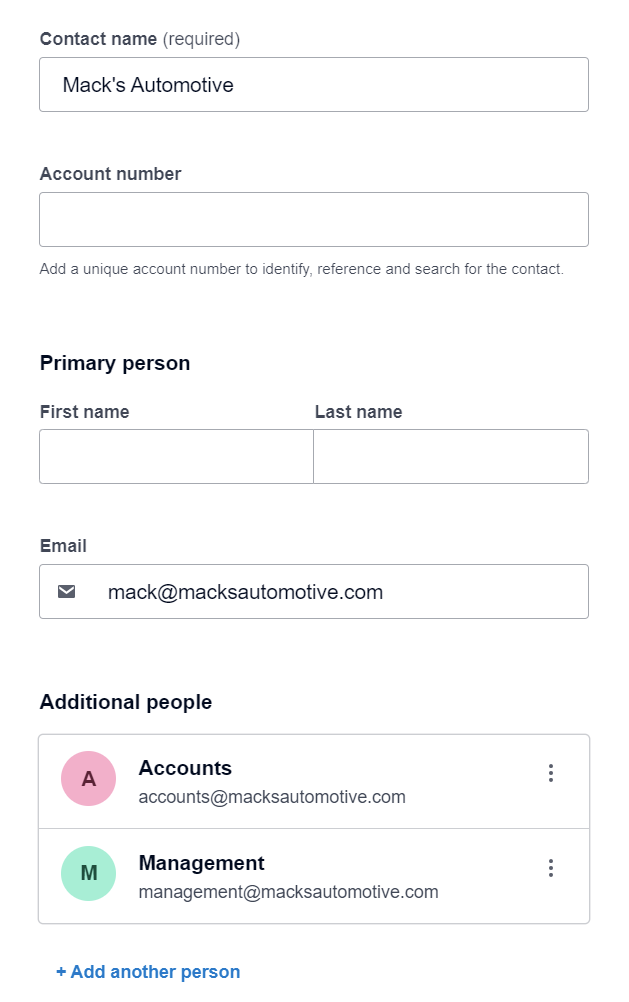
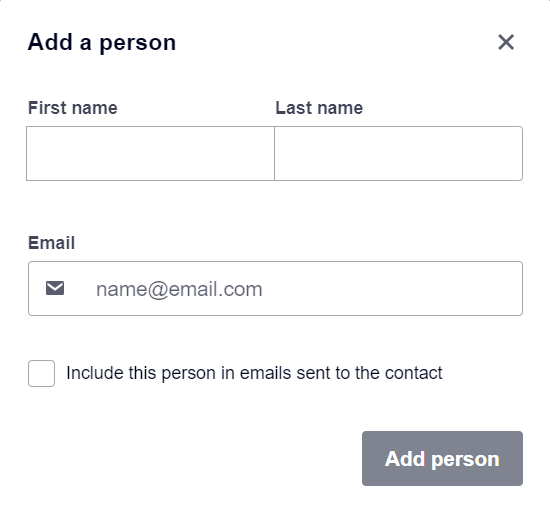
It's important to note a specific detail within Xero's contact setup: when adding additional people, you'll encounter a checkbox labeled "Include this person in emails sent to the contact." For the purpose of this Make.com automation, you should NOT enable this checkbox. This option is specifically designed to control whether Xero's native email service sends emails to that person. Since our automation will bypass Xero's built-in email functionality and use an external email client, this setting is irrelevant to our workflow. Leaving it unchecked ensures that Make.com retains full control over who receives the email, based on the logic we will define in the next steps.
By meticulously setting up your Xero contacts with all necessary email addresses, you lay the groundwork for a robust and efficient automation. This initial configuration is vital for Make.com to accurately pull the contact information and distribute your invoices as intended, ensuring that no important stakeholder is missed in the communication loop.
Step 2: Set up the Make scenario to automatically email Xero invoices to your Xero contacts
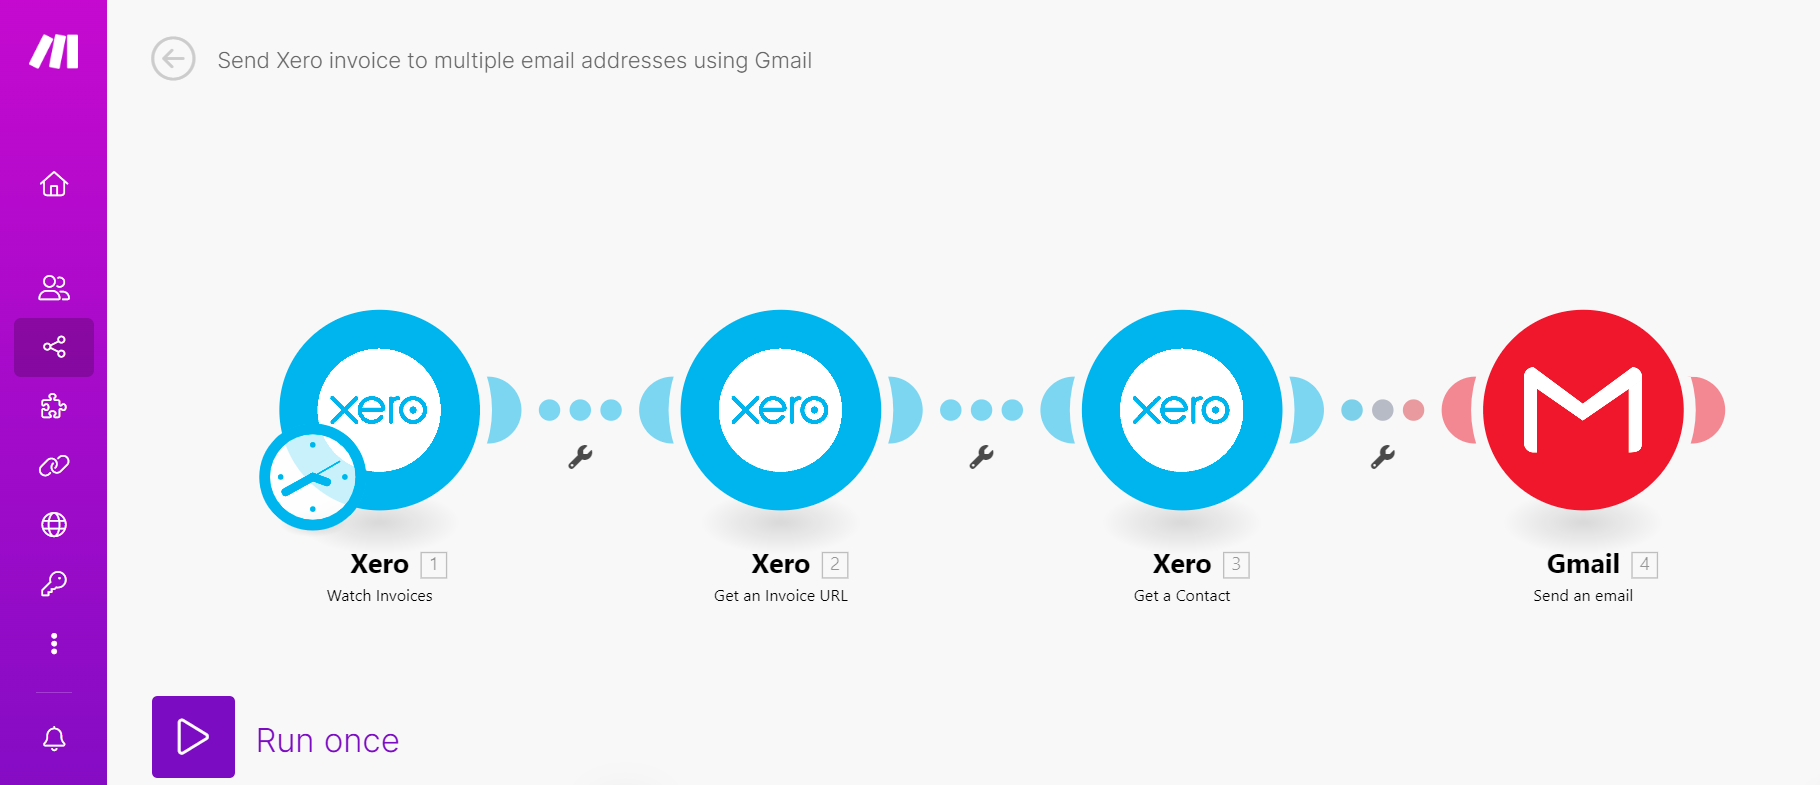
With your Xero contacts properly configured, the next phase involves building the automation scenario within Make.com. This scenario will act as the bridge between Xero and your email client, orchestrating the automatic delivery of approved invoices. The entire process is streamlined into four distinct modules, each serving a specific function in retrieving data and sending the email.
To begin, log into your Make.com account and create a new scenario. This visual workflow builder will allow you to connect different applications and define the sequence of actions. We will walk through configuring each of the four essential modules step-by-step, ensuring that your automation is set up correctly to handle Xero invoice distribution efficiently.
1. Watch for new invoices in Xero
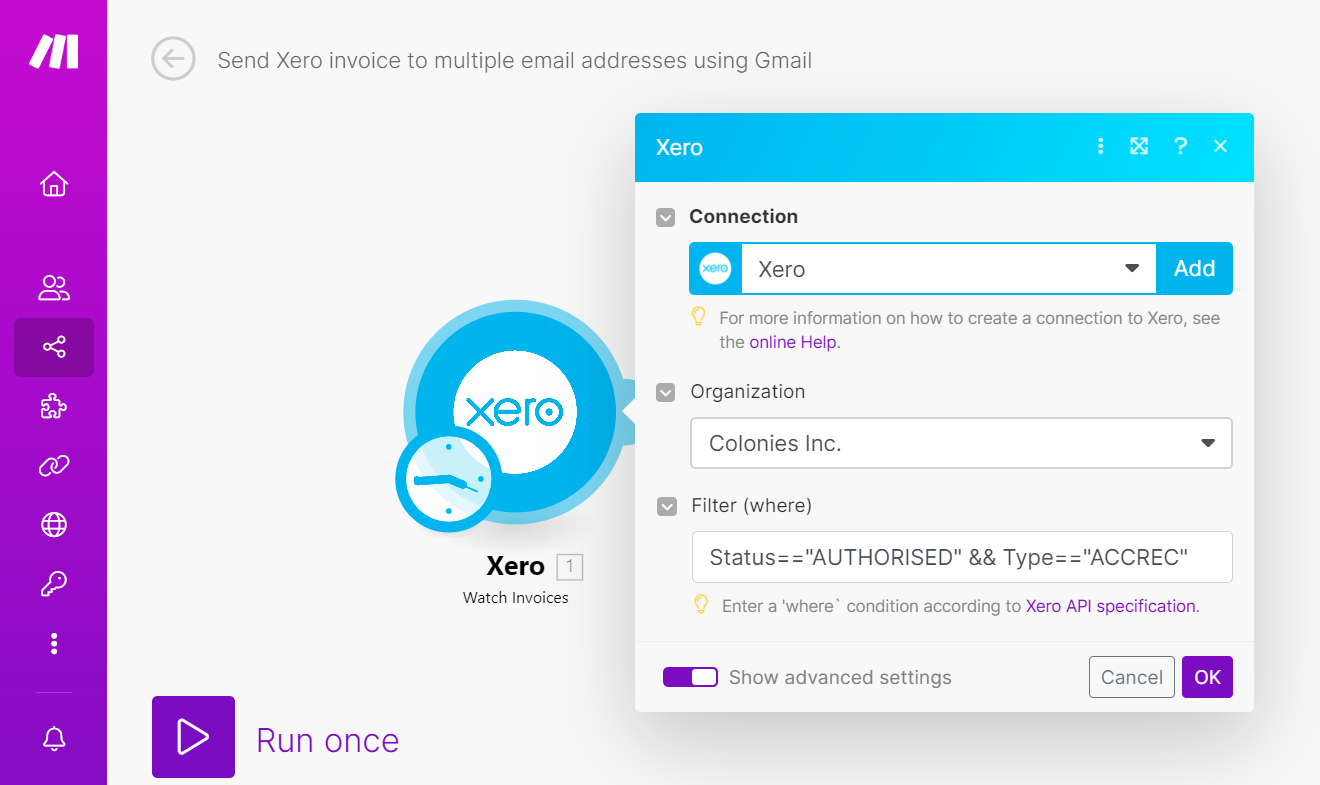
The first module in your Make.com scenario will be the trigger that initiates the entire automation. Search for and add the "Watch Invoices in Xero" module. This module is designed to continuously monitor your Xero account for new invoices that meet specific criteria you define. It acts as the starting point, listening for relevant events in Xero.
When configuring this module, it's crucial to specify which invoices you want the automation to process. To do this, toggle the "Show advanced settings" option within the module's configuration panel. Here, you will add a filter to the "Filter (where)" field. The recommended filter is: Status=="AUTHORISED" && Type=="ACCREC". This filter ensures that Make.com only triggers the scenario for invoices that have been approved (AUTHORISED) and are accounts receivable (ACCREC), meaning they are invoices owing to your business. This prevents the automation from sending out draft invoices or other types of transactions that are not meant for external distribution.
Once configured, this "Watch Invoices" module will diligently monitor your Xero account. Whenever a new invoice is approved and matches the specified criteria, it will capture key data about that invoice. This data typically includes the invoice number, the unique invoice ID, and importantly, the contact ID of the client to whom the invoice is addressed. This information is then passed on to the subsequent modules in your Make.com scenario, forming the foundation for retrieving more detailed information and ultimately sending the email.
2. Get the Xero invoice URL for the new invoice
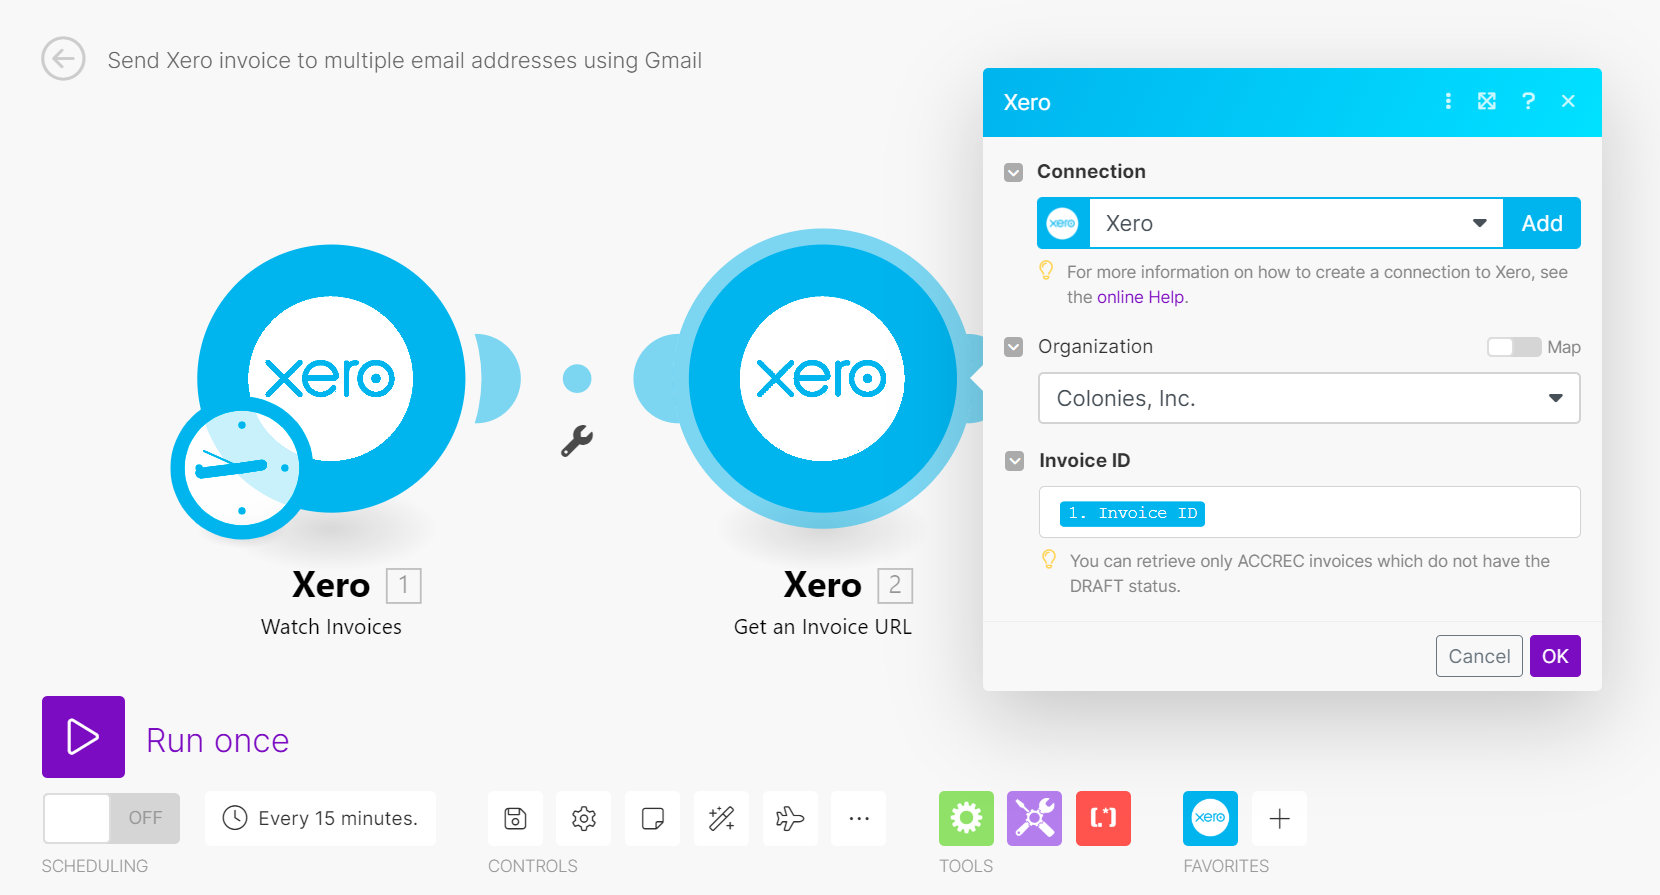
While the "Watch Invoices in Xero" module provides essential data like the invoice ID and contact ID, it does not directly supply the public URL for the invoice. This URL is often crucial for recipients to easily access and view their invoice online. Therefore, the next step in our Make.com scenario is to explicitly retrieve this invoice URL.
To achieve this, you will add a "Get an Invoice URL in Xero" module to your scenario, connecting it directly after the "Watch Invoices in Xero" trigger. This module is specifically designed to fetch the unique web link for a given invoice. For this module to function correctly, it requires the Invoice ID of the newly approved invoice. You can easily map this by selecting the "Invoice ID" item from the output of the preceding "Watch Invoices in Xero" module. This ensures that the correct URL is retrieved for each specific invoice that triggers the automation.
This step is vital because including a direct link to the invoice in the email significantly enhances the recipient's experience, allowing them to quickly review the document without needing to log into Xero or search for it manually. By adding this module, your automation gains the ability to provide a complete and convenient invoice notification, making the process smoother for both your business and your clients.
3. Get the contact’s email addresses in Xero
Just as the "Watch Invoices" module doesn't provide the invoice URL, it also doesn't directly retrieve all the associated email addresses for a contact. While it gives you the Contact ID, you need to perform an additional step to fetch the primary and any additional email addresses you've saved for that contact in Xero. This is a critical step to ensure that your invoice is sent to all intended recipients.
To gather these email addresses, you will add a "Get a Contact in Xero" module to your Make.com scenario, placing it after the initial trigger. This module allows you to retrieve comprehensive details about a specific contact using their Contact ID. You will map the "Contact: Contact ID" item from the "Watch Invoices in Xero" module to the "Contact ID" field in this new module. This action tells Make.com to look up the full contact record in Xero for the client associated with the newly approved invoice.
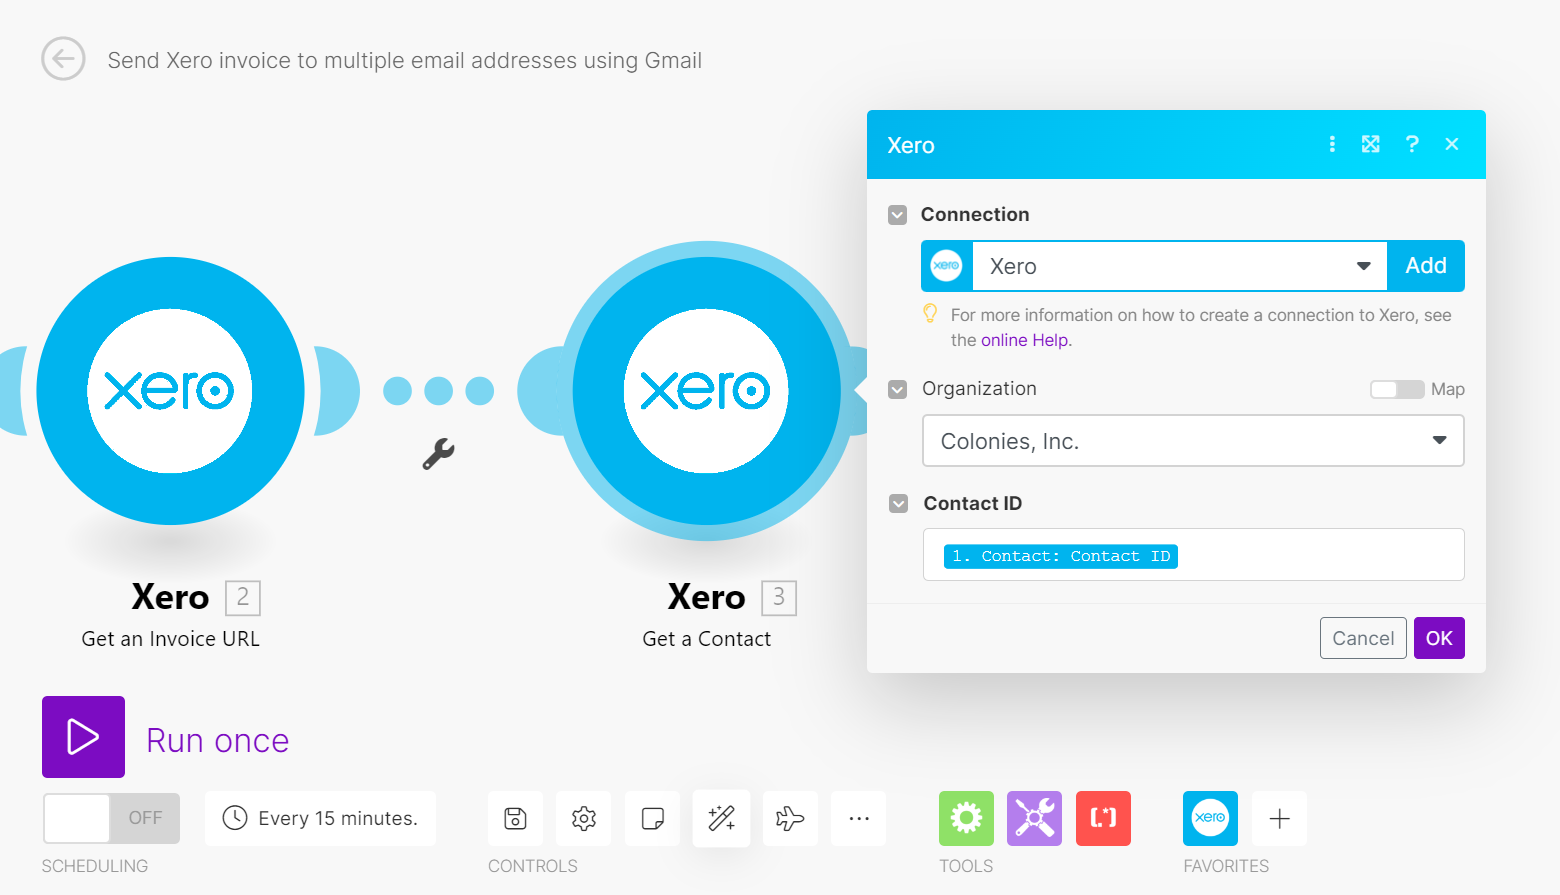
Upon execution, the "Get a Contact in Xero" module will return all the contact's details, including the primary email address and any additional email addresses you configured in Step 1. This consolidated list of email addresses is essential for the final step of the automation, where you will use them to populate the "To," "CC," and "BCC" fields of your outgoing email. This ensures that every relevant party receives the invoice, making your communication process both thorough and efficient.
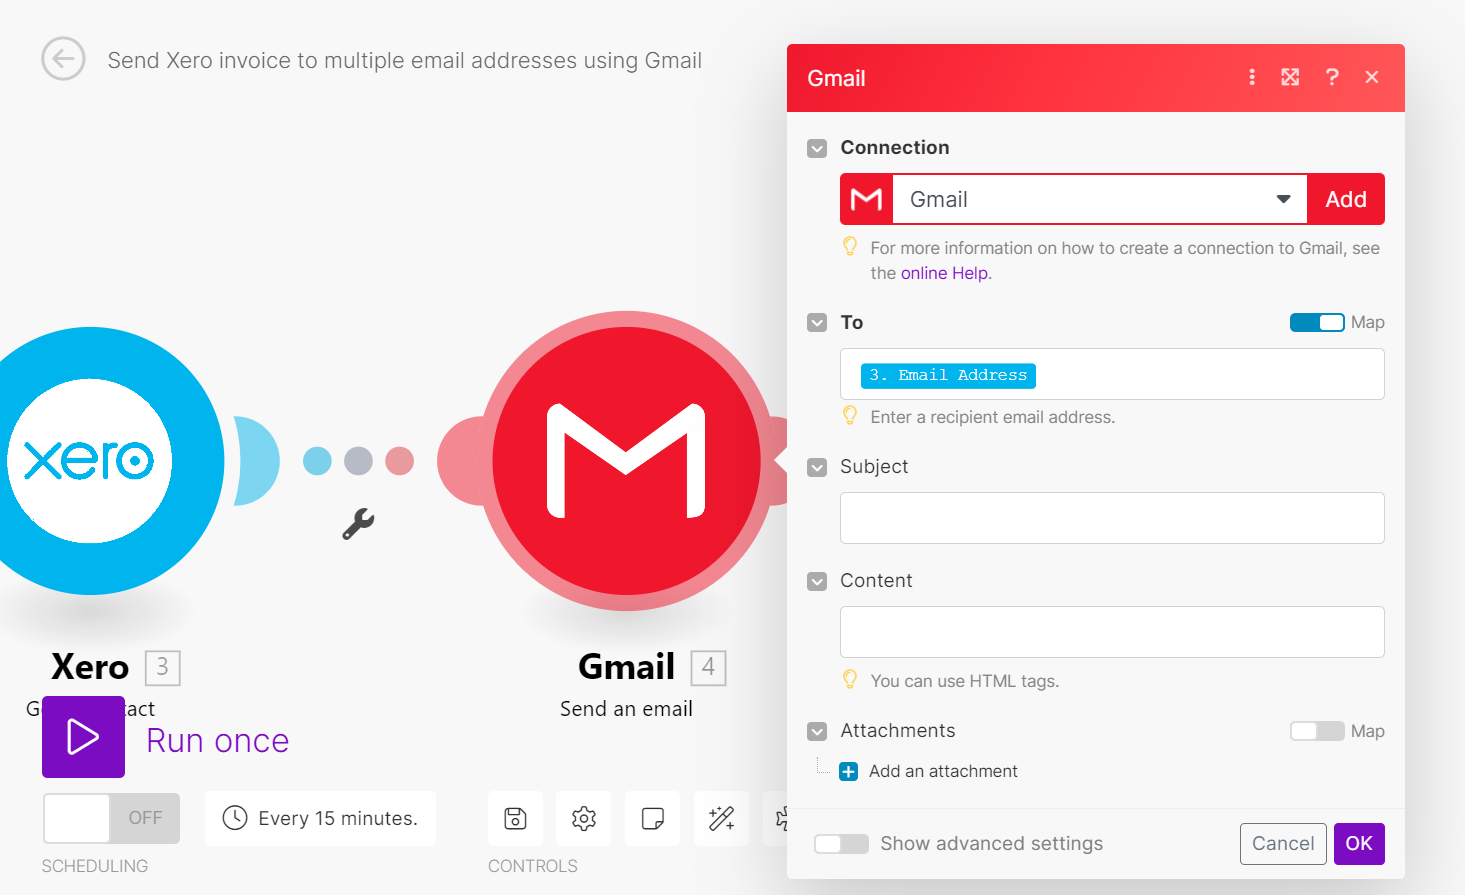
4. Set up the Gmail module
The final and most crucial step in your Make.com scenario is to configure the email sending module. For users with Gmail, you'll add the "Send an email" Gmail module. If you use a different email client, a generic "Send an email" module will function similarly. This module will take all the information gathered in the previous steps—the primary recipient's email, additional email addresses, and the invoice URL—and compose and send the invoice notification.
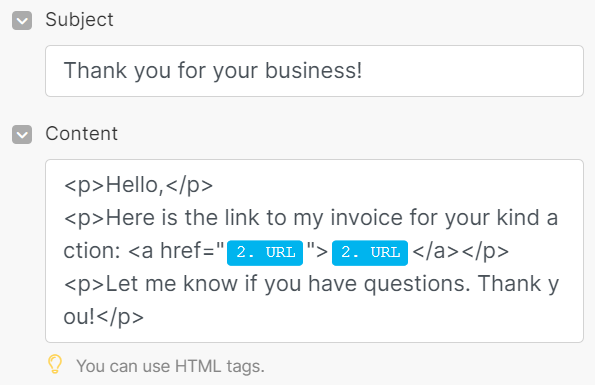
First, within the Gmail module, locate the "To" field. Toggle the "Map" option next to it and select the "Email Address" item obtained from the "Get a Contact in Xero" module. This action will dynamically insert the primary recipient's email address into the "To" field of your email. Next, populate the "Subject" and "Content" fields with your desired default email subject and body text. Crucially, remember to map the Xero invoice URL, which you obtained from the "Get an Invoice URL in Xero" module, into the "Content" field. This ensures that the recipient receives a direct link to view their invoice.
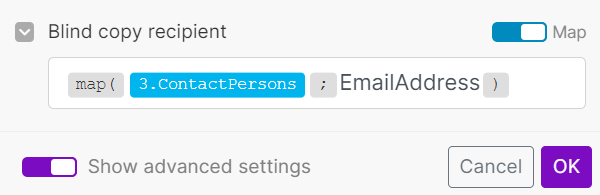
To include additional recipients, toggle the "Show advanced settings" option at the bottom of the Gmail module. This will reveal fields like "Blind copy recipient" (BCC) and "Copy recipient" (CC). For BCC, toggle the "Map" option and enter the following value: {{map(3.ContactPersons; "EmailAddress")}}. This specific syntax is vital because Xero stores additional email addresses as a complex array of collections, while Gmail expects a simple list of email addresses. The map() function extracts only the email addresses from Xero's complex data structure and formats them into a simple array that Gmail can understand. Without this function, only the first additional email address would be included.
If you prefer to CC rather than BCC the additional persons, simply map the same {{map(3.ContactPersons; "EmailAddress")}} value to the "Copy recipient" field instead. Once all fields are correctly mapped and configured, your complete Make.com scenario will be ready. It's highly recommended to perform a test run to ensure everything works as expected. After successful testing, you can schedule, save, and activate your scenario. This automation will then automatically send approved Xero invoices to all designated recipients, saving you significant time and ensuring consistent communication for every invoice.
This comprehensive setup ensures that every invoice is properly sent to the corresponding stakeholders at once, eliminating the need for manual intervention each time. This not only saves valuable time but also reduces the potential for human error, leading to a more reliable and professional invoicing process. The power of Make.com lies in its ability to handle these complex data transformations and integrations seamlessly, making advanced automation accessible to all.
By implementing this Make.com scenario, you can significantly streamline your invoicing process, ensuring that all approved Xero invoices are automatically sent to the correct recipients, including primary contacts and any additional stakeholders via BCC or CC. This automation eliminates manual steps, reduces the risk of errors, and frees up valuable time that can be reallocated to more strategic tasks. The ability to customize email content and recipient lists provides a professional and efficient solution for managing your financial communications.
This robust automation is not just a time-saver; it's a strategic tool that enhances the reliability and professionalism of your business operations. Whether you're a small business or a larger enterprise, automating invoice distribution ensures that your clients receive timely communications and that your internal teams are always in the loop. This tutorial provides a clear path to achieving this efficiency, making your Xero invoicing process quicker and more effective than ever before.