Non-disclosure agreements (NDAs) are a cornerstone of modern business, protecting sensitive information and intellectual property. However, managing these critical documents can quickly become overwhelming, especially for organizations dealing with a high volume of contracts. The manual creation, distribution, and tracking of NDAs are not only time-consuming but also prone to human error, leading to potential legal risks and operational inefficiencies.
The sheer volume of NDAs in circulation highlights the need for a more streamlined approach. With millions of NDAs binding workers across various industries, the administrative burden on legal and operational teams is immense. This tutorial will guide you through building an automated solution using Make.com to simplify the entire NDA lifecycle, from initial data collection to document generation and secure distribution.
By leveraging the power of automation, you can reclaim valuable time, reduce the risk of errors, and ensure that your NDA processes are both efficient and compliant. This guide will walk you through integrating popular tools like Typeform, Salesforce, Google Docs, and Google Drive to create a robust and reliable NDA automation system. Let's dive in and transform your contract management.
How to Automate NDAs: An Overview
The automation solution we will construct in this tutorial is designed to streamline the creation and distribution of Non-Disclosure Agreements across your organization. It integrates several widely used applications to handle different stages of the NDA process, ensuring a smooth and error-free workflow. This setup is flexible, allowing for customization and the use of alternative tools based on your existing tech stack and preferences.
The core applications required for this automation include:
- Typeform (or any other form-building application) for collecting necessary information.
- Salesforce (or a similar CRM system) for retrieving and managing contact data.
- Google Docs for creating and templating your NDA documents.
- Google Drive for secure storage and management of the generated NDAs.
- Make.com, which serves as the central automation platform to connect and orchestrate these services.
To implement this tutorial, you will need an active Make.com account. A paid plan, such as the Core Plan, is sufficient to access the necessary features, but you can choose any plan that best fits your organizational needs. This investment will unlock the full potential of automating your NDA workflows.
The Make.com scenario we'll build will perform several key actions:
- It will monitor for new responses submitted through your Typeform.
- It will query Salesforce to retrieve relevant data for the NDA.
- It will dynamically create the NDA document using a Google Docs template.
- The generated document will then be securely stored in Google Drive.
- Finally, the NDA will be emailed to the designated recipients for review and signature.
This comprehensive automation eliminates manual intervention at each step, significantly reducing the time and effort traditionally associated with NDA management. Prepare to say goodbye to tedious back-and-forths and embrace a more efficient, automated contracting process.
Step 1: Create the NDA Document Template
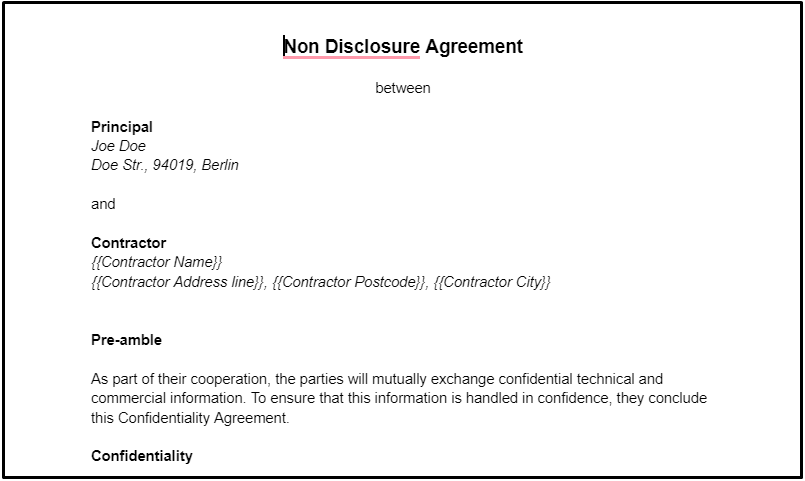
The foundational element of our NDA automation is a well-structured template in Google Docs. This template will serve as the blueprint for all your non-disclosure agreements, allowing for consistent formatting and content while enabling dynamic personalization through placeholders. It's crucial to design this template with all the standard clauses and legal language your organization requires.
Within your Google Docs template, you will insert specific placeholder variables where dynamic information needs to be injected. These placeholders could include fields for the recipient's name, company name, effective date, specific project details, and any other variable data that changes with each new NDA. Using clear and distinct placeholder names (e.g., {{RecipientName}}, {{CompanyName}}, {{EffectiveDate}}) will make the mapping process in Make.com much simpler.
While the example provided here offers a basic structure, you should tailor your template to precisely match your organization's legal requirements and recurring needs. Ensure that all necessary sections, such as definitions, obligations, term, and governing law, are included. A robust template minimizes the need for manual adjustments after generation, maximizing the efficiency of your automation.
Once your Google Docs template is complete and saved in a designated Google Drive folder, you're ready to proceed to the next step: setting up the Make.com scenario that will bring this template to life with automated data.
Step 2: Create a Make Scenario and Add the First Module
With your NDA template prepared, the next step is to initiate the automation workflow within Make.com. Begin by creating a new scenario in your Make.com dashboard. This scenario will act as the central hub that connects all the different applications and orchestrates the entire NDA generation process. The first module you'll add will be the trigger that kicks off the automation.
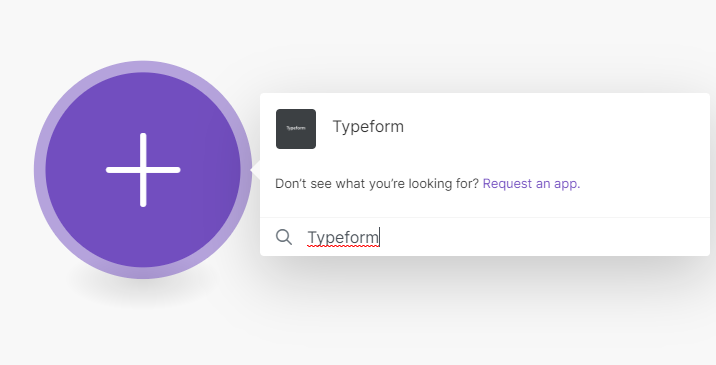
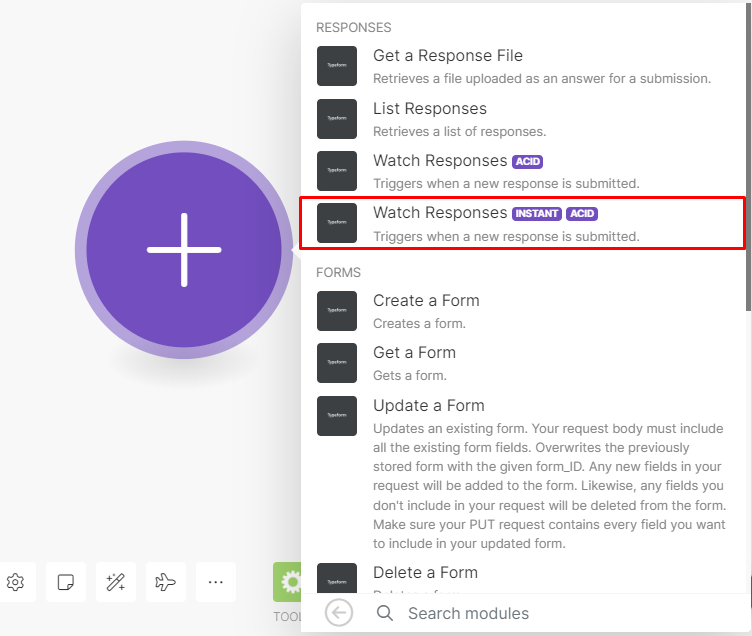
Search for the Typeform app within Make.com and select it. You'll notice two primary modules for Typeform: "Watch Responses" and "Watch Responses (Instant)." For this automation, it's crucial to select the "Watch Responses (Instant)" module. This module functions as a webhook, meaning it will instantly receive data from your Typeform form as soon as a new response is submitted, ensuring real-time processing of NDA requests.
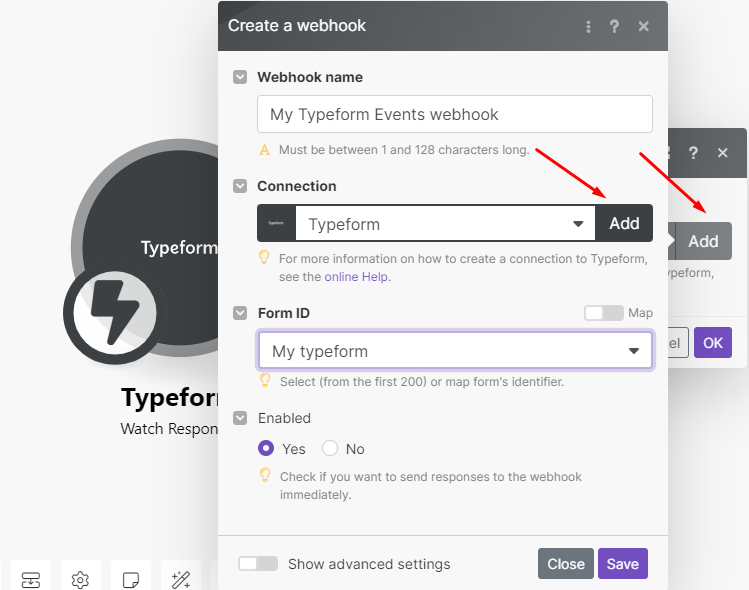
Configuring this webhook is straightforward. Click "Add" under the Connection settings to link your Typeform account to Make.com. Provide a descriptive name for your webhook to easily identify it later. Once connected, select the specific Typeform form that will be used to collect NDA requests. This form should include all the necessary fields corresponding to the placeholders in your Google Docs template, such as the contact's email, name, and company.
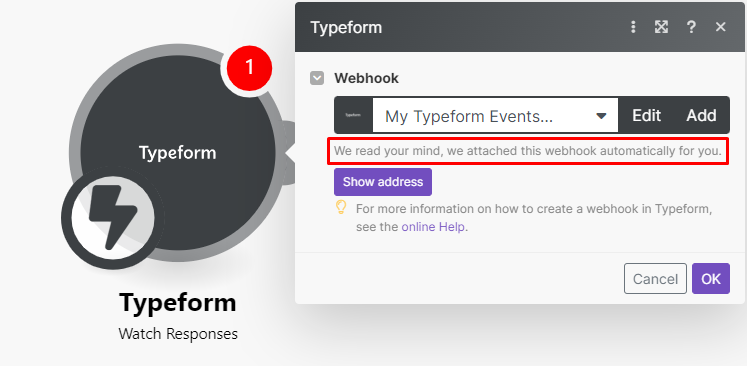
A significant advantage of using Make.com is that it automatically handles the attachment of the webhook to your Typeform. You don't need to manually configure any webhook settings within Typeform itself, simplifying the setup process. After selecting your form and saving the connection, your Make.com scenario will be ready to listen for new Typeform submissions, initiating the NDA automation workflow instantly.
Pro tip: When designing your Typeform, ensure that the field names are clear and descriptive. This will make it much easier to map the data correctly to your Google Docs template and Salesforce fields in later steps, reducing potential confusion and errors.
This initial setup is critical as it establishes the entry point for your automated NDA process. Any new submission to the selected Typeform will now trigger the subsequent actions in your Make.com scenario, moving you closer to a fully automated contract management system.
Step 3: Add Salesforce to Your Scenario
Once a new Typeform response is received, the next logical step in our NDA automation is to enrich the data by retrieving additional contact information from your CRM. This is where Salesforce comes into play. By integrating Salesforce, you can automatically pull comprehensive details about the individual or company requesting the NDA, ensuring that your generated document is accurate and complete.
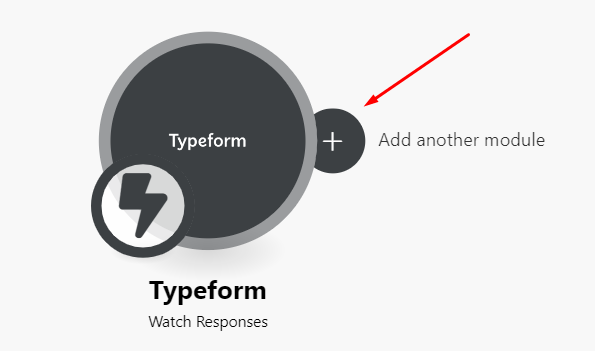
To add Salesforce to your scenario, hover over the Typeform module in Make.com and click the "Add another module" button that appears. Search for the Salesforce app and select the "List/Search Records" module. This module is designed to query your Salesforce database based on specific criteria, allowing us to find the relevant contact record.
After adding the Salesforce module, you'll need to connect your Salesforce account to Make.com. This typically involves authenticating through Salesforce's login portal. Once connected, the configuration fields for the "List/Search Records" module will become accessible. Our goal is to use the email address provided in the Typeform submission to locate the corresponding contact in Salesforce.
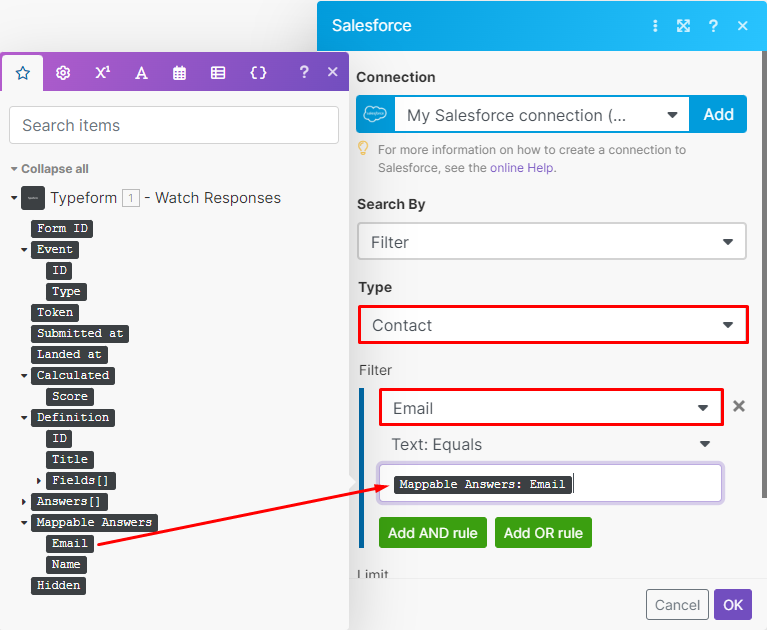
In the module's settings, select "Contact" under the "Type" field to specify that you are searching for contact records. For the filter, choose "Email" as the field, "Text: Equals" as the operator, and then map the "Mappable Answer: Email" element from your Typeform module to the value field. This ensures that Salesforce searches for a contact whose email address exactly matches the one submitted in the form. It's vital that your Typeform includes a dedicated field for email addresses to facilitate this lookup.
Once you've configured these settings, click "OK" to save the Salesforce module. This step is crucial for pulling in all the necessary details from your CRM, such as full names, company addresses, and other relevant information that will be used to populate your NDA template accurately. By automating this data retrieval, you eliminate manual data entry and ensure consistency across your documents.
Step 4: Add Google Docs to Automatically Create NDAs
With the contact information successfully retrieved from Salesforce, the next critical step is to generate the actual NDA document. This is accomplished by integrating Google Docs into your Make.com scenario, allowing you to leverage your pre-designed template and dynamically populate it with the collected data.
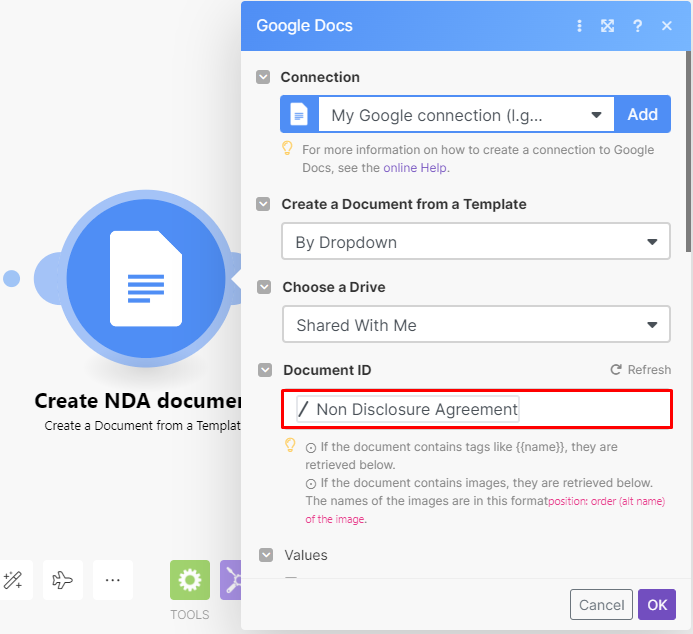
To add this functionality, search for the Google Docs app in Make.com and select the "Create a Document from a template" module. This module is specifically designed for our purpose, enabling the creation of new documents based on an existing template while filling in variable fields.
Upon adding the module, you'll need to connect your Google account to Make.com. After successful authentication, specify the Google Drive folder where your NDA template is stored. This ensures Make.com can locate the correct template. Then, from the dropdown menu, select your NDA template using its "Document ID."
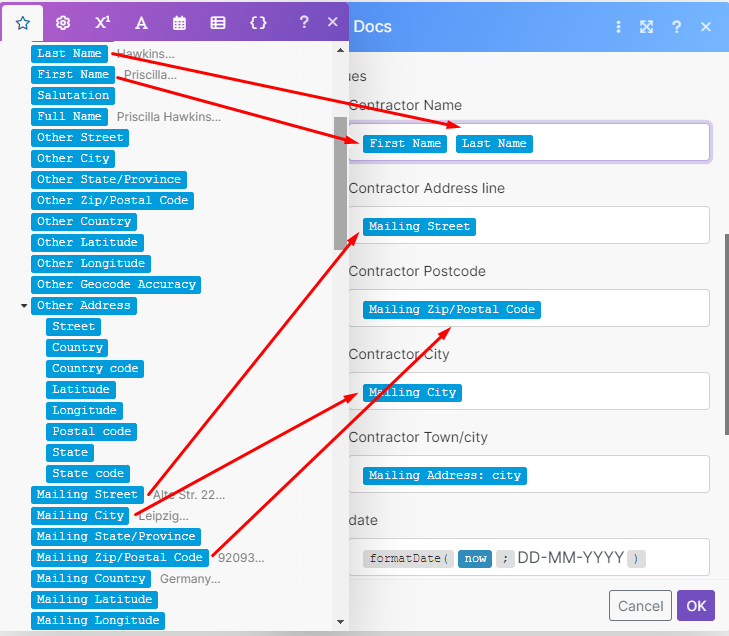
Continue configuring the module by scrolling down to the fields where you will map the data elements. These fields correspond to the placeholder variables you defined in your Google Docs template (e.g., {{RecipientName}}, {{CompanyName}}). You will drag and drop the relevant data elements from the Salesforce module (and potentially the Typeform module) into these corresponding fields. This mapping is crucial for ensuring that each generated NDA is personalized with the correct information.
It's important to remember that your specific template will dictate the exact variable fields you need to map. Review your Google Docs template carefully to ensure all dynamic elements are accounted for in this mapping step. This precise mapping guarantees that the NDA is generated accurately and reflects the specific details of the individual or entity involved.
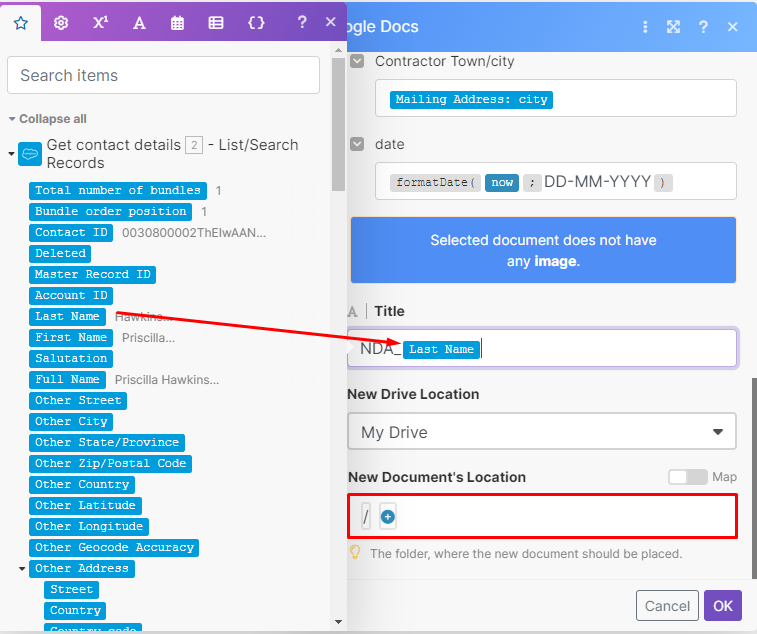
Finally, you can specify a title for the newly created document and choose its destination folder within Google Drive. This ensures that all generated NDAs are organized and easily retrievable. Once these configurations are complete, your Make.com scenario will be capable of automatically generating personalized NDA documents, a significant leap in automating your contract management.
Step 5: Add Google Drive to Your Scenario
After the NDA document has been successfully created in Google Docs and saved to Google Drive, the next step is to prepare it for distribution. While the document is already in your Google Drive, to attach it to an email, Make.com needs to explicitly "download" it within the scenario's context. This ensures that the file is in a format that can be easily sent as an attachment.
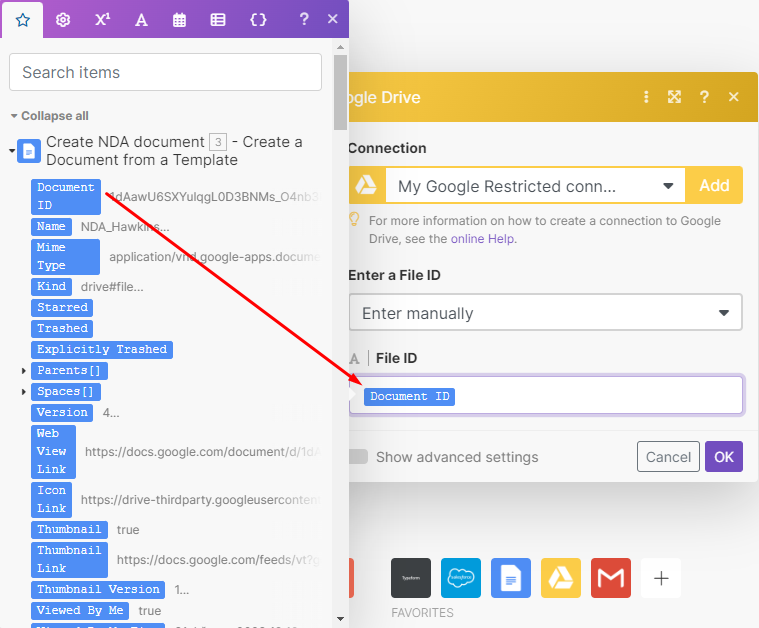
To achieve this, add another module to your Make.com scenario. Search for the Google Drive app and select the "Download a File" module. This module will retrieve the newly created NDA document from Google Drive and make it available for subsequent actions in the workflow.
Connect your Google Drive account to Make.com if you haven't already. Then, in the module's configuration, you will map the "Document ID" data element from the previous Google Docs module to the "File ID" field of the "Download a File" module. This tells Make.com exactly which document to download. The Document ID is a unique identifier for the file that was just created from your template.
Once you've mapped the Document ID to the File ID field, click "OK" to complete the module's configuration. This step is crucial for bridging the gap between document creation and its final distribution via email. By downloading the file within the scenario, you ensure that the NDA is ready to be attached and sent out, moving the automation closer to completion.
Step 6: Automatically Email NDAs for Review and Approval
The final stage of our NDA automation involves securely sending the generated document to the relevant parties for review and approval. This step ensures that the NDA reaches the intended recipient promptly, facilitating a quicker turnaround for signatures and formalization. Make.com's Email app provides the functionality to send these documents directly from your scenario.
Add the Email app to your scenario and select the "Send an Email" module. This module allows you to compose and dispatch emails with attachments, making it perfect for distributing your NDAs. You will need to configure several fields within this module to ensure the email is sent correctly.
First, enter the recipient's email address. This can be dynamically mapped from the Salesforce module's output, ensuring the email goes to the correct contact. Next, craft a clear and professional subject line and body content for the email. You can use a combination of static text and dynamic data elements from the Salesforce module to personalize the message, such as addressing the recipient by name or referencing specific project details.
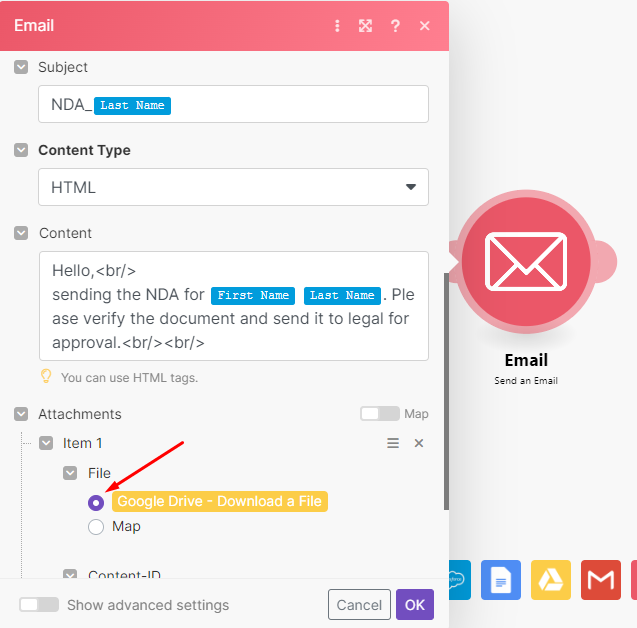
Crucially, under the "Attachments" section, ensure you select the output from the "Google Drive - Download a File" module. This action attaches the freshly generated and downloaded NDA document to your email. Without this, the recipient would receive an email without the actual agreement. This step completes the automated distribution of your NDA, ready for the recipient's review.
Once all fields are configured, click "OK" to save the Email module. This marks the completion of your NDA automation scenario. With this final module in place, your workflow is now capable of taking a Typeform submission, enriching it with Salesforce data, generating a personalized NDA in Google Docs, saving it to Google Drive, and then emailing it out – all automatically. The next step is to thoroughly test your new automation.
Step 7: Test the Scenario
After meticulously building your NDA automation scenario, the final and most crucial step is to test it thoroughly. Testing ensures that all modules are correctly configured, data flows seamlessly between applications, and the final NDA document is generated and distributed as expected. A successful test run confirms the reliability and accuracy of your automated workflow.
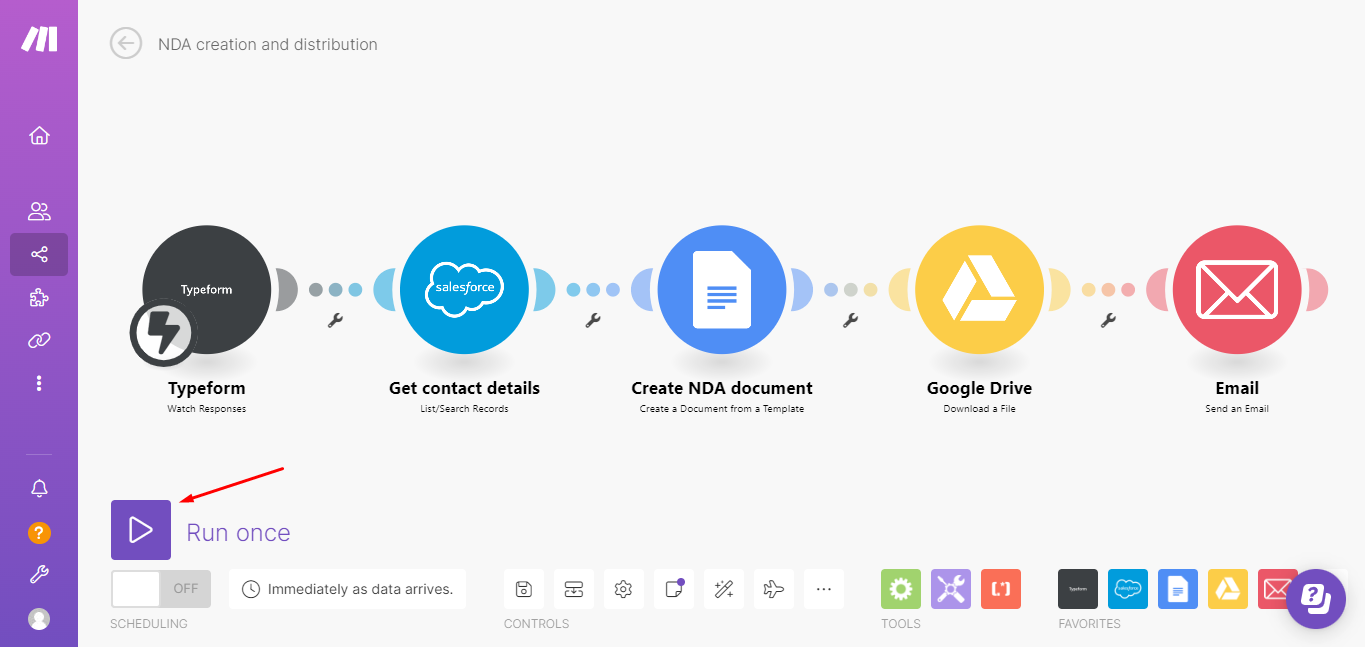
To initiate a test, locate and click the "Run Once" button, typically found at the bottom left of the Make.com scenario builder. This action will put your scenario into a listening mode, waiting for a trigger event to occur. Once in this mode, you'll need to manually trigger the automation by submitting a new response to your designated Typeform form.
Submit a test entry through your Typeform, providing realistic data that would typically be used for an NDA. Observe the Make.com scenario as it executes each module, verifying that data is correctly retrieved from Salesforce, the Google Docs document is created without errors, and the email with the attached NDA is successfully sent to the specified recipient. Check your email inbox to confirm receipt of the NDA and review the document for accuracy and proper data population.
Once you've confirmed that the entire workflow operates as intended and produces the desired outcome, you can confidently save your scenario. The "Save" button is usually located at the bottom of the builder under the "Tools" menu. After saving, the final step is to activate your automation by toggling the switch located near the "Run Once" button. This will set your scenario to run continuously, automatically processing all future Typeform submissions.
Pro tip: Always perform multiple test runs with different data sets, including edge cases, to ensure your automation is robust. This helps identify any potential issues before deploying it for live use.
Congratulations! Your NDA automation tool is now live and fully operational. You've successfully eliminated the manual burden of drafting and distributing NDAs, freeing up valuable time and resources for more strategic tasks within your organization. This automated system will handle all future NDA requests efficiently and accurately, ensuring a streamlined and professional contracting process.