
Many marketers are familiar with the challenge of tracking website traffic origins. Google Analytics UTM tracking links are essential for identifying where your audience comes from, allowing you to measure the effectiveness of different marketing channels.
For example, if you promote a landing page across email campaigns and various social media platforms, standard links won't tell you which source drove the most conversions. Without UTM parameters, it's impossible to attribute success to specific channels, making it difficult to optimize your marketing spend and strategy.
This guide, developed with certified Make Partner Andy O’Neil, demonstrates how to leverage Make.com to automate the generation of Google tracking URLs directly from Slack. This innovative approach allows you to create UTM-tagged links without ever leaving your Slack workspace, significantly streamlining your marketing operations.
Even if you're not a seasoned tech expert, this use case is designed to be straightforward, helping you set up an automated scenario that saves considerable time on the repetitive task of creating UTM links. To follow along, you will need an active Make.com account. If you don't have one yet, you can register for free to get started.
Operating Principles
This automation scenario is designed to simplify the creation of Google tracking URLs for your digital marketing campaigns, operating on a few simple rules. Once the setup is complete, the process becomes incredibly efficient.
To generate a UTM link, you simply enter specific information into a designated Slack channel. This includes your campaign name, followed by a space, and then the full URL of your landing page. The system then takes over, processing this input to create the necessary tracking links.
Upon sending your message in Slack, the automation scenario will instantly generate the UTM-tagged links and send them back to you in a Slack message. This immediate feedback loop ensures that you have your tracking links ready for use without any delay.
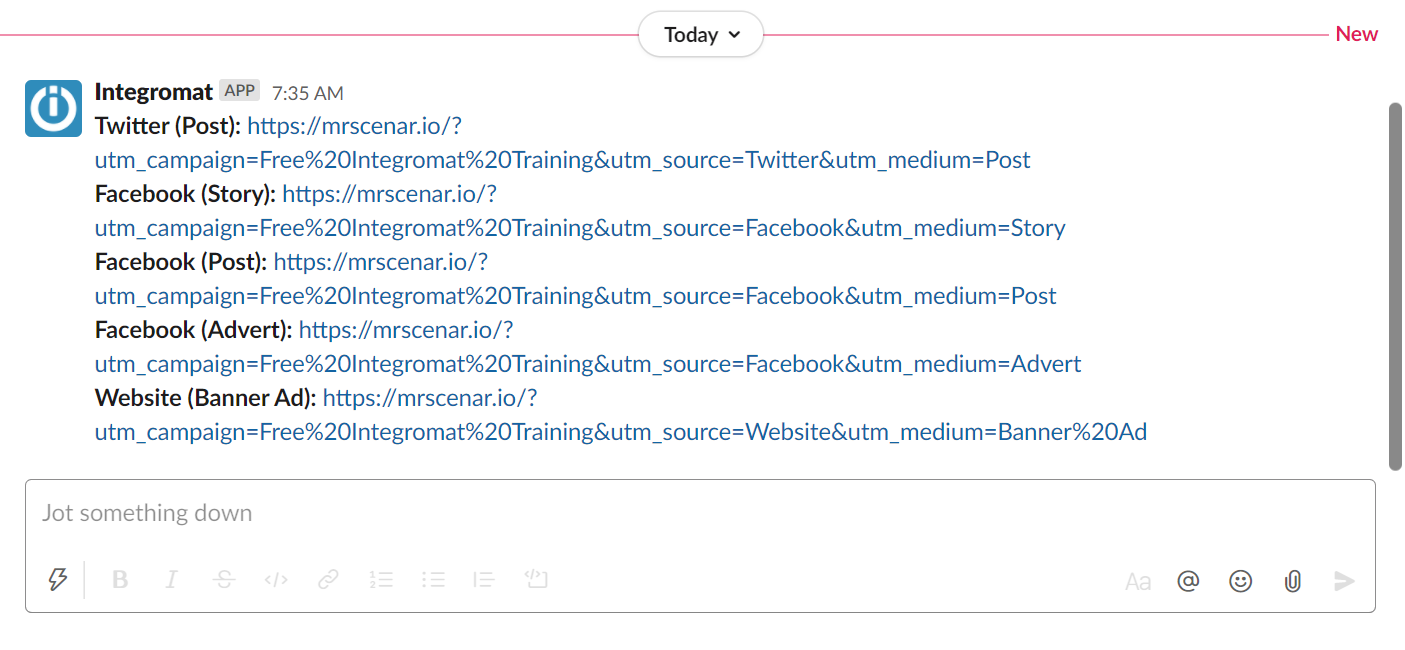
Each link generated by this system will automatically include tags for your landing page, campaign name, and predefined source and medium options. This structure allows for comprehensive customization of your tracking parameters.
You can define various sources (e.g., Facebook, Twitter) and mediums (e.g., banner, text link, advertisement) within the scenario setup. This flexibility ensures that your UTM links accurately reflect your marketing efforts and provide granular data for effective traffic tracking.
Under the Hood: Slack API and Make
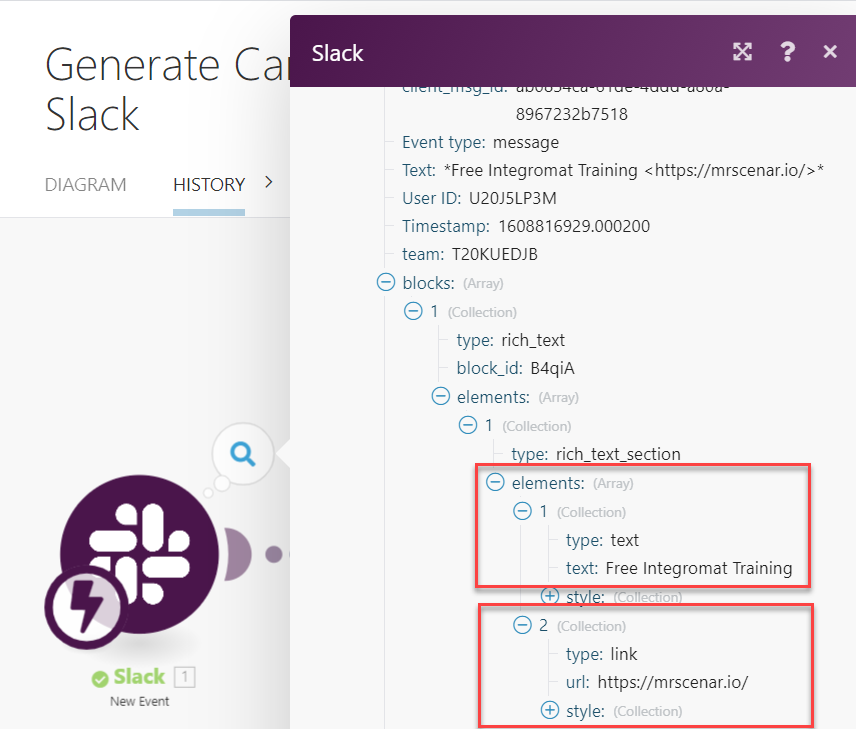
The core functionality of this automation relies on the seamless interaction between the Slack API and Make.com. When you submit a message in the specified format, the Slack API intelligently parses the message, breaking it down into its individual components.
It's crucial to adhere to the specified message format: "campaign name [space] landing page link". This consistent structure allows Slack to predictably recognize and extract the campaign name and URL, which are then used by Make.com to construct the UTM-tagged links.
By following this format, the automation can reliably generate accurate tracking links, ensuring that your marketing data is consistent and actionable. This behind-the-scenes integration makes the entire process effortless for the end-user.
Scenario Summary
To implement this powerful automation, you'll need both a Make.com account and a Slack account. The good news is that we'll be utilizing a pre-built Make template, which significantly simplifies the setup process, making it quick and easy to get started.
This pre-configured template includes several Make modules that work in conjunction to achieve the desired outcome. Understanding each module's role will help you grasp the flow of the automation and customize it if needed.
Let's take a closer look at the key Make modules that comprise this scenario:
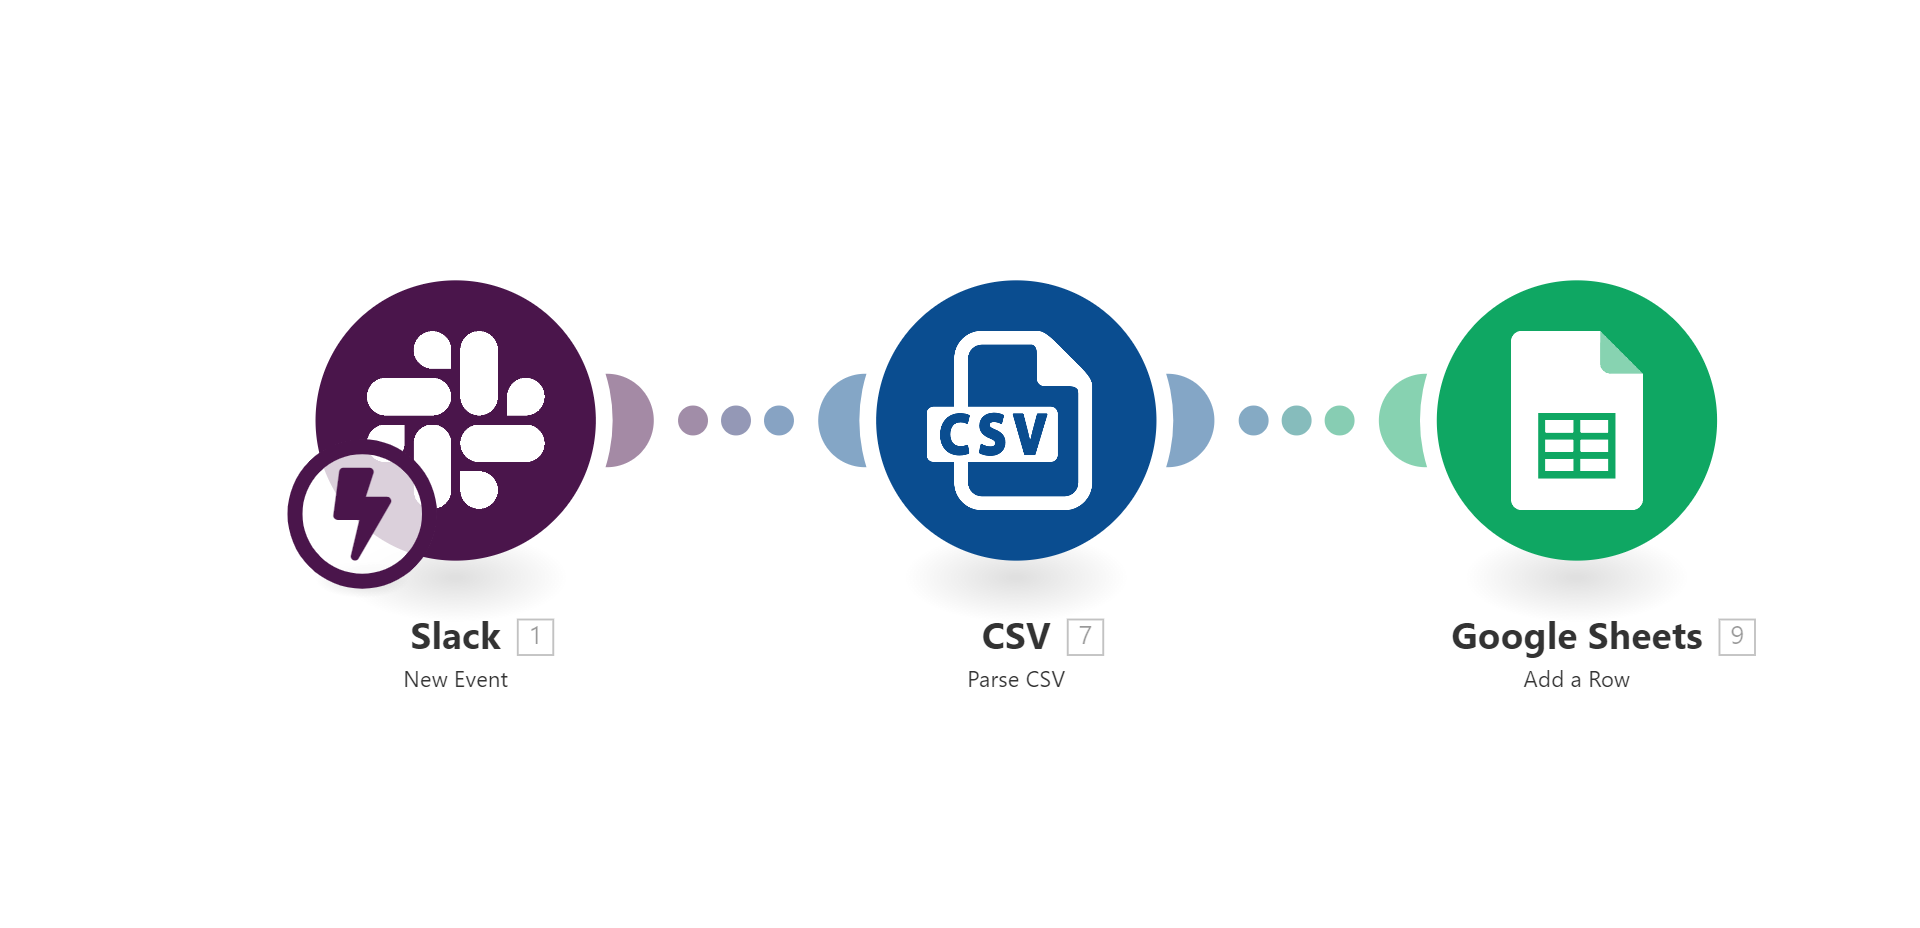
Module 1 - Slack » New Event: This module acts as the trigger for your automation. It continuously monitors a designated private Slack channel for new messages. When a message is posted in this channel, it initiates the subsequent steps of the scenario.
Module 2 - Parse CSV: Within this module, you will define your marketing source and medium values. These values are crucial for customizing the tracking parameters of your UTM links. For more detailed information on campaign values and their usage, refer to Google's "More information and examples for each parameter" guide.
Module 3 - Google Sheets » Add a Row: This module is responsible for storing your newly generated UTM links. It connects to a specified Google Sheet and adds a new row containing all the relevant tracking information, ensuring a centralized record for your marketing team.
Pro tip: Consistency is key with UTM parameters. Decide on a naming convention for your sources and mediums (e.g., all lowercase, specific abbreviations) and stick to it across all campaigns to ensure accurate and easily comparable data in Google Analytics.
Configuring the Template
To begin setting up this automation, you'll start by accessing the pre-built template within Make.com. This template provides a foundational structure that you can quickly adapt to your specific needs, making the configuration process straightforward.
Simply locate the "Generate digital marketing campaign UTM links with Slack and save to Google Sheets" template on Make.com and click the "Create new scenario from template" button, usually found on the bottom left of your screen, to import it into your Make.com dashboard.
Setting Up a Private Slack Channel
Before diving into the Make.com modules, it's highly recommended to create a dedicated private Slack channel for generating your UTM links. This ensures that the automation is triggered only by authorized personnel and keeps your workspace organized.
You can name this channel something descriptive like "UTM Generator" or "UTM Requests." Share it exclusively with the marketing team members responsible for creating campaign links. This practice centralizes the link generation process and encourages consistent usage, accelerating the creation of accurate UTM links.
Step 1: Configuring the Slack » New Event Module
This first module is the trigger that kicks off your entire automation scenario. It's responsible for listening for new messages in your designated Slack channel. Here's how to set it up:
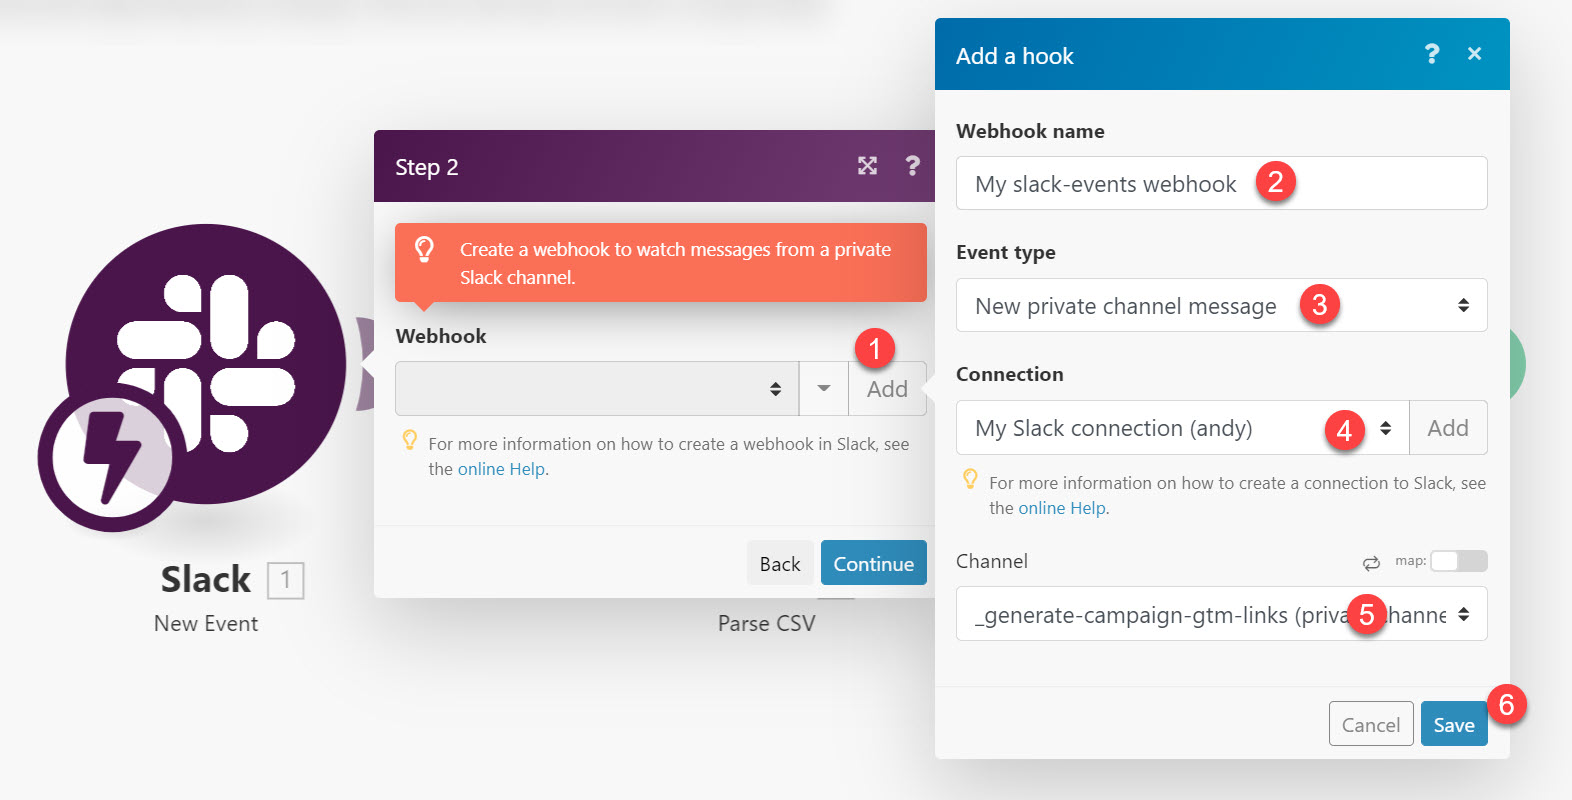
1. Click "Add" to create a new webhook. This webhook will be the bridge between Slack and Make.com, allowing Make.com to detect new messages in your private Slack channel.
2. Give your webhook a meaningful name, such as "Campaign Link Generation Webhook," to easily identify its purpose within your Make.com scenarios.
3. Select "New private channel message" as the event type. This ensures that the module only triggers when a new message is posted in a private channel, preventing unintended triggers from public conversations.
4. Select your Slack connection. If you haven't connected Slack to Make.com before, click "Add" to establish a new connection and grant the necessary permissions.
5. Choose the name of your private campaign link generation channel from the dropdown list. This links the module directly to the specific Slack channel you created earlier.
6. Click "Save" to confirm your webhook settings.
7. Finally, click "OK" and then "Continue" to proceed to the next module configuration.
Step 2: Configuring the CSV » Parse CSV Module
This module is where you define the specific source and medium values that will be appended to your UTM links. It's a critical step for customizing your tracking parameters and ensuring your analytics data is accurate.
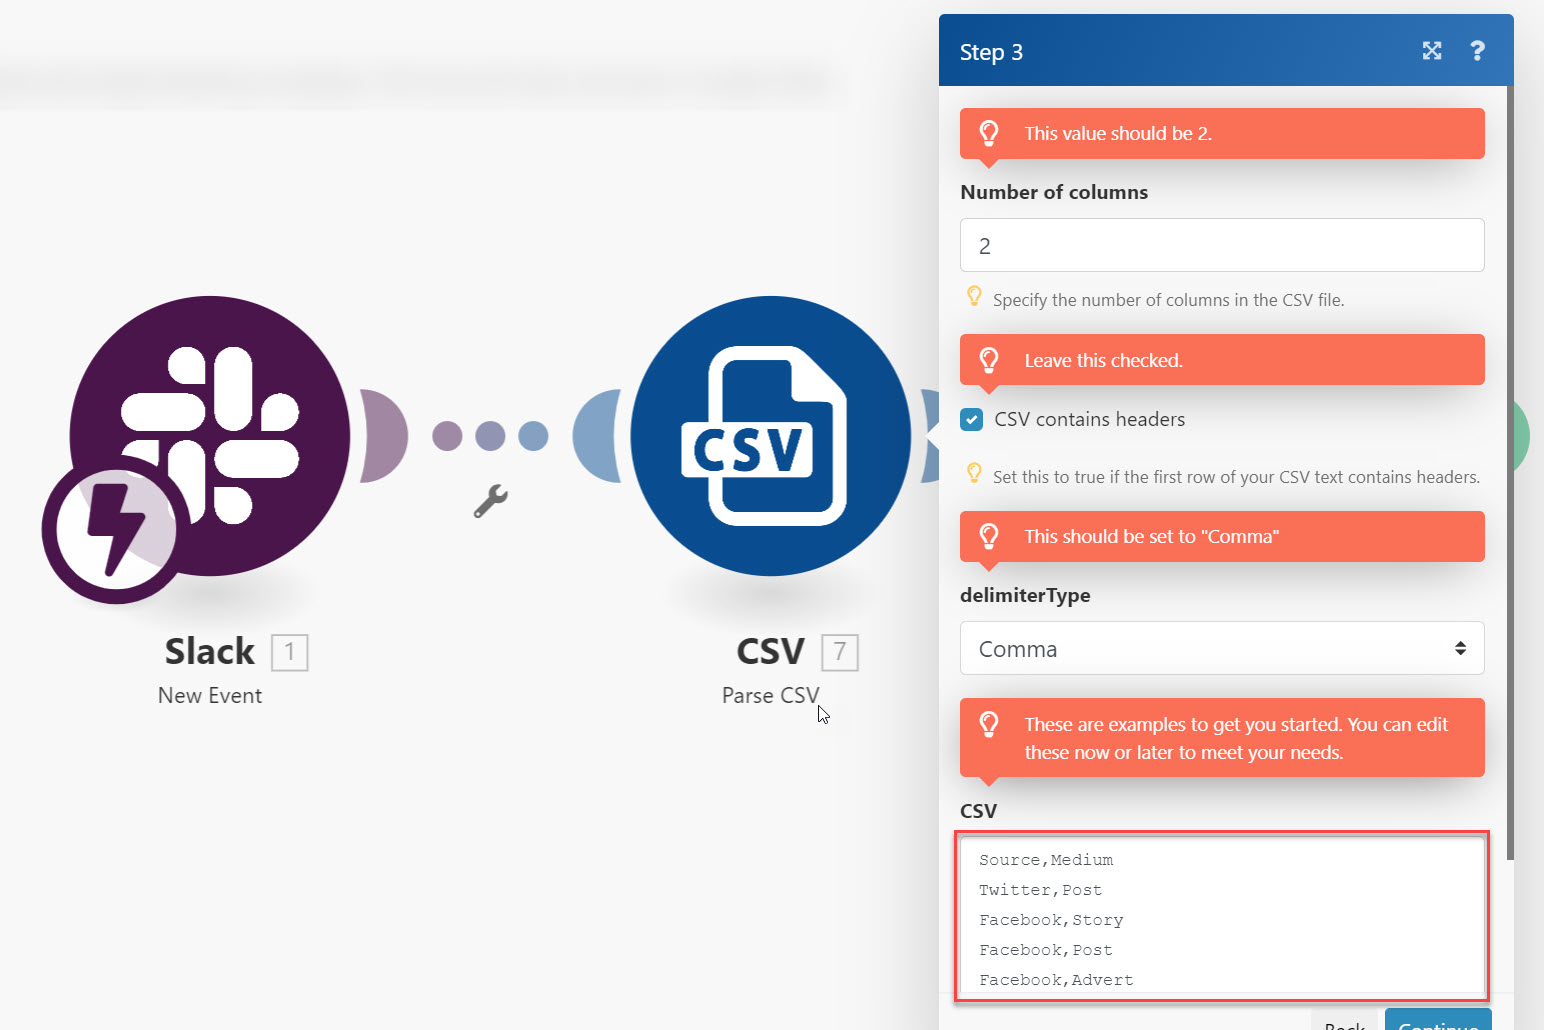
You will primarily focus on one field in this module, which dictates your campaign medium and source values. For a comprehensive understanding of campaign values, consult Google's guide on "More information and examples for each parameter."
The 'source' refers to where your traffic originates (e.g., Twitter, Facebook), while the 'medium' describes the type of source (e.g., Post, Story, Banner Ad). The module comes pre-populated with default values like:
- Source,Medium
- Twitter,Post
- Facebook,Story
- Facebook,Post
- Facebook,Advert
- Website,Banner Ad
Important: The header row ("Source,Medium") must remain intact as it's essential for the subsequent modules in the scenario. Also, ensure there are no spaces after the comma in your entries for optimal results. While it's recommended to use lowercase for UTMs, consistency is paramount; if you choose uppercase, apply it uniformly.
Once you've defined your desired source and medium values, click "OK" to save the module configuration and proceed.
Pro tip: To avoid data discrepancies, establish a clear set of standardized UTM source and medium values for your team. This ensures everyone uses the same terminology, leading to cleaner, more accurate data in Google Analytics.
Step 3: Configuring the Google Sheets » Add a Row Module
This module is crucial for maintaining a centralized record of all your generated UTM links. Before configuring it, you'll need a Google Sheet ready to store this data. Start by making a copy of this Google Sheet template to save your Google Analytics Tracking Links.
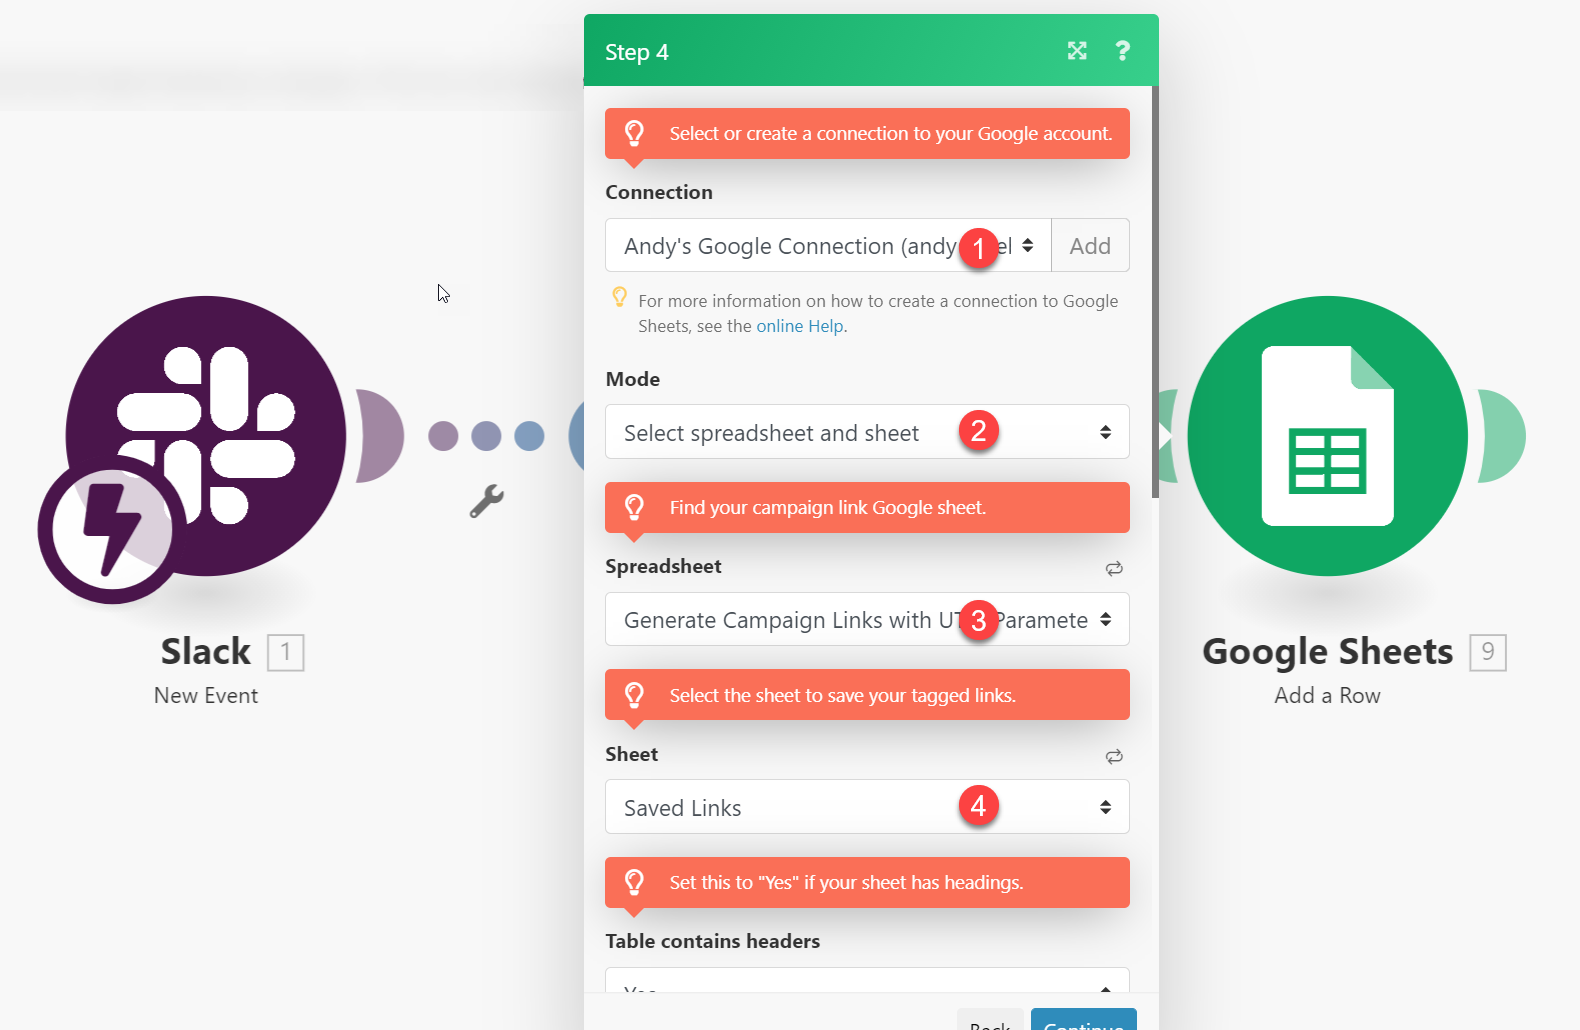
1. Click "Add" to establish a new Google connection, or select an existing one from the dropdown menu if you've already linked your Google account to Make.com.
2. Select "Spreadsheet and sheet" in the Mode dropdown. This tells Make.com that you want to interact with a specific spreadsheet and a particular sheet within it.
3. Locate and select your Google Sheet from the "Spreadsheet" dropdown. This should be the copy of the template you created earlier.
4. Choose the sheet name. If you used the provided template, select "Saved Links" here to ensure the data is written to the correct tab.
5. Set "Table Contains Headers" to "Yes." This is important because your Google Sheet template includes a header row, and this setting ensures Make.com correctly maps data to the appropriate columns.
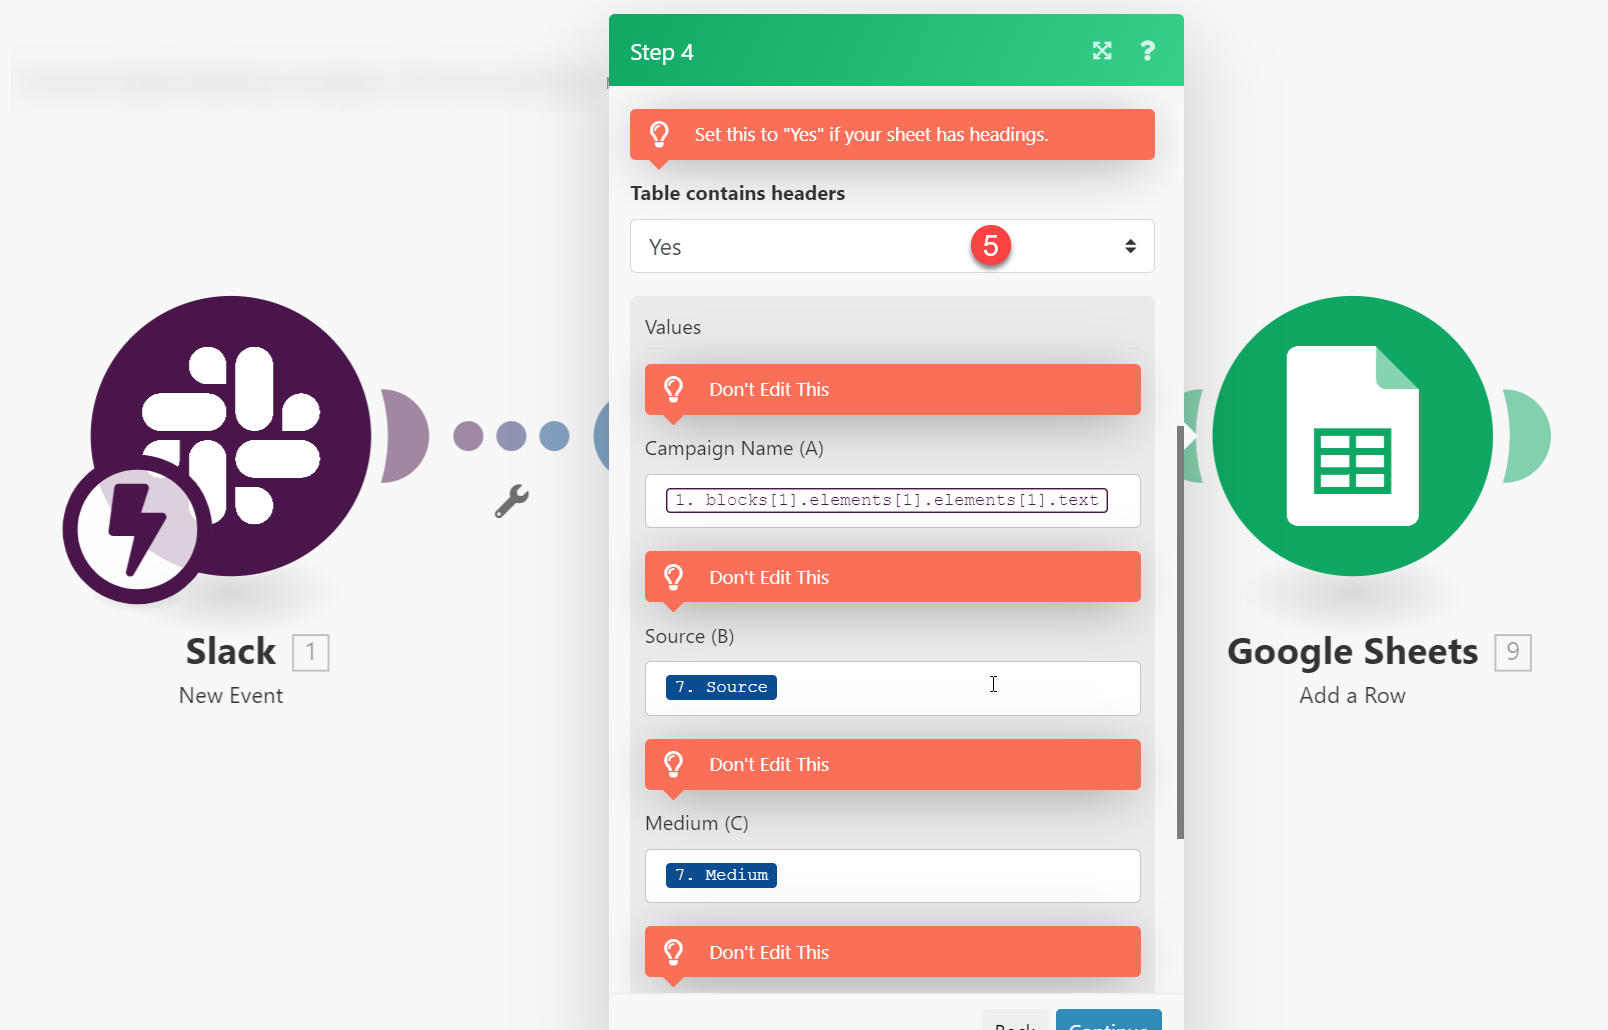
The remaining fields in this module should already be pre-mapped within the template. After verifying all settings, click "Continue," and your template will be fully configured and ready for use.
Step 4: Test Your Scenario
With all modules configured, it's time to test your automation to ensure everything is working as expected. This step is crucial for verifying that UTM links are generated correctly and saved to your Google Sheet.
1. Click the blue "Run Once" button in your Make.com scenario editor. This will activate the scenario for a single execution, waiting for a trigger from Slack.
2. Next, switch to your dedicated private Slack channel and compose and send a message. Remember to follow the specific format: your campaign name, followed by a single space, and then the full link to your landing page. For example: "SummerSale https://example.com/summer-landing-page".
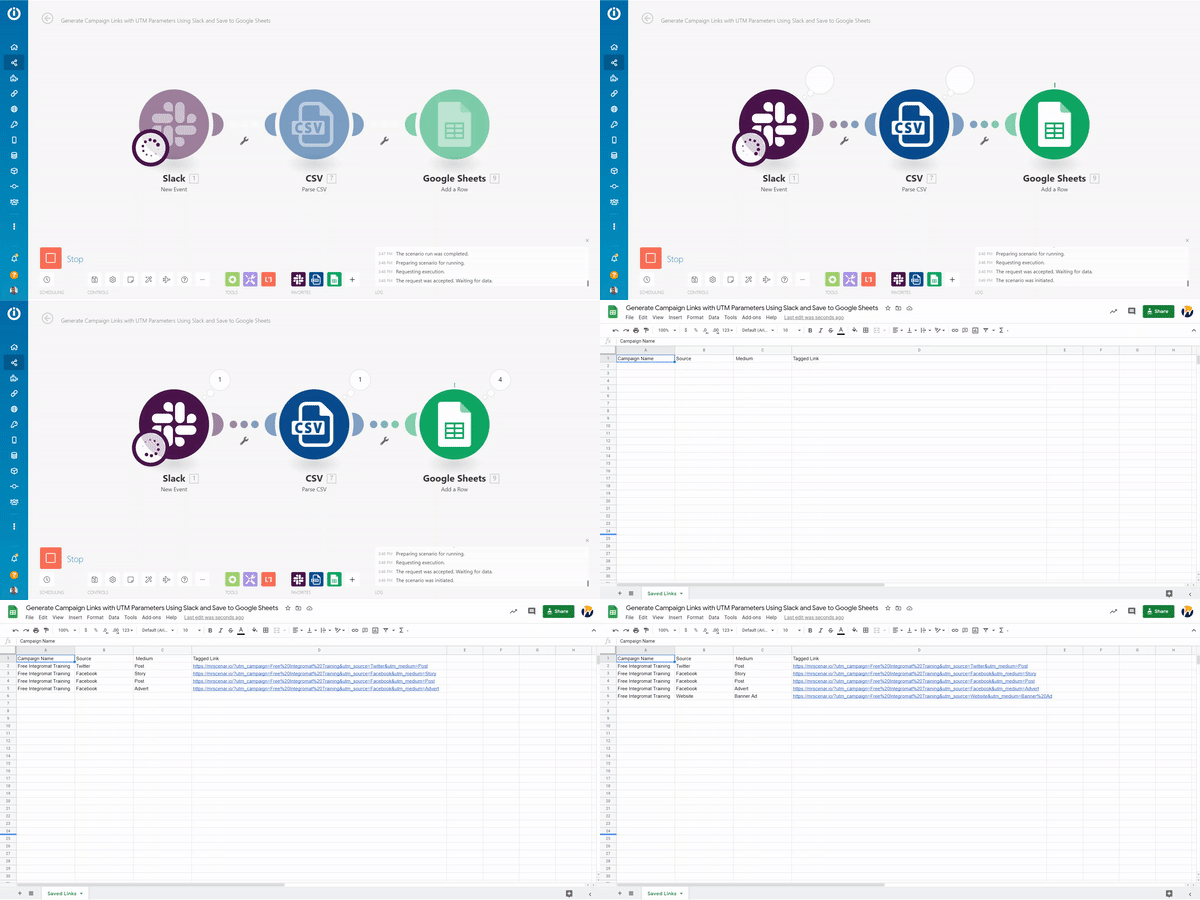
After sending your message in Slack, navigate to your Google Sheet. You should see new rows automatically created, containing the campaign name, source, medium, and the complete UTM-tagged link. This confirms that your automation is successfully generating and recording your tracking links.