What This Workflow Does
For businesses running Facebook ad campaigns, a flood of leads is a good problem to have—until it becomes a logistical nightmare. Manually downloading lead lists, copying data into spreadsheets, figuring out which sales rep covers which area, and then sending out notifications is a slow, error-prone process that costs you conversions. Leads go cold while you’re busy sorting spreadsheets.
This automation template solves that by creating a seamless bridge between your Facebook Lead Ads and your sales team. Every time someone fills out your lead form on Facebook, this workflow instantly captures their information—including their location—and adds it to a designated Google Sheet. It then intelligently matches the lead’s city, state, or ZIP code against a pre-defined map of your sales territories and assigns the lead to the corresponding sales representative. The result is a fully organized lead log and a notified salesperson, all within seconds of the form submission.
The business value is clear: you eliminate hours of administrative work each week, ensure zero leads are missed or misassigned, and empower your sales team to make contact while the lead is still hot, dramatically increasing your chances of closing the deal.
How It Works
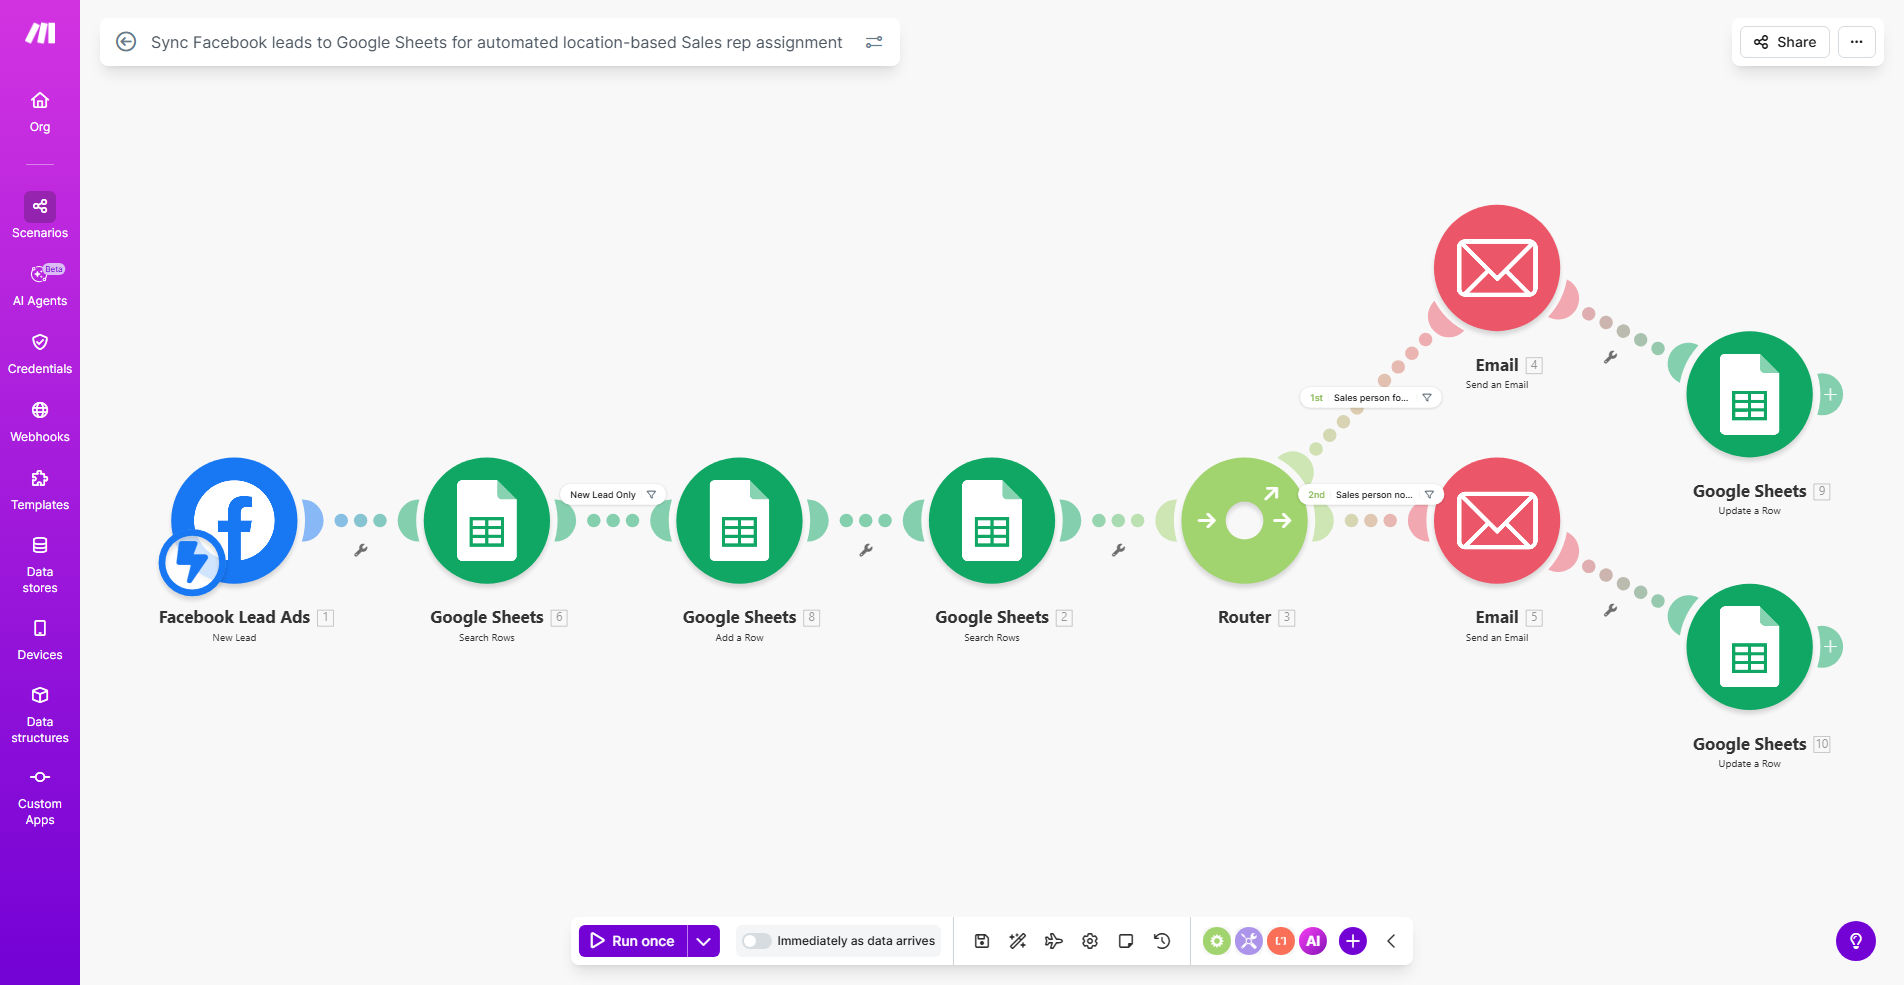
The workflow acts as your intelligent routing dispatcher, operating in a continuous cycle from lead capture to rep notification.
Step 1: Instant Lead Capture from Facebook
The moment a potential customer submits your Facebook Lead Ad form, the automation is triggered. It securely pulls all the form data—such as name, email, phone number, and the critical location field (e.g., "City")—via the Facebook Lead Ads API. This happens in real-time, so there’s no delay waiting for manual exports.
Step 2: Data Logging in Google Sheets
The captured lead data is immediately appended as a new row in your master Google Sheet. Columns are populated with the lead’s details, a timestamp of submission, and an initial status (e.g., "New"). This creates a single source of truth for all lead activity that your entire team can access.
Step 3: Location Analysis & Rep Matching
Here’s the intelligent core. The workflow takes the lead’s location data and checks it against a separate "Territory Map" sheet or table within your workbook. This map defines which sales rep is responsible for which cities, states, or regions. The automation finds the match and retrieves the assigned rep’s name and contact information.
Pro tip: Keep your Territory Map sheet simple and clean. Use one column for location identifiers (like ZIP codes) and an adjacent column for the assigned rep’s name or email. This makes the matching logic fast and easy to update as your team changes.
Step 4: Assignment & Notification
The assigned rep’s name is written back into the lead’s row in the master sheet (e.g., in an "Assigned Rep" column). Simultaneously, the workflow can trigger a notification to that rep via email, Slack, or SMS, alerting them that a hot lead in their territory needs immediate attention, often including a link directly to the sheet.
Who This Is For
This automation is a game-changer for any business with a geographically structured sales team that uses Facebook for lead generation.
Local & Regional Service Businesses: Companies like home services (HVAC, roofing), real estate agencies, or educational institutes with representatives for different districts. It ensures the lead goes to the agent who can actually service their area.
Multi-location Franchises or Dealerships: Franchise owners or sales managers who need to direct leads from national ad campaigns to the correct local branch or dealership for follow-up.
Marketing Agencies Managing Client Campaigns: Agencies running Facebook ads for multiple clients can use this to automatically sort and deliver leads to each client’s appropriate regional sales contacts, providing immense value as a service.
Startups and SMBs Scaling Sales Operations: Teams that are growing beyond a single salesperson and need to implement fair, organized, and efficient lead distribution rules without investing in a complex CRM upfront.
What You'll Need
To implement this workflow, you’ll need the following accounts and assets set up and ready:
- A Facebook Business Manager account with an active Facebook Lead Ad campaign.
- A Google Sheets spreadsheet to serve as your lead database and territory map.
- A Make.com account (free tier available) to build and run the automation.
- A clearly defined Sales Territory Map. This should be a list of locations (cities, states, ZIP codes) and the corresponding sales representative responsible for each.
- (Optional) A communication app for notifications, such as Gmail, Slack, or Microsoft Teams.
Quick Setup Guide
Follow these steps to configure your automated lead routing system:
- Prepare Your Google Sheet: Create two sheets within one workbook. Name one "Lead Log" with columns for lead data, timestamp, and "Assigned Rep". Name the second sheet "Territory Map" with columns for "Location" and "Sales Rep".
- Connect Facebook Lead Ads in Make.com: In your Make.com scenario, add the "Facebook Lead Ads" module. Authenticate your Facebook account and select the specific Page and Lead Form you want to monitor.
- Add Lead to Google Sheets: Add the "Google Sheets" module. Choose the "Add a Row" action, select your "Lead Log" sheet, and map the fields from the Facebook lead (name, email, location) to the corresponding columns.
- Build the Routing Logic: Use Make.com's "Router" or "Tools" modules to compare the lead's location from Step 2 with the list in your "Territory Map" sheet. Set up a search function to find the matching rep.
- Update the Lead Log & Notify: Add another "Google Sheets" module to update the newly created row, writing the found rep's name into the "Assigned Rep" column. Then, add a module for your preferred notification method (e.g., Gmail) to alert the rep.
- Test and Activate: Use Facebook's test lead feature to send a dummy lead through the form. Watch the scenario run in Make.com and verify the data appears correctly in your sheet and the correct notification is sent. Once confirmed, activate the scenario.
Key Benefits
Cut Lead Response Time from Hours to Minutes. The biggest factor in lead conversion is speed. This automation ensures your sales team is notified the instant a qualified lead comes in, allowing for contact while interest is highest, potentially increasing conversion rates by up to 400%.
Eliminate 5-10 Hours of Manual Admin Work Per Week. No more downloading CSV files, copying, pasting, and sorting. This workflow handles all the data entry and logical assignment, freeing your marketing or sales ops personnel to focus on higher-value strategic tasks.
Ensure 100% Accurate Lead Distribution. Remove human error from the assignment process. Leads are routed based on clear, consistent rules defined in your territory map, guaranteeing fairness and coverage so no rep misses a lead in their area and no lead falls through the cracks.
Gain a Centralized, Real-Time Lead Dashboard. Your Google Sheet becomes a live dashboard showing all lead sources, statuses, and assignments. This transparency improves team accountability and provides managers with instant insight into campaign performance and rep activity.
Scale Your Lead Generation Effortlessly. As your Facebook ad spend and lead volume grow, this system scales with you. It can handle 10 leads or 10,000 leads per day with the same efficiency, preventing process breakdowns during growth spurts.