What This Workflow Does
For businesses using Xero for accounting and Invoiced for professional billing and payment collection, managing invoices across two systems is a major pain point. Every time you create an invoice in Xero, someone on your team must manually re-enter the same details—customer, amount, due date, line items—into Invoiced. This process is slow, prone to typos, and delays getting invoices to customers.
This automation solves that problem completely. It acts as a digital bridge between Xero and Invoiced. The moment a new invoice is saved in Xero, the workflow is triggered. It securely fetches all the relevant invoice data and uses it to create a corresponding, ready-to-send invoice in your Invoiced account. The result is a seamless, error-free billing process that operates in the background.
The business value is immediate: your finance team reclaims hours each week, invoice accuracy improves dramatically, and customers receive their bills faster, which can significantly improve your cash flow. It turns a fragmented, manual task into a reliable, automated system.
How It Works
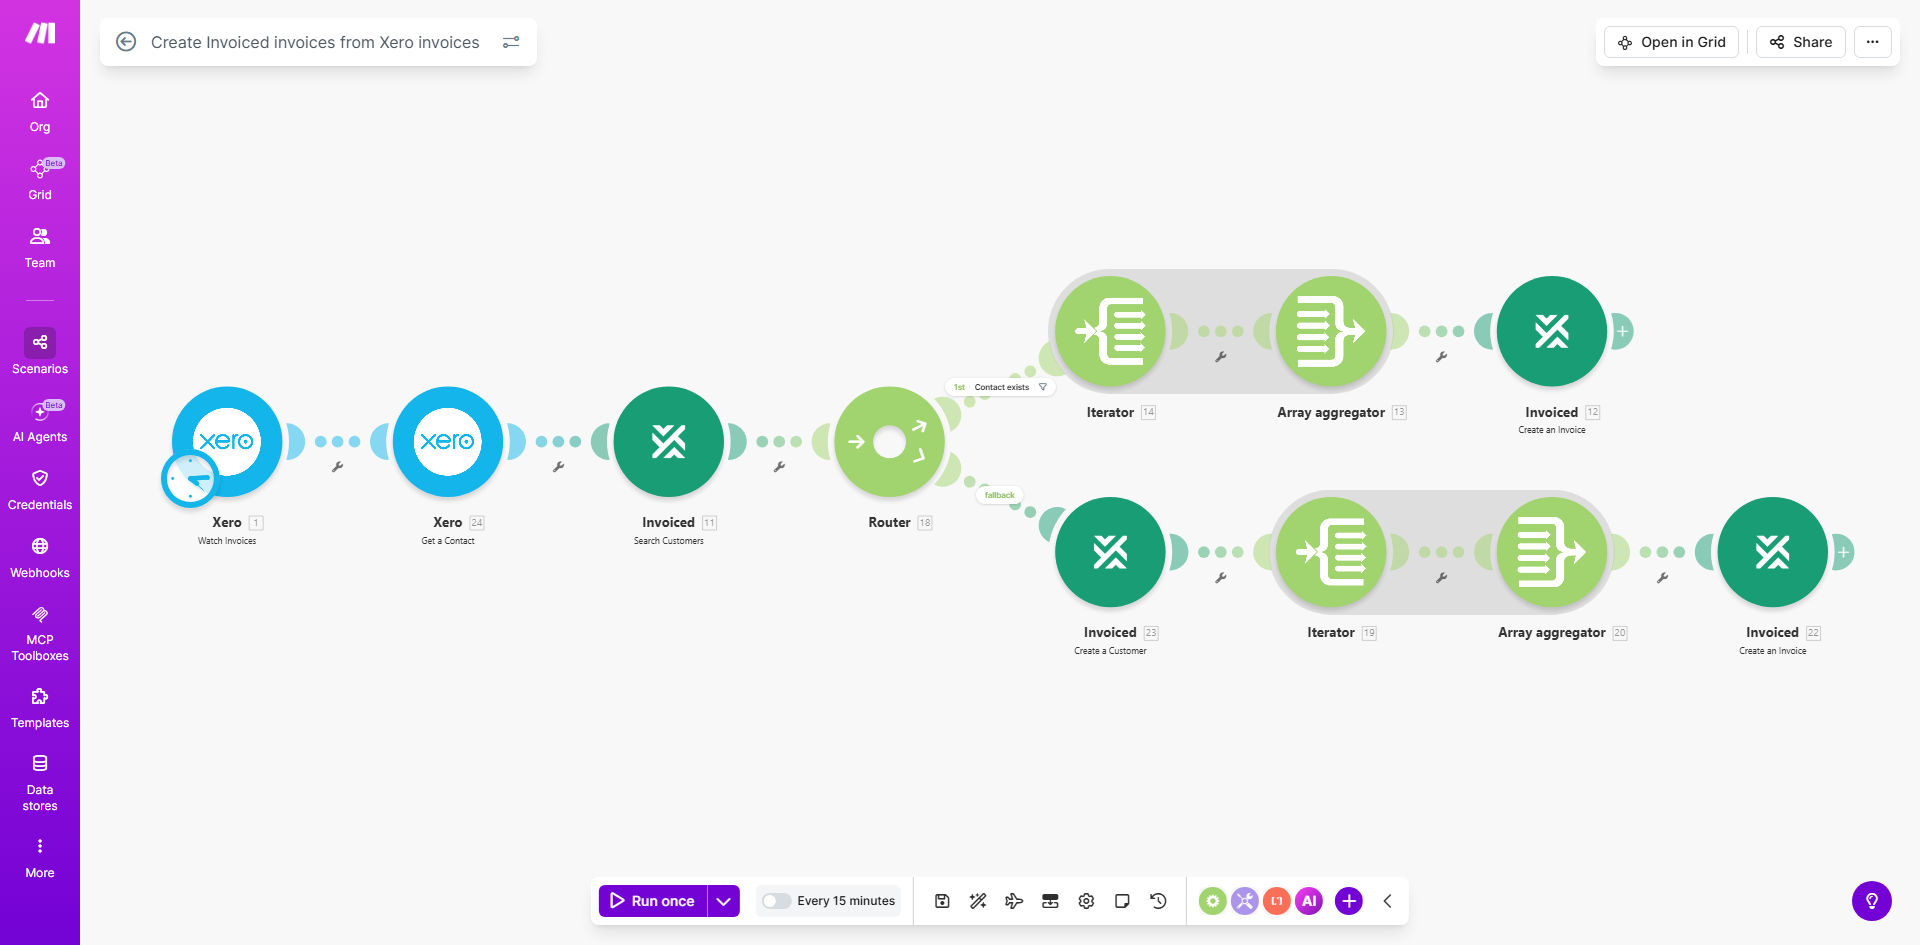
The workflow follows a simple, reliable sequence to transfer data from one platform to the other.
Step 1: Monitor Xero for New Invoices
The workflow starts with a Make.com "Watch Invoices" module connected to your Xero account. It continuously checks for newly created invoices. You can configure it to trigger only on invoices with a specific status (like "Approved") to match your internal approval process.
Step 2: Extract and Map Invoice Data
Once a new invoice is detected, the workflow pulls all necessary data: the invoice number, issue date, due date, customer contact information, line item descriptions, quantities, rates, taxes, and the total amount. This data is structured and prepared for the next step.
Pro tip: Use Make.com's data mapping tools to ensure fields like customer email and tax rates are correctly formatted for Invoiced, preventing common sync errors.
Step 3: Create the Invoice in Invoiced
The prepared data is sent to Invoiced via the "Create an Invoice" API module. The workflow populates the customer record (creating it if necessary), adds all line items, applies the correct payment terms, and sets the status. The invoice is now live in your Invoiced account.
Step 4: Confirm and Log the Action
Finally, the workflow can send a confirmation—such as logging the new Invoiced invoice ID back to a custom field in Xero, sending a notification to a Slack channel, or creating a record in a Google Sheet for audit purposes. This closes the loop and provides visibility.
Who This Is For
This automation is ideal for any business that relies on both Xero's robust accounting features and Invoiced's superior invoicing and payment experience. This includes SaaS companies, agencies, consultants, and professional service firms.
It's particularly valuable for growing companies where the finance team is stretched thin, or for businesses with a high volume of recurring invoices. If you've ever experienced a delay in billing because someone was out of the office, or had a payment dispute due to a data entry error, this workflow is your solution.
What You'll Need
- A Make.com account (free or paid plan).
- An active Xero subscription with administrator access to connect the API.
- An active Invoiced account with API access enabled.
- The customer/contact details in Xero should have valid email addresses for Invoiced to send to.
- Basic understanding of your invoice approval process (to set the correct trigger conditions).
Quick Setup Guide
You can have this automation running in under 30 minutes.
- Get the Template: Click the "Get This Workflow" button above to copy the template to your Make.com account.
- Connect Xero: In the first module, authorize Make.com to access your Xero account. Select the specific Xero organization you use.
- Connect Invoiced: In the "Create Invoice" module, authorize the connection to your Invoiced account using your API credentials.
- Map the Data Fields: Review the data mapping between Xero and Invoiced. Ensure key fields like "Customer Email," "Invoice Number," and "Total Amount" are correctly linked.
- Set a Filter (Optional): Add a filter after the Xero trigger to only process invoices that are "Approved" or "Authorized," if needed.
- Test and Activate: Turn on the scenario and create a test invoice in Xero. Verify that it appears correctly in your Invoiced account within moments.
Key Benefits
Eliminate Manual Data Entry: Save 5-10 hours per month per finance staff member by removing the need to copy-paste invoice details between systems. This time can be redirected to strategic financial analysis and cash flow management.
Achieve 100% Data Accuracy: Automated sync removes the risk of human error—no more transposed numbers, missed line items, or incorrect customer emails. Your financial data is consistent and reliable across both platforms.
Accelerate Your Cash Flow: Invoices are created in Invoiced and sent to customers instantly after being issued in Xero, shaving days off your billing cycle. Faster invoices lead to faster payments.
Improve Operational Visibility: With every invoice automatically logged, you have a perfect audit trail. You can easily track which invoices have been synced and identify any process exceptions at a glance.
Scale Your Billing Effortlessly: Whether you issue 10 or 1,000 invoices a month, the automation handles the volume without any additional effort or hiring. Your billing process grows seamlessly with your business.