What This Workflow Does
Collecting Net Promoter Score (NPS) feedback is essential for understanding customer loyalty, but manually tagging each respondent in your CRM is time-consuming and prone to errors. This automation workflow solves that by creating a seamless bridge between your feedback database (Airtable) and your marketing platform (ActiveCampaign).
Whenever a new NPS response is recorded in Airtable, this Make.com scenario automatically checks the score, categorizes the customer as a Promoter, Passive, or Detractor, and then updates or creates the corresponding contact in ActiveCampaign with the appropriate tag. This turns static survey data into dynamic, actionable segments for your marketing and support teams.
The business value is clear: you move from having raw data in a spreadsheet to having tagged, segmented contacts ready for personalized follow-up campaigns in minutes. It eliminates manual data entry, ensures consistency, and allows you to react to customer sentiment in real-time.
How It Works
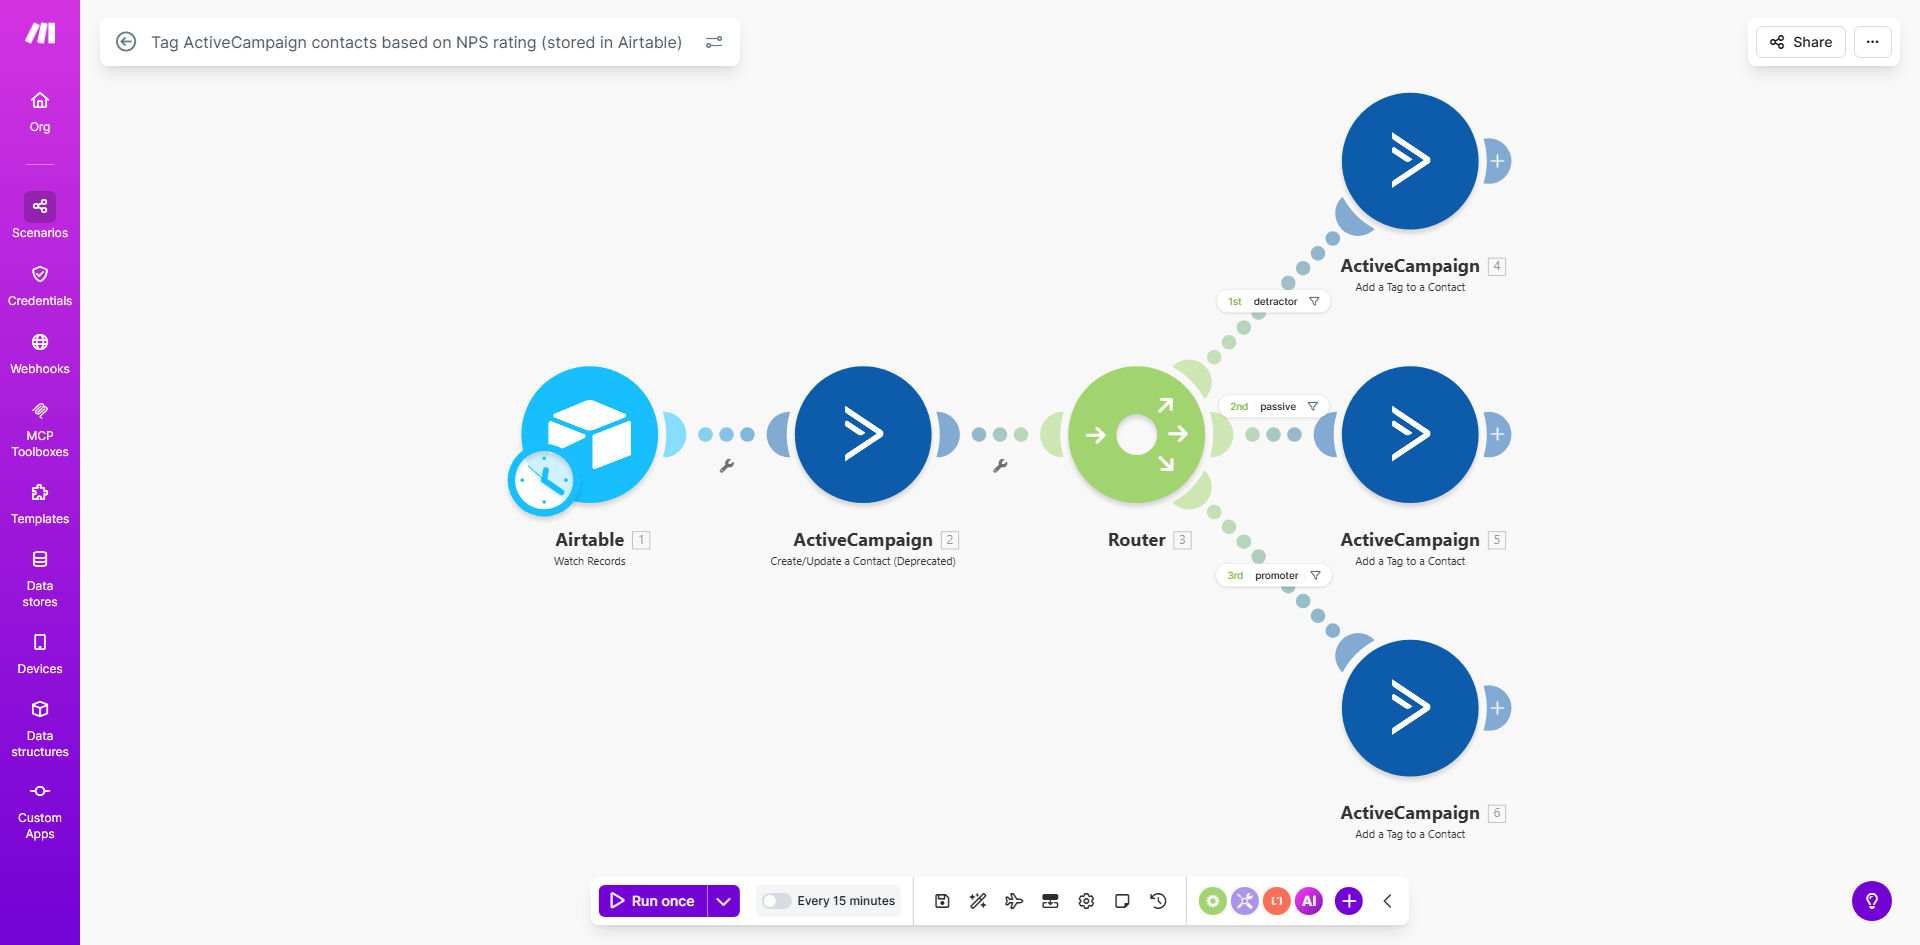
Step 1: Monitor Airtable for New NPS Responses
The workflow starts by periodically checking your designated Airtable base for new records or updates to existing NPS scores. It filters for records where the feedback is recent or the score has changed, ensuring only relevant data triggers the automation.
Step 2: Analyze the Score and Determine the Segment
Each NPS score (typically a number from 0 to 10) is evaluated against your predefined thresholds. For example, scores 9-10 are classified as "Promoters," 7-8 as "Passives," and 0-6 as "Detractors." The workflow logic assigns the correct segment label based on this analysis.
Step 3: Find or Create the Contact in ActiveCampaign
Using the customer's email address from the Airtable record, the scenario searches your ActiveCampaign account for an existing contact. If found, it proceeds to update them. If not found, it can create a new contact with the basic details provided, ensuring your CRM stays comprehensive.
Step 4: Apply the Correct Tag
The final action is to apply the segment-specific tag (e.g., "NPS_Promoter," "NPS_Detractor") to the contact in ActiveCampaign. This tag is the key that unlocks downstream automation, such as adding the contact to specific email campaigns, triggering internal alerts, or updating customer health dashboards.
Pro tip: Before running the workflow, ensure you have created the three corresponding tags ("NPS_Promoter", "NPS_Passive", "NPS_Detractor") in your ActiveCampaign account. This prevents errors and makes your segmentation clear for future campaigns.
Who This Is For
This template is ideal for businesses that actively measure customer loyalty and want to leverage that data for smarter marketing and support. It's perfect for:
- Product Managers & CX Teams: Who need to segment users based on satisfaction to prioritize feature development or support outreach.
- Marketing Managers: Who want to send targeted follow-up emails—like referral requests to Promoters or win-back offers to Detractors—without manual list building.
- Startups & SaaS Companies: That use NPS as a core health metric and need to automate the connection between survey tools and their CRM to save operational time.
- Consultants & Agencies: Managing client feedback programs who require a reliable, automated system to keep client CRMs updated with fresh sentiment data.
What You'll Need
- Airtable Base: Configured with a table containing NPS survey responses, including fields for Customer Email, NPS Score, and Date of Response.
- ActiveCampaign Account: With API access enabled. You must have the permission to create/update contacts and manage tags.
- Make.com Account: A free or paid Make.com account to host and run the automation scenario.
- Predefined Tags in ActiveCampaign: Create three tags corresponding to your NPS segments (e.g., "NPS_Promoter", "NPS_Passive", "NPS_Detractor") before activating the workflow.
- Clear Segmentation Rules: Decide on the score thresholds for each category (the standard is 9-10: Promoter, 7-8: Passive, 0-6: Detractor).
Quick Setup Guide
- Duplicate the Template: Click "Get This Workflow" to open the template on Make.com and duplicate it into your own account.
- Connect Your Airtable: In the first module, replace the sample Airtable connection with your own. Select the correct base and table that holds your NPS data.
- Configure the Filter: Set up the filter to watch for new records or updated scores. You might schedule it to run every hour or daily based on your survey frequency.
- Connect Your ActiveCampaign: Add your ActiveCampaign API credentials to the relevant modules. Ensure the connection is tested and working.
- Map the Data Fields: Adjust the field mapping so the workflow correctly reads the email from Airtable and uses it to find the contact in ActiveCampaign.
- Set the Tag Logic: Confirm that the router logic correctly assigns the tag name based on your NPS score thresholds. Update the tag names if you used different ones.
- Test with Sample Data: Run the scenario once with a test record from your Airtable to verify a contact is correctly tagged in ActiveCampaign. Monitor the execution logs for errors.
- Activate and Schedule: Once testing is successful, activate the scenario and set a schedule (e.g., every 6 hours) to keep your CRM continuously updated.
Key Benefits
Turn Feedback into Immediate Action: Instead of waiting days to analyze and segment NPS data, your marketing team can launch targeted campaigns within hours of a survey closing, significantly improving response relevance and timing.
Save 5–10 Hours per Month on Manual Tagging: Eliminate the repetitive task of copying scores from spreadsheets and applying tags in your CRM. This automation reclaims time for your team to focus on strategy and content creation.
Improve Campaign Performance with Precise Segmentation: Emails sent to "Promoters" have higher open and conversion rates than generic blasts. By automating segmentation, you ensure your campaigns are always targeting the right audience with the right message.
Identify At-Risk Customers Automatically: Detractors are tagged instantly, allowing your support or account management team to proactively reach out and address concerns, potentially reducing churn and improving customer retention rates.
Maintain a Clean, Actionable CRM: The workflow ensures every surveyed contact is in your CRM with a current loyalty tag. This creates a richer customer profile for all future interactions and reporting.