What This Workflow Does
Security teams are drowning in alerts. Every time Snyk flags a new vulnerability, someone has to manually create a Jira ticket, notify the right team in Slack, and update a tracking spreadsheet. This process is slow, inconsistent, and prone to human error—critical issues can get lost, and compliance reporting becomes a nightmare.
This automation workflow solves that by creating a seamless pipeline from detection to resolution. When Snyk finds a vulnerability, it triggers this n8n workflow instantly. The system validates the data, checks for duplicates in Jira, creates or updates the ticket, pings the responsible channel in Slack, and logs everything into Airtable for audit trails. What used to take 15–30 minutes per finding now happens in seconds, with zero manual effort.
The result? Faster response times, guaranteed tracking for every finding, and a clear historical record for security audits. Your team stops being ticket clerks and can focus on actual threat mitigation.
How It Works
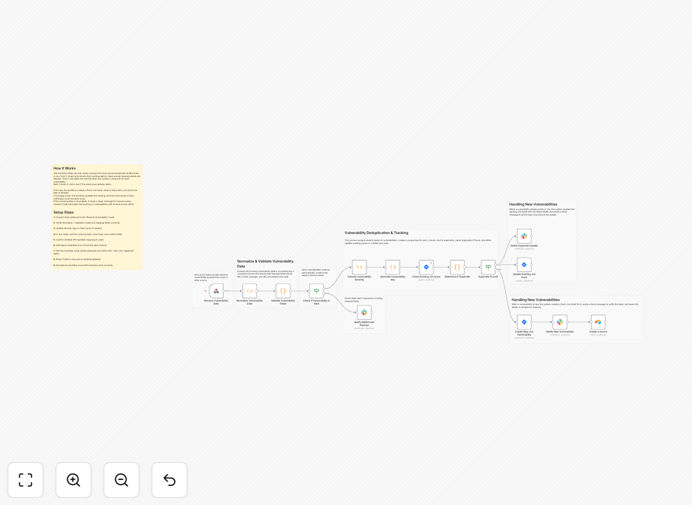
The workflow is a linear, logical chain that transforms a raw Snyk webhook into actionable items across your tools.
Step 1: Receive & Validate the Webhook
A webhook trigger node listens for POST requests from Snyk. When a new vulnerability is detected, Snyk sends a JSON payload. The workflow first checks for required fields (ID, title, CVSS score, URL). If data is missing, it immediately sends an alert to a dedicated Slack channel for manual review, preventing broken processes.
Step 2: Normalize & Assign Severity
Security tools often have inconsistent data formats. A Function node standardizes the payload into a clean structure. It then maps the CVSS score to a business-friendly severity level (Critical, High, Medium, Low). This severity determines the Jira priority and the Slack notification urgency.
Step 3: Check for Duplicates in Jira
Using a unique key (like vuln-<ID>), the workflow queries Jira for an existing issue with a matching label. This prevents creating multiple tickets for the same vulnerability across different scans, which is a common frustration for development teams.
Step 4: Create or Update the Jira Issue
If a duplicate is found, the workflow updates the existing ticket—adding a new comment with the latest scan info and adjusting the severity if needed. If no duplicate exists, it creates a new Jira issue with all relevant details: title, description, severity, affected component, and a direct link back to Snyk.
Step 5: Notify Teams via Slack
A formatted message is sent to a designated Slack channel (or a specific user). For Critical issues, it can @mention the security lead. The message includes the Jira ticket link, severity, and a quick summary, enabling immediate awareness and action.
Step 6: Log to Airtable for Reporting
Every vulnerability, whether new or updated, is written to an Airtable base. This creates a searchable master log with timestamps, statuses, and resolution dates—perfect for compliance reports, trend analysis, and demonstrating due diligence to auditors.
Who This Is For
This template is built for teams that value speed, accuracy, and visibility in their security operations.
- DevOps & Platform Engineers: Who need to integrate security findings directly into their existing sprint and ticketing workflow without manual overhead.
- Security Engineers & SOC Teams: Looking to automate the triage and assignment of vulnerabilities to reduce alert fatigue and ensure nothing slips through.
- Engineering Managers & Team Leads: Who want visibility into their team's security posture and need a reliable, auditable process for vulnerability management.
- Compliance & Audit Officers: Requiring a tamper-proof log of all security findings, actions taken, and resolution timelines.
- Companies using Snyk (or similar scanners) that want to close the loop between detection and developer action instantly.
What You'll Need
- An n8n instance (cloud or self-hosted) to run the workflow.
- A Snyk account with webhook permissions configured to send vulnerability alerts.
- A Jira Cloud project where security tickets will be created (with API credentials).
- A Slack workspace and a bot/app with permissions to post to your chosen channels.
- An Airtable base with a table ready to receive vulnerability records (and a personal access token).
- Basic understanding of JSON to potentially adjust field mappings if your Snyk payload structure differs.
Quick Setup Guide
You can have this automation running in under 30 minutes.
- Download & Import: Click the "Download Template" button above and import the JSON file into your n8n instance.
- Configure Credentials: In n8n, set up credentials for Jira, Slack, and Airtable using OAuth or API tokens.
- Get Your Webhook URL: Activate the "Webhook" trigger node in n8n and copy its unique URL.
- Connect Snyk: In your Snyk project settings, add this webhook URL as the endpoint for vulnerability notifications.
- Customize (Optional): Update the Jira project key, issue type, Slack channel ID, and Airtable base/table names in the respective nodes to match your environment.
- Test & Activate: Trigger a test scan in Snyk or use the n8n "Test Workflow" feature. Confirm a ticket appears in Jira, a message in Slack, and a row in Airtable. Then activate the workflow.
Pro tip: Start by testing with a low-severity finding. This lets you verify the entire flow works without spamming your team with high-priority alerts during setup.
Key Benefits
Eliminate Manual Toil: Cut the 15–30 minutes spent per vulnerability on manual data entry and ticket creation. This automation handles it instantly, freeing your team for higher-value security work.
Guarantee Tracking & Accountability: Every single finding is logged in Jira and Airtable. No more spreadsheets, missed emails, or forgotten vulnerabilities. You have a complete, searchable audit trail.
Speed Up Mean Time to Resolution (MTTR): By instantly creating tickets and notifying the right people, vulnerabilities move into the development workflow immediately. This can reduce MTTR by over 70%, significantly lowering your attack surface.
Improve Compliance & Reporting: With all data automatically stored in Airtable, generating reports for audits, management, or compliance frameworks (like SOC 2, ISO 27001) becomes a matter of running a pre-built query, saving dozens of hours each quarter.
Prevent Duplicate Work: The built-in deduplication logic ensures the same vulnerability doesn't spawn multiple Jira tickets, keeping your backlog clean and preventing developer frustration.