What This Workflow Does
This automation solves a common business problem: manually downloading CSV files from various sources and converting them to Excel format for analysis, reporting, or sharing with team members. Many business systems export data as CSV files, but Excel's formatting, formulas, and visualization capabilities make it the preferred format for most business users.
The workflow automatically fetches CSV files from specified URLs (like data exports from CRMs, e-commerce platforms, or financial systems), processes the data, and converts it into properly formatted Excel files. This eliminates hours of manual work each week and ensures consistency in how data is presented across your organization.
Beyond simple conversion, this template demonstrates how to handle different data sources, manage file formats, and automate what would otherwise be a repetitive, error-prone manual task. It's particularly valuable for businesses that regularly receive data exports from multiple systems that need to be standardized into a single reporting format.
How It Works
The workflow follows a logical sequence to transform raw CSV data into polished Excel files without manual intervention.
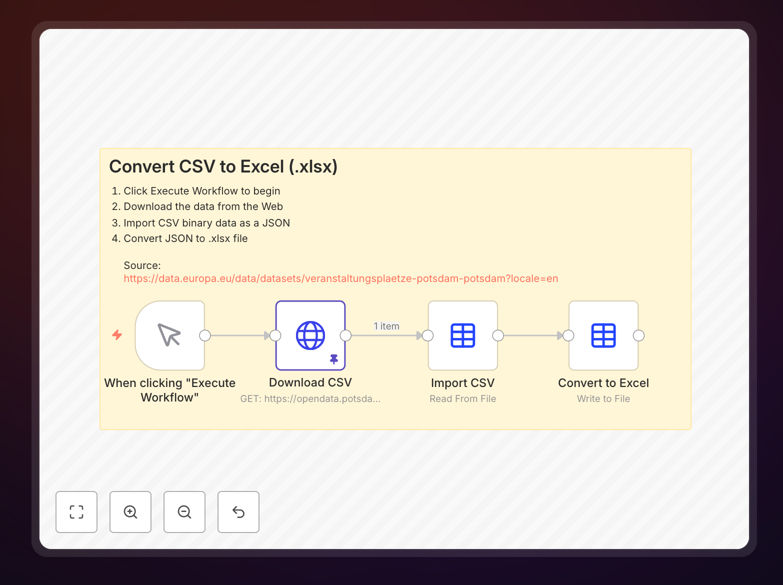
Step 1: Fetch CSV from URL
The workflow starts by connecting to a specified URL where the CSV file is hosted. This could be a direct download link from a business system, a shared cloud storage location, or an API endpoint that returns CSV data. The HTTP Request node handles the connection and downloads the file securely.
Step 2: Process CSV Data
Once downloaded, the CSV data is parsed and prepared for conversion. This stage can include data cleaning operations like removing unnecessary columns, filtering specific rows based on criteria, or reformatting data types (dates, currencies, numbers) to ensure consistency in the final Excel file.
Step 3: Convert to Excel Format
The core conversion happens here. The Spreadsheet File node (or Convert to File node in newer n8n versions) transforms the processed CSV data into Excel format. You can configure output options like sheet names, column widths, and basic formatting to make the Excel files immediately usable for your team.
Step 4: Deliver or Store Results
The final Excel file can be saved to cloud storage (Google Drive, Dropbox), sent via email to stakeholders, uploaded to a shared company drive, or forwarded to another system for further processing. This completes the automation cycle from raw data to actionable business intelligence.
Who This Is For
This automation is ideal for finance teams that receive daily transaction exports from banking systems, marketing departments that download campaign analytics from various platforms, e-commerce businesses that export order data from their stores, and operations teams that work with inventory or logistics data exports.
Small business owners who manually convert sales data from their e-commerce platform to Excel for tax reporting will save significant time. Data analysts who spend hours each week reformatting CSV exports from multiple sources will appreciate the consistency and reliability of automated conversion. Even non-technical team members can benefit from having fresh Excel reports automatically delivered to their inbox or shared drive.
Pro tip: Combine this workflow with scheduling to automatically process CSV files at specific times (like end of day or week). This ensures your Excel reports are always up-to-date without manual triggering.
What You'll Need
- n8n instance – Either self-hosted or n8n.cloud account
- Source URL – A reliable URL pointing to your CSV file (with authentication if required)
- Destination setup – Configured connections to where Excel files should be saved (Google Drive, email, etc.)
- Basic data mapping – Understanding of which CSV columns need to be included in your Excel output
- Testing environment – Sample CSV files to test the workflow before production use
Quick Setup Guide
Follow these steps to implement this automation in your business:
- Download and import the template JSON file into your n8n instance using the Import Workflow function.
- Configure the HTTP Request node with the URL of your CSV file source. Add any required authentication headers or parameters.
- Adjust data processing nodes to match your CSV structure. Map columns, set data types, and apply any necessary filters or transformations.
- Set up the Excel output by configuring the Spreadsheet File node with your preferred sheet name, column formatting, and file naming convention.
- Connect delivery channels by adding nodes to save files to cloud storage, send via email, or upload to other systems.
- Test thoroughly with sample data to ensure the conversion works correctly before activating the workflow on a schedule.
- Activate and monitor the workflow, setting it to run on your preferred schedule (daily, weekly, or triggered by events).
Key Benefits
Save 5-10 hours per week by eliminating manual CSV downloads and Excel conversions. What typically takes 15-30 minutes per file becomes fully automated, freeing your team for higher-value analysis work.
Eliminate formatting errors that occur when manually copying data between applications. Automated conversion ensures consistent column widths, date formats, number formatting, and data validation across all your reports.
Improve data timeliness with scheduled automation that processes files immediately when they become available. No more waiting for someone to manually download and convert the latest data exports.
Standardize reporting across departments by applying the same conversion rules to all CSV sources. This creates uniform Excel templates that make cross-departmental analysis and executive reporting more efficient.
Scale effortlessly as your data sources grow. Adding new CSV URLs or modifying conversion rules requires minimal configuration compared to training staff on new manual processes.