What This Workflow Does
Manually checking the weather every morning is a repetitive task that eats into productive time. For businesses whose operations are weather-dependent—like construction, logistics, event planning, or field services—missing a critical forecast can lead to costly delays, safety issues, and frustrated teams.
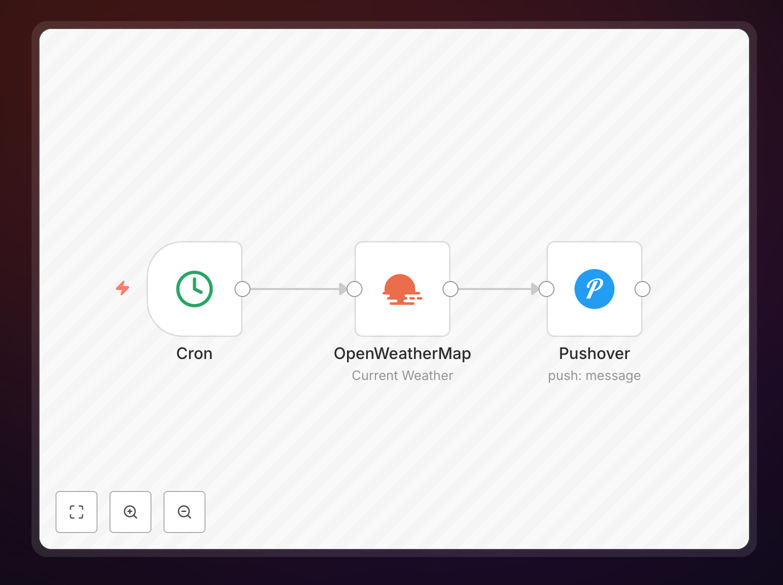
This automation solves that by turning a manual check into a hands-off, reliable system. It connects to a weather data service (like OpenWeatherMap), retrieves the current conditions and forecast for your specified location, formats the information into a clear, actionable message, and delivers it as a push notification directly to your mobile device or your team's devices at a scheduled time each day.
The value isn't just in receiving the weather; it's in receiving the right weather information, formatted for your context, without you having to search for it. This creates consistency, ensures everyone is working from the same data, and frees up mental bandwidth for more strategic work.
How It Works
The workflow follows a logical, step-by-step process to gather, process, and deliver weather intelligence.
Step 1: Scheduled Trigger
A scheduler node (like Cron) acts as the automation's alarm clock. It's configured to trigger the workflow at a specific time each day—for example, at 7:00 AM local time. This ensures the alert arrives when you need it, every day, without fail.
Step 2: Fetch Weather Data
The workflow calls the OpenWeatherMap API (or a similar service), sending the geographic coordinates or city name for your desired location. The API returns a rich dataset including current temperature, "feels like" temperature, humidity, wind speed and direction, a short description (e.g., "clear sky"), and an icon code.
Step 3: Process & Format the Message
This is where the raw data becomes useful information. A Function or Code node takes the API response and constructs a human-readable message. It might say: "🌤️ Good morning! Current weather in Downtown: 68°F, feels like 65°F. Partly cloudy with 10 mph winds from the west. No rain expected today."
Step 4: Send Push Notification
The formatted message is sent to a push notification service like Pushover. This service delivers the alert to the mobile apps on your designated devices. The notification appears on your lock screen, ensuring you see it immediately.
Pro tip: Enhance this workflow by adding conditional logic. For example, only send a push notification if the forecast calls for rain or temperatures drop below freezing. This prevents alert fatigue and ensures you only get notified for conditions that truly require your attention.
Who This Is For
This automation delivers value to a wide range of professionals and businesses:
- Operations & Logistics Managers: Need to make daily decisions about routes, schedules, and outdoor work based on weather conditions.
- Construction Project Managers: Require daily updates on site conditions to plan work, ensure crew safety, and manage equipment.
- Event Planners & Venue Managers: Must monitor weather closely in the days leading up to outdoor events to activate contingency plans.
- Small Business Owners with outdoor services (landscaping, cleaning, etc.) who need to inform crews and clients of schedule changes.
- Remote Teams & Distributed Companies: Where team members are in different locations and need localized weather context for planning and communication.
- Any Professional who starts their day by checking the weather and wants to automate that habit for efficiency.
What You'll Need
- A running n8n instance: This could be n8n.cloud, a self-hosted n8n, or the desktop app.
- OpenWeatherMap API Key: A free account provides more than enough calls for daily personal use. Sign up at their website to get your key.
- Pushover Account & App: Pushover is a unified push notification service. Create an account, install their app on your iOS/Android device, and note your User Key and API Token.
- The geographic location for which you want weather updates (e.g., city name, zip code, or latitude/longitude).
Quick Setup Guide
Get this automation running in your n8n environment in just a few minutes.
- Download & Import: Click the "Download Template" button above to get the JSON file. In your n8n instance, go to Workflows, click "Import from file," and select the downloaded JSON.
- Configure the Weather Node: Open the "OpenWeatherMap" node. Replace the placeholder API Key with your own from your OpenWeatherMap account. Set the "City" or "Coordinates" field to your desired location.
- Configure the Push Node: Open the "Pushover" node. Enter your User Key and API Token from your Pushover account. You can customize the notification title, sound, and priority here.
- Set the Schedule: Open the "Cron" or "Schedule Trigger" node. Set the time you want the daily alert to run (e.g., "0 7 * * *" for 7:00 AM daily).
- Activate & Test: Toggle the workflow to "Active." Click "Execute Workflow" once to trigger a manual test and ensure you receive a notification on your phone.
Key Benefits
Eliminates a Daily Manual Task: Save 5-10 minutes every morning that you would spend opening a weather app or website. Over a year, that's over 30 hours of recovered time.
Ensures Consistency & Reliability: The automation never forgets to check. You and your team receive the same accurate data at the same time every day, creating a single source of truth.
Enables Proactive Decision-Making: Instead of reacting to weather you discover, you're informed in advance. This allows for proactive rescheduling, resource allocation, and communication with clients or teams.
Highly Customizable Foundation: This template is a starting point. You can easily modify it to send alerts via Slack, email, or SMS, add multiple locations, or integrate the weather data into other business systems like your CRM or project management tool.
Improves Operational Safety: For field teams, timely alerts about severe weather (high winds, extreme temperatures, precipitation) are a critical component of a safety protocol, helping to prevent accidents and ensure well-being.