What This Workflow Does
This automation solves the manual, time-consuming process of creating AI-generated images and managing their storage. Instead of switching between OpenAI's interface, downloading files, renaming them, and uploading to cloud storage, this workflow handles everything in one seamless pipeline.
It's designed for marketing teams, content creators, e-commerce businesses, and developers who need a reliable system for generating visual assets on demand. The workflow ensures consistent naming conventions, organized folder structures in AWS S3, and eliminates the risk of lost or mislabeled files.
By connecting AI creativity with enterprise-grade cloud storage, you create a scalable content production system that can grow with your business needs, whether you're generating dozens or thousands of images monthly.

How It Works
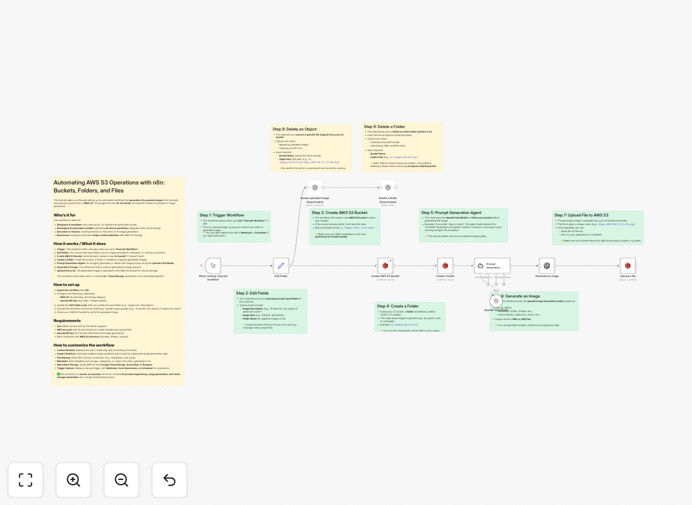
The automation follows a logical sequence that mimics how a human would complete the task, but with perfect consistency and speed.
1. Trigger & Input Collection
The workflow starts with a manual trigger or can be scheduled. You provide basic inputs like image description, desired style, and resolution preferences through a simple form interface.
2. AWS S3 Infrastructure Setup
The automation checks if your designated S3 bucket exists and creates it if necessary. It then establishes a organized folder structure based on date, project, or category to keep your images systematically arranged.
3. AI Prompt Refinement
Using OpenAI's chat models, the system refines your initial image description into an optimized prompt that will generate higher quality results, adding relevant artistic direction and technical specifications.
4. Image Generation
The refined prompt is sent to OpenAI's image generation API (DALL-E). The system handles all API communication, error checking, and waits for the completed image file.
5. Secure Storage & Organization
The generated image is automatically uploaded to your AWS S3 bucket with proper naming conventions, metadata tags, and placed in the correct folder. The workflow confirms successful storage and can trigger notifications.
Pro tip: Add a metadata tagging step to include information like generation date, prompt used, and project ID. This makes searching and managing your image library much easier later.
Who This Is For
This workflow is particularly valuable for specific roles and business scenarios where visual content is regularly produced:
Marketing Teams: Create campaign visuals, social media graphics, and advertisement banners without waiting for designers. Maintain brand consistency through prompt templates.
E-commerce Businesses: Generate product mockups, lifestyle images, and promotional graphics for new listings. Scale visual content production during peak seasons.
Content Agencies: Deliver client assets faster with reproducible workflows. Manage multiple client buckets and maintain organized archives for each project.
Developers & Product Teams: Prototype UI elements, create app screenshots, and generate visual assets for documentation or presentations.
Educators & Trainers: Produce illustrations for courses, worksheets, and educational materials with consistent visual style.
What You'll Need
- n8n instance (cloud or self-hosted) with access to the workflow editor
- AWS Account with S3 permissions (Access Key, Secret Key, and Region configured)
- OpenAI API Key with access to image generation models (DALL-E)
- Basic understanding of AWS S3 bucket structure and folder organization
- Clear image requirements and prompt guidelines for consistent results
Quick Setup Guide
Follow these steps to implement this automation in your environment:
- Import the Template: Download the JSON file and import it into your n8n instance using the "Import from File" option.
- Configure Credentials: Set up your AWS S3 credentials and OpenAI API key in n8n's credential management system.
- Update Configuration Nodes: Modify the "Edit Fields" node with your preferred image parameters (size, style, naming conventions).
- Test with Simple Prompt: Execute the workflow manually with a test prompt like "modern office workspace" to verify the complete pipeline.
- Check AWS S3: Confirm the generated image appears in your designated bucket with proper folder structure.
- Customize for Production: Add error handling, notifications, or connect to other triggers based on your use case.
Pro tip: Start with a dedicated test bucket in AWS S3. Once the workflow is stable, switch to your production bucket. This prevents accidental organization issues with existing files.
Key Benefits
Save 2-3 hours per image batch by eliminating manual downloading, renaming, and uploading. What used to take an afternoon now happens automatically while you focus on strategy.
Eliminate human errors like misnamed files, wrong folders, or lost images. The automation ensures perfect consistency every time, with proper logging of every step.
Scale visual content production without adding team members. Generate hundreds of images for campaigns, products, or content without proportional time investment.
Maintain organized archives with automatic date-based folder structures and consistent naming conventions. Find any image months later with simple searches.
Integrate with other systems by extending the workflow to notify teams via Slack, update project management tools, or trigger additional processing steps.