What This Workflow Does
This automation solves a critical security and accessibility challenge for businesses using AI image generation. Instead of giving team members or customers direct access to your OpenAI API keys (which can lead to unauthorized usage and unexpected costs), you create a secure webhook endpoint that accepts image generation requests and returns the AI-created images.
The workflow acts as a middleware layer between your users and OpenAI's DALL-E 3. Users simply send a text prompt via a URL, and the system handles authentication with OpenAI, processes the request, generates the image, and returns it—all while keeping your API credentials completely secure on your server.
This approach enables businesses to offer AI image generation capabilities to employees, customers, or integrated systems without the security risks and management overhead of distributing API keys. It's perfect for marketing teams needing quick visuals, product teams creating mockups, or SaaS platforms offering image generation as a feature.
How It Works
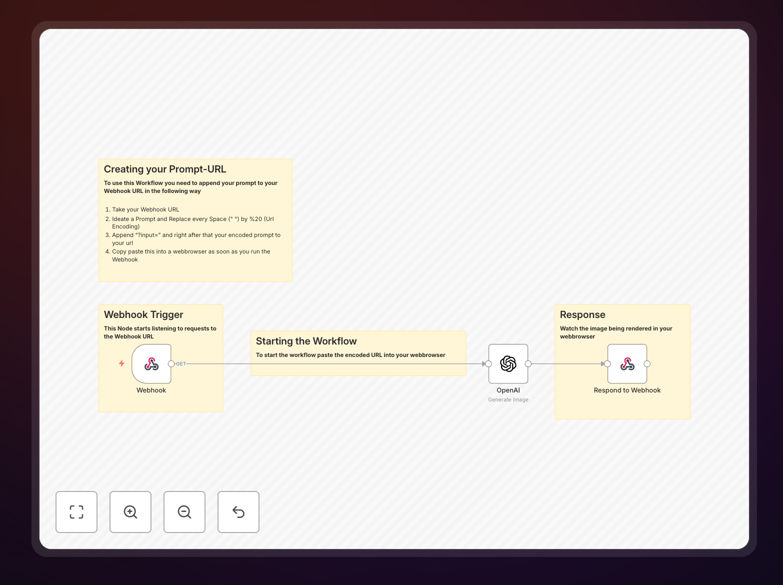
1. Webhook Trigger
The workflow starts with a webhook node that listens for incoming HTTP requests. When someone accesses your custom URL with a prompt parameter, the workflow captures the request and extracts the text prompt for image generation.
2. Prompt Processing & Validation
The system processes the incoming prompt, URL-encodes it properly, and validates it meets your business requirements (length limits, content filters, etc.). You can add custom logic here to ensure prompts align with your brand guidelines.
3. Secure OpenAI Authentication
Using your securely stored OpenAI API credentials, the workflow authenticates with DALL-E 3. Your API keys never leave your server environment, eliminating the risk of exposure through client-side applications or user error.
4. Image Generation & Processing
The processed prompt is sent to DALL-E 3, which generates a high-quality image based on the text description. The workflow can handle multiple image sizes and styles based on your configuration parameters.
5. Response Delivery
Once the image is generated, the workflow formats the response and returns it to the requester. You can configure the output format (direct image, JSON with URL, etc.) based on how the API will be consumed by your applications or users.
Pro tip: Add a caching layer to store frequently requested images. This reduces API costs and improves response times for common prompts like "company logo watermark" or "product background template."
Who This Is For
Marketing Teams: Create social media graphics, blog illustrations, and ad visuals on-demand without design software or stock photo subscriptions.
SaaS Companies: Offer AI image generation as a feature within your platform without managing individual user API keys or worrying about credential security.
E-commerce Businesses: Generate product mockups, lifestyle images, and promotional graphics without expensive photoshoots or design agencies.
Content Agencies: Streamline visual content creation for multiple clients with consistent styling and rapid turnaround times.
Internal IT Teams: Provide secure, controlled AI image generation capabilities to employees across departments with usage tracking and cost management.
What You'll Need
- OpenAI API Account: Access to DALL-E 3 with valid API credentials and sufficient credits for image generation.
- n8n Instance: Self-hosted n8n or n8n.cloud account where you can deploy and run workflows.
- Webhook URL: A publicly accessible endpoint (provided by n8n) that will receive image generation requests.
- Basic Understanding of APIs: Knowledge of how to construct URLs with parameters and handle HTTP responses.
- Prompt Engineering Guidelines: Established best practices for your team to create effective image generation prompts.
Quick Setup Guide
Follow these steps to implement your custom AI image generation API:
- Import the Template: Download the JSON file and import it into your n8n instance using the workflow import feature.
- Configure OpenAI Credentials: Add your OpenAI API key to the credentials manager in n8n and connect it to the DALL-E 3 node.
- Set Up Webhook: Activate the webhook node and note the unique URL it generates for receiving requests.
- Test Basic Functionality: Access your webhook URL with a test prompt parameter to verify image generation works correctly.
- Customize Parameters: Adjust image size, quality settings, and response formats based on your specific use case requirements.
- Add Security Layers: Implement API key validation, rate limiting, or IP whitelisting if exposing the endpoint publicly.
- Integrate with Your Systems: Connect the webhook to your applications, websites, or internal tools that need image generation capabilities.
Pro tip: Create a simple web form that constructs the proper URL with the user's prompt. This makes it easy for non-technical team members to use your image generation API without understanding URL parameters.
Key Benefits
Eliminate API Key Exposure: Your OpenAI credentials remain securely on your server, preventing unauthorized usage and potential financial losses from compromised keys. Team members only interact with your custom endpoint.
Reduce Image Creation Costs by 60-80%: Compared to traditional design services or stock photo subscriptions, AI generation provides unlimited custom visuals at a fraction of the cost, especially for high-volume needs.
Accelerate Content Production: Generate marketing visuals, product mockups, or presentation graphics in seconds instead of hours or days waiting for designers or searching stock libraries.
Maintain Brand Consistency: Create prompt templates with specific brand colors, styles, and themes to ensure all generated images align with your visual identity guidelines.
Scale with Your Business: The API approach allows you to easily add more users, integrate with additional systems, or expand to new use cases without rearchitecting your solution.