What This Workflow Does
This automation solves the tedious, error-prone task of manually collecting and recording weather data. For businesses that depend on weather patterns—agriculture, logistics, event planning, retail, or energy management—having reliable historical weather data is crucial for decision-making, forecasting, and operational planning.
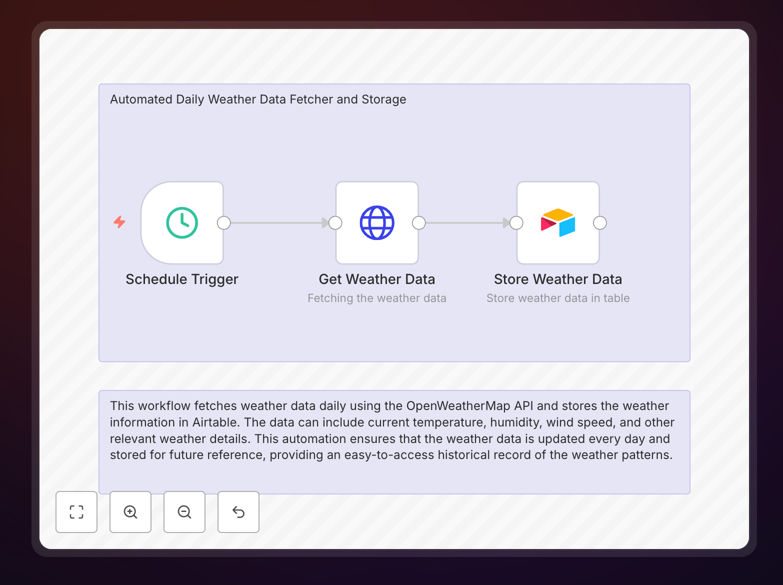
The workflow automatically fetches current weather conditions from the OpenWeatherMap API at scheduled intervals (daily, hourly, or custom), extracts key metrics like temperature, humidity, wind speed, and precipitation, then stores this structured data in an Airtable database. This creates a searchable, timestamped historical record that can be analyzed, visualized, or connected to other business systems.
Instead of employees wasting time checking weather websites and copying data into spreadsheets, this automation runs silently in the background, ensuring consistent data collection without human intervention or oversight.
How It Works
1. Scheduled Trigger
A schedule node (Cron) activates the workflow at your specified time—typically once daily in the morning. You can customize this to run hourly for more frequent data points or at specific times relevant to your operations.
2. API Data Fetch
The workflow sends a request to the OpenWeatherMap API with your location parameters (city, coordinates, or ZIP code) and API key. It retrieves comprehensive weather data including temperature, humidity, wind speed/direction, atmospheric pressure, visibility, and weather conditions.
3. Data Parsing & Transformation
The raw JSON response is parsed to extract the specific metrics you need. The workflow can convert units (Celsius to Fahrenheit, meters/second to miles/hour), calculate derived values (heat index, wind chill), and format timestamps for consistent recording.
4. Airtable Storage
Structured data is inserted into your designated Airtable base and table. Each record includes the timestamp, location, and all collected weather metrics. Airtable's flexibility allows you to later add formulas, linked records, or attachments to enrich the data.
5. Error Handling & Logging
The workflow includes error handling for API failures, rate limits, or connection issues. Failed attempts can be retried or logged for manual review, ensuring data continuity even when external services experience temporary issues.
Who This Is For
This automation template is ideal for businesses and professionals who need systematic weather data without manual effort:
Agricultural Operations: Farmers, vineyard managers, and agricultural researchers tracking growing conditions, frost warnings, and irrigation planning.
Logistics & Transportation: Companies managing fleets, delivery routes, or outdoor operations affected by weather conditions.
Event & Hospitality Industry: Wedding planners, outdoor venue managers, and tourism businesses needing historical weather patterns for planning and customer communication.
Retail & E-commerce: Businesses selling weather-sensitive products (apparel, seasonal items) that want to correlate sales with weather patterns.
Research & Education: Students, academics, and citizen scientists conducting environmental studies or climate research.
Facility Management: Building managers optimizing HVAC systems based on external temperature and humidity conditions.
What You'll Need
- OpenWeatherMap API Key: Free tier available (1,000 calls/day), register at openweathermap.org
- Airtable Account: Free plan sufficient for basic use, create a base with a table containing columns for date, temperature, humidity, wind speed, etc.
- n8n Instance: Self-hosted n8n, n8n.cloud, or desktop app installed and running
- Location Parameters: City name, coordinates, or ZIP code for the weather data you want to collect
- Basic Automation Understanding: Familiarity with connecting APIs and configuring simple workflows
Pro tip: Start with the free OpenWeatherMap tier to test the automation. If you need historical data or more frequent updates, upgrade to a paid plan before scaling. Consider creating separate Airtable tables for different locations if tracking multiple sites.
Quick Setup Guide
- Download and Import: Download the template file and import it into your n8n instance via the workflow import function.
- Configure OpenWeatherMap: Replace the placeholder API key with your actual OpenWeatherMap key in the HTTP Request node. Set your location parameters (city, units).
- Prepare Airtable: Create an Airtable base with columns matching the data structure (Date, Temperature, Humidity, Wind Speed, Conditions, etc.). Note your Base ID and Table Name.
- Connect Airtable: In the Airtable node, authenticate with your Airtable account and enter your Base ID and Table Name.
- Set Schedule: Adjust the Cron expression in the Schedule Trigger node to your preferred collection frequency (default is daily at 7 AM).
- Test and Activate: Run the workflow once manually to verify data flows correctly from API to Airtable, then activate it for automated execution.
Key Benefits
Eliminates Manual Data Entry: Saves 15-30 minutes daily that would be spent checking and recording weather data manually. Over a year, this represents 60-120 hours of recovered productive time.
Ensures Data Consistency: Automated collection removes human error—no typos, missed days, or inconsistent formatting. All records follow the same structure with accurate timestamps.
Creates Actionable Historical Records: Builds a searchable database of weather conditions that can be analyzed for patterns, correlated with business metrics, or used for forecasting and planning.
Enables Data-Driven Decisions: Provides reliable environmental data to inform operational choices—when to plant, ship, schedule events, or adjust inventory based on weather patterns.
Scalable and Flexible: Easily adapt to track multiple locations, add additional weather parameters, or connect to other systems (alerting, reporting, dashboards) as needs evolve.